Monthly Archives

December 2011

DIY copper etching tutorial

December 28, 2011

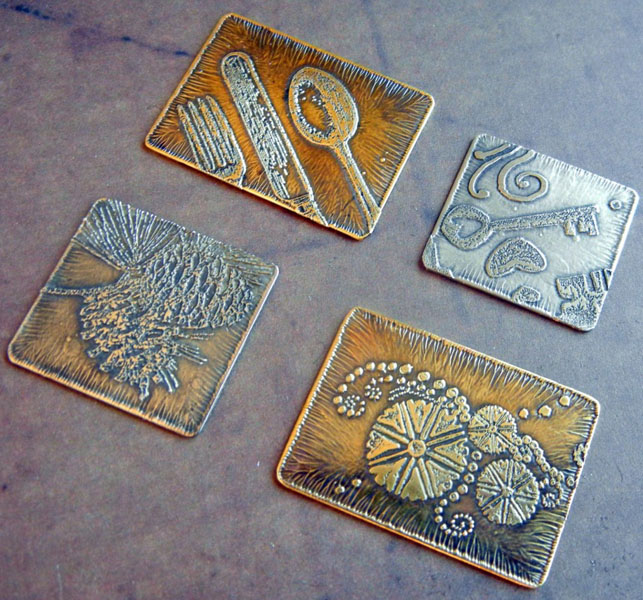
It is easy to etch your own designs into metal for jewelry. This tutorial will teach you how! (Check out our etching kit too!)

etched-stamped-metal
Rubber stamp designs etched into brass sheet metal.

Before you begin, please read the safety considerations for etching metal with chemicals blog post.

You’ll also probably want to read the design considerations for etching metal blog post too!

Now, here are the steps for etching metal with ferric chloride:

1. Choose your metal(s). Ferric chloride works on copper, brass and nickel silver. It will not work on actual silver (fine or sterling). Do NOT use ferric chloride on aluminum. Metal as thin as 24-gauge can be etched – just leave it in for less time than you would for thicker metal. If you want to etch both sides or etch really deeply, use at least 20-gauge metal.

2. Clean metal with Penny Brite (our favorite) or an abrasive cleaner and scrubbie. The metal must be very clean. Water will sheet off (not bead up) on the surface when it is truly clean.

3. Apply resist. Stazon ink, Sharpies, toner transfers – there are many options! (Read the design considerations.)

Continue Reading…

Design considerations for etching metal

December 28, 2011

Creating attractive etched metal pieces for jewelry requires masking portions of the metal to prevent the etchant from etching those areas. The unetched areas will be the high points on the metal.

artist-etched-metal-jewelry

This rubber stamp design transferred and etched nicely.

Lines need to be at least as wide as the etch will be deep. Lines should be a little wider than how you’d like them to be when the etching is done to allow for the fact that the etchant will typically undercut your design lines a bit.

If you’re doing a deep etch, use lines that are at least 1/32″ wide. Finer details might be lost.

There are a variety of resists you can use to created etched designs on metal. Here are some of our favorites:

  • Fine point Sharpie pens
  • Staedler red ink pens
  • Stazon ink pads (black and red work best) and rubber stamps.
  • Press-n-Peel (PnP) Blue paper or other toner transfers. If using transfers, be sure to reverse the text and images before you print them.

If you mess up your design, use Stazon cleaner to remove the ink and try again. The etchant will eat through faint, blurry or thin ink, so make sure your lines are dark and crisp.

That’s basically it! Please feel free to add any experiences you’ve had with etched designs by leaving a comment. The DIY etching tutorial has full instructions for etching metal. Please also read the safety considerations. Thanks! ~ Cindy

Safety considerations for etching metal with chemicals

December 28, 2011

Using chemicals doesn’t have to be dangerous, so long as you take basic steps to set up your work area to avoid problems. For chemical etching, you need:

  1. Rubber gloves (latex or nitrile).
  2. Safety goggles. The etching solution might splash, and you don’t want that in your eyes.
  3. Shop apron. The etchant will stain your clothes and anything else it touches.
  4. Good ventilation (open a window if possible or run an exhaust fan). Never etch in a small enclosed space. Chemical fumes and gases that aren’t noticeable in the proper setup can build to dangerous levels in a small space. Outdoors is a great place to etch, weather permitting.
  5. Plastic or glass containers for the etchant “bath.” We like using the clear plastic tubs from spinach or salad mixes.
  6. Baking soda to neutralize the acid.
  7. Secure screw-top plastic container to dispose of used etchant.

resisted-taped-ready

Metal with designs applied, ready to etch!

ferric-chloride-etching

See how the acid has eaten away the metal? Keep your work area safe and don’t get chemicals on you!

The basic rules for working with chemicals are simple, but worth revisiting:

  1. Keep pets and children out of the area.
  2. Don’t get it on your skin or in your eyes. Wash any splashes off immediately.
  3. Be careful about heating any chemical – there is a potential for toxic gases to form. Ferric chloride works faster when it is slightly warmed. You can accomplish this by putting the bottle in a warm water bath or a heat-plate set on low. Don’t try to heat it up on a stove top or in a microwave.
  4. Get plenty of fresh air.
  5. Don’t breathe in fumes or dust. It is best to clean the etched metal under water to avoid distributing particles into the air.
  6. Use disposable scrubbies or steel wool to clean your etched metal to avoid contaminating your good brushes, for example, with chemical residues.
  7. Soak up any spills with baking soda and/or kitty litter.

I know a guy who doesn’t really have any feeling left in his fingertips. You probably know someone like this too. Years of hard work have left his hands extremely callused and insensitive. For this reason, he can grab hot things with his bare hands, somehow not get splinters doing things where normal people would get splinters. I (and most anyone else) need oven mitts and work gloves for tasks he takes on bare handed.

I tell you this because sometimes I worry a bit about some of the advice on the internet. Take chemical etching. The chemicals used to etch metals are called mordants. By nature they are caustic – they eat through metal. Yet, for whatever reason, some people are extremely casual about their usage. For example, not using proper ventilation, sticking their bare hands into a chemical bath, not bothering with safety glasses, pouring the chemicals into their gardens … I’ve seen a lot of stuff that just isn’t safe. Maybe the guy on YouTube hasn’t gotten hurt doing what he’s doing – yet – but it is way better to be safe than sorry!

Obviously, it is up to each individual to determine the level of risk he or she is ok with. Some chemicals – such as the ferric chloride we use for etching copper and brass –  are relatively safe, but they are still chemicals and need to be treated with care. It isn’t complicated.

In case you are wondering, ferric chloride is much, much safer than ferric nitrate and nitric acid, two mordants which are used to etch silver.  While you don’t want to get it on you, ferric chloride will not eat through your skin (muriatic/hydrochloric acid, which is used in some etching recipes, will!).

And, ferric chloride in liquid form, like Rings & Things sells, is much safer than dry ferric chloride. Ferric chloride can be used more than once. Once it stops etching, follow the hazardous waste guidelines for where you live. Spokane’s are found here: https://my.spokanecity.org/solidwaste/hazardous/. Please be responsible and do not pour chemicals down the drain. (Note: all etching, even “chemical-free” etching, leaves bits of metal in the etching solution and must be disposed of properly.)

Now that you’ve read the safety guidelines,  read the DIY etching tutorial and start etching!

Be safe – and have fun! ~ Cindy

Turn it upside down!

December 22, 2011

What happens when you take the oh-so-popular Swarovski crystal tree charm pattern and turn it upside down? Beautiful, festive crystal earrings that can be worn year-round!

melissa-earrings

The French clips are another nice touch. Melissa made these classic clear crystal margarita earrings while on vacation with her mom and I snatched them off her ears as soon as I saw them. I think they look like frosty pine cones or icicles, but in a subtle way. Unlike the “real” crystal trees, they’ll still look appropriate in June. Something to keep in mind if you’re making last-minute gifts! ~ Cindy

Season of Giving

December 20, 2011

The holiday season is all about giving, yet it has been a tough year economically and budgets are tight. Fortunately, Rings & Things offers a voluntary donation program for employees where a set dollar amount is deducted from each paycheck. At the end of the year, owners Russ & Dee match the deducted funds and give the money to charity. Each employee chooses which charity to support. So, for example, just $2 per bi-weekly paycheck translates into a $100 donation!

Yesterday our HR manager sent out the grand total: through this humble program, Rings & Things employees donated more than $10,000 to charity in 2011! It is really exciting to see a those few dollars we end up not even missing each month add up to something so substantial. The nonprofits selected this year include:

Spokesman Review Christmas Fund ~ 2nd Harvest Food Bank ~ ACLU Foundation ~ Alzheimers Association ~ Anna Ogden Hall ~ Cancer Patient Care ~ American Childhood Cancer Organization ~ Doctors without Borders ~ KSFC ~ KYRS ~ Living Tongues Institute ~ Las Hermanas ~ Meals on Wheels ~ Planned Parenthood ~ SCRAPS ~ SNAP ~ Spokanimal ~ Union Gospel Mission ~ Vanessa Behan Crisis Nursery ~ YFA Connections

Christmas is just days away, but to make them easier to find I also wanted to post a recap of the 12 Days of Christmas Jewelry Designs. There’s always next year to plan for, plus many of the techniques are adaptable to any occasion!

Day 1 – Swarovski Crystal Christmas Tree Earrings

Day 2 – Bottle Cap Baubles

Day 3 – Lampwork Glass Bead Zipper Pulls

Day 4 – Beaded Snowflakes

Day 5 – Swarovski Crystal Holiday Light Charms

Day 6 – Family Keepsakes

Day 7 – Faux Stained Glass Soldered Ornaments

Day 8 – Mini Ceramic Cookies Charm Bracelet

Day 9 – Hinged Picture Frames

Day 10 – Velvet Ribbon and Bead Bookmarks

Day 11 – Stamped Metal Gift Tags

Day 12 – Brass Fairy Door Sandwich Pendants

Happy holidays everyone! ~ Cindy

DIY Earring Project: Swarovski Crystal Tassel Earrings

December 19, 2011

Tassel Earrings made using WireLace, Swarovski Crystals and Vintaj charms and bead caps

Tassel Earrings made using WireLace, Swarovski Crystals, and Vintaj birds and bead caps

I have always been a sucker for anything sparkly. So when I started working here at Rings and Things, I soon became addicted to everything Swarovski! I know all the colors and all the shapes. Bronze Shade, Golden Shadow, Silver Night, Red Magma and of course the coveted Bermuda Blue! I dream of crystals. Seriously. I rarely leave work without buying a few new crystals. (Basically I get paid in crystals!) So here is my new fun crystal project!

Crystal Bead Mixes: Swarovski Crystal Jams

Some of the different Swarovski Crystal Jams bicone bead mixes.

One thing we do here at Rings & Things are make these magical little baggies full of mixed Swarovski Crystals called crystal jams. I love crystal jams because they are carefully selected assortments that contain several colors that coordinate. I have been wanting to make something with one of the crystal jams for a while so when a co-worker suggested these tassel earrings, I couldn’t resist.

Supplies for Swarovski Crystal Tassel Earrings

Supplies needed to make these lovely earrings.

The crystal jam I decided to use for this project is called Brown Sugar. It blends golden shades of topaz, beige and browns. I paired the crystals with chocolate WireLace, shell pearls, Vintaj bead caps, Vintaj bird charms, and niobium earring wires. I also use Hypo Cement to seal the edges of the WireLace.

Supplies needed:

Step 1 - How to make Swarovski Crystal and WireLace Tassels

First make several templates from card stock. Start with a 3×3 inch square. Cut a triangle out of one corner of the square, leaving about an inch on each side. Create a stair pattern up the diagonal, making a new step at each 1/4 inch.

Step 2 - How to make Swarovski Crystal and WireLace Tassels

Start threading the crystals onto the wire lace. Make a slit on the top left to string the lace through after each new loop is made.

Step 3 - How to make Swarovski Crystal and WireLace Tassels

Place anywhere from 5 to 10 crystals per step on the template.

Step 4 - How to make Swarovski Crystal and WireLace Tassels

Keep going until you have the desired amount of loops for your tassle.

Step 5 - How to make Swarovski Crystal and WireLace Tassels

For this one, I used 8 bicones on each loop, and made 8 loops, so a total of 64 bicones per earring.

Step 6 - How to make a Wire Lace and Swarovski crystal tassel.

Tie the two ends together. Then wrap one end under all the loops and tie another secure square knot. This way all the loops are connected.

Step 7 - How to make a Wire Lace and Swarovski crystal tassel.

Remove tassel from the template. I found that the best way to do this is to cut away the template from the tassel. This is why you need to make several templates.

Step 8 - How to make a Wire Lace and Swarovski crystal tassel for earrings.

Trim excess Wire Lace and add a dab of Hypo Fabric Cement to secure the loose ends. Attach your fold-over crimp before the glue sets. Fold the crimp over using your chain nose pliers.

Finished Tassel Earrings, made with shell pearls, wire lace, large Vintaj bead caps, Vintaj bird charms and niobium earring wires.

Finished Tassel Earrings! I used some beautiful shell pearls, large Vintaj bead caps, cute little Vintaj bird charms and niobium earring wires.

Well I hope you liked my tassel earrings! I think that this technique could really be applied to all different beads and cording so go nuts with it! Now I just need to figure out what to name these earrings…..

~~Tiffany in the Showroom

Twelve Days of Christmas Jewelry Designs: 12 – Fairy Doors

December 12, 2011

A super easy way to create some holiday magic is with our exclusive brass fairy doors. These precut metal shapes with cutouts can be stamped, hammered, riveted, painted, patinaed, layered…so, so many options! Mollie used one to make her sister a sweet keepsake necklace (Day 6). Sondra added a stamped tag to one of her designs on Day 11. Earlier this year, Polly made several sweet pins and pendants by sandwiching pieces of recycled tins between the riveted layers. Basically, the designers here are in love with them – and it isn’t just us! Sondra’s Victorian Christmas fairy door design just won Vintaj’s blog contest!

sondra barrington christmas vintaj winning design

Also, jewelry designer extraordinaire Molly Alexander shared with us the design below that she created with our heart fairy doors for Art Bead Scene’s November Challenge. It is just too lovely not to share. Merry Christmas! ~ Cindy

Molly Alexander design

Twelve Days of Christmas Jewelry Designs: 11 – Stamped Metal Gift Tags

December 8, 2011

let-it-snowThe best thing about metal stamping is the ability to personalize jewelry and ornaments with the exact words, phrases and names you want. Hammering metal is one of those instant gratification crafts. In just a few minutes you can create a completely customized gift that will be functional for years. Below are some examples of custom gift tags and other gift items to inspire your Christmas crafting. Continue Reading…

Twelve Days of Christmas Jewelry Designs: 10 – Velvet Bookmarks

December 5, 2011

Yes, it is just my opinion, but I’ll say it as though it is a fact: books always make great gifts. I love giving books. I love receiving books. And it is easy to make pretty ribbon bookmarks to personalize your gifts even more!

velvet-ribbonsStart with a length of beautiful
velvet ribbon.

bead-marked-booksUse choker clamps to attach beads and baubles to the ends.

velvet-ribbon-bookmarksAmy’s bookmarks are in our design gallery, where you’ll also find a list of the exact supplies she used to make them.

Sure, Kindles and other e-readers are gaining popularity, but nothing really compares to curling up with an actual paper book and a big mug of your favorite beverage. Make the moment even more indulgent with a luxurious bookmark! Need a jewelry-making book to gift (to a friend or maybe yourself)? Here are three recommendations:

Jewelry Lab by Melissa Manley

Wire Style 2 by Denise Peck (includes DVD)

The Encyclopedia of Contemporary Jewelry Making Techniques by Vanetta Seecharran.

Happy reading! ~ Cindy

Twelve Days of Christmas Jewelry Designs: 9 – Hinged Picture Frames

December 1, 2011

Family photos. Collages. Upcycled Christmas cards. Meaningful quotes. There are many keepsakes and bits of nostalgia that are worth framing for the holidays. It is really fun to solder your own pendants and ornaments, but if that’s not your thing – or you want unique shapes without having to cut glass – or time is of the essence – Rings & Things has a pretty amazing selection of hinged memory picture frames to choose from. Just insert two images and you have a reversible pendant or piece of art!

Continue Reading…