It is easy to etch your own designs into metal for jewelry. This tutorial will teach you how! (Check out our etching kit too!)

Before you begin, please read the safety considerations for etching metal with chemicals blog post.
You’ll also probably want to read the design considerations for etching metal blog post too!
Now, here are the steps for etching metal with ferric chloride:
1. Choose your metal(s). Ferric chloride works on copper, brass and nickel silver. It will not work on actual silver (fine or sterling). Do NOT use ferric chloride on aluminum. Metal as thin as 24-gauge can be etched – just leave it in for less time than you would for thicker metal. If you want to etch both sides or etch really deeply, use at least 20-gauge metal.
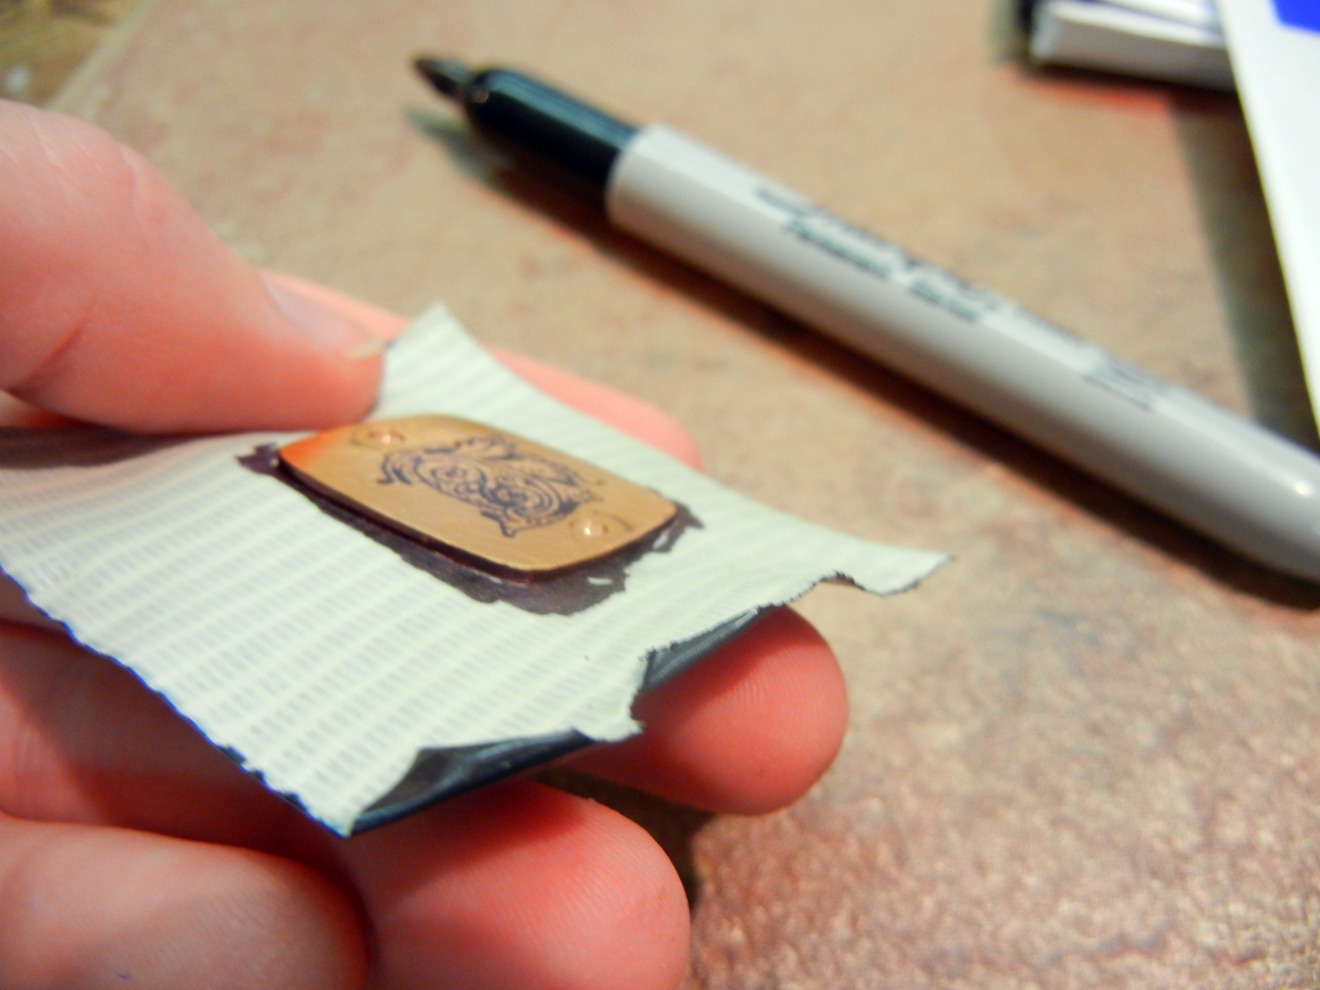
2. Clean metal with Penny Brite (our favorite) or an abrasive cleaner and scrubbie. The metal must be very clean. Water will sheet off (not bead up) on the surface when it is truly clean.
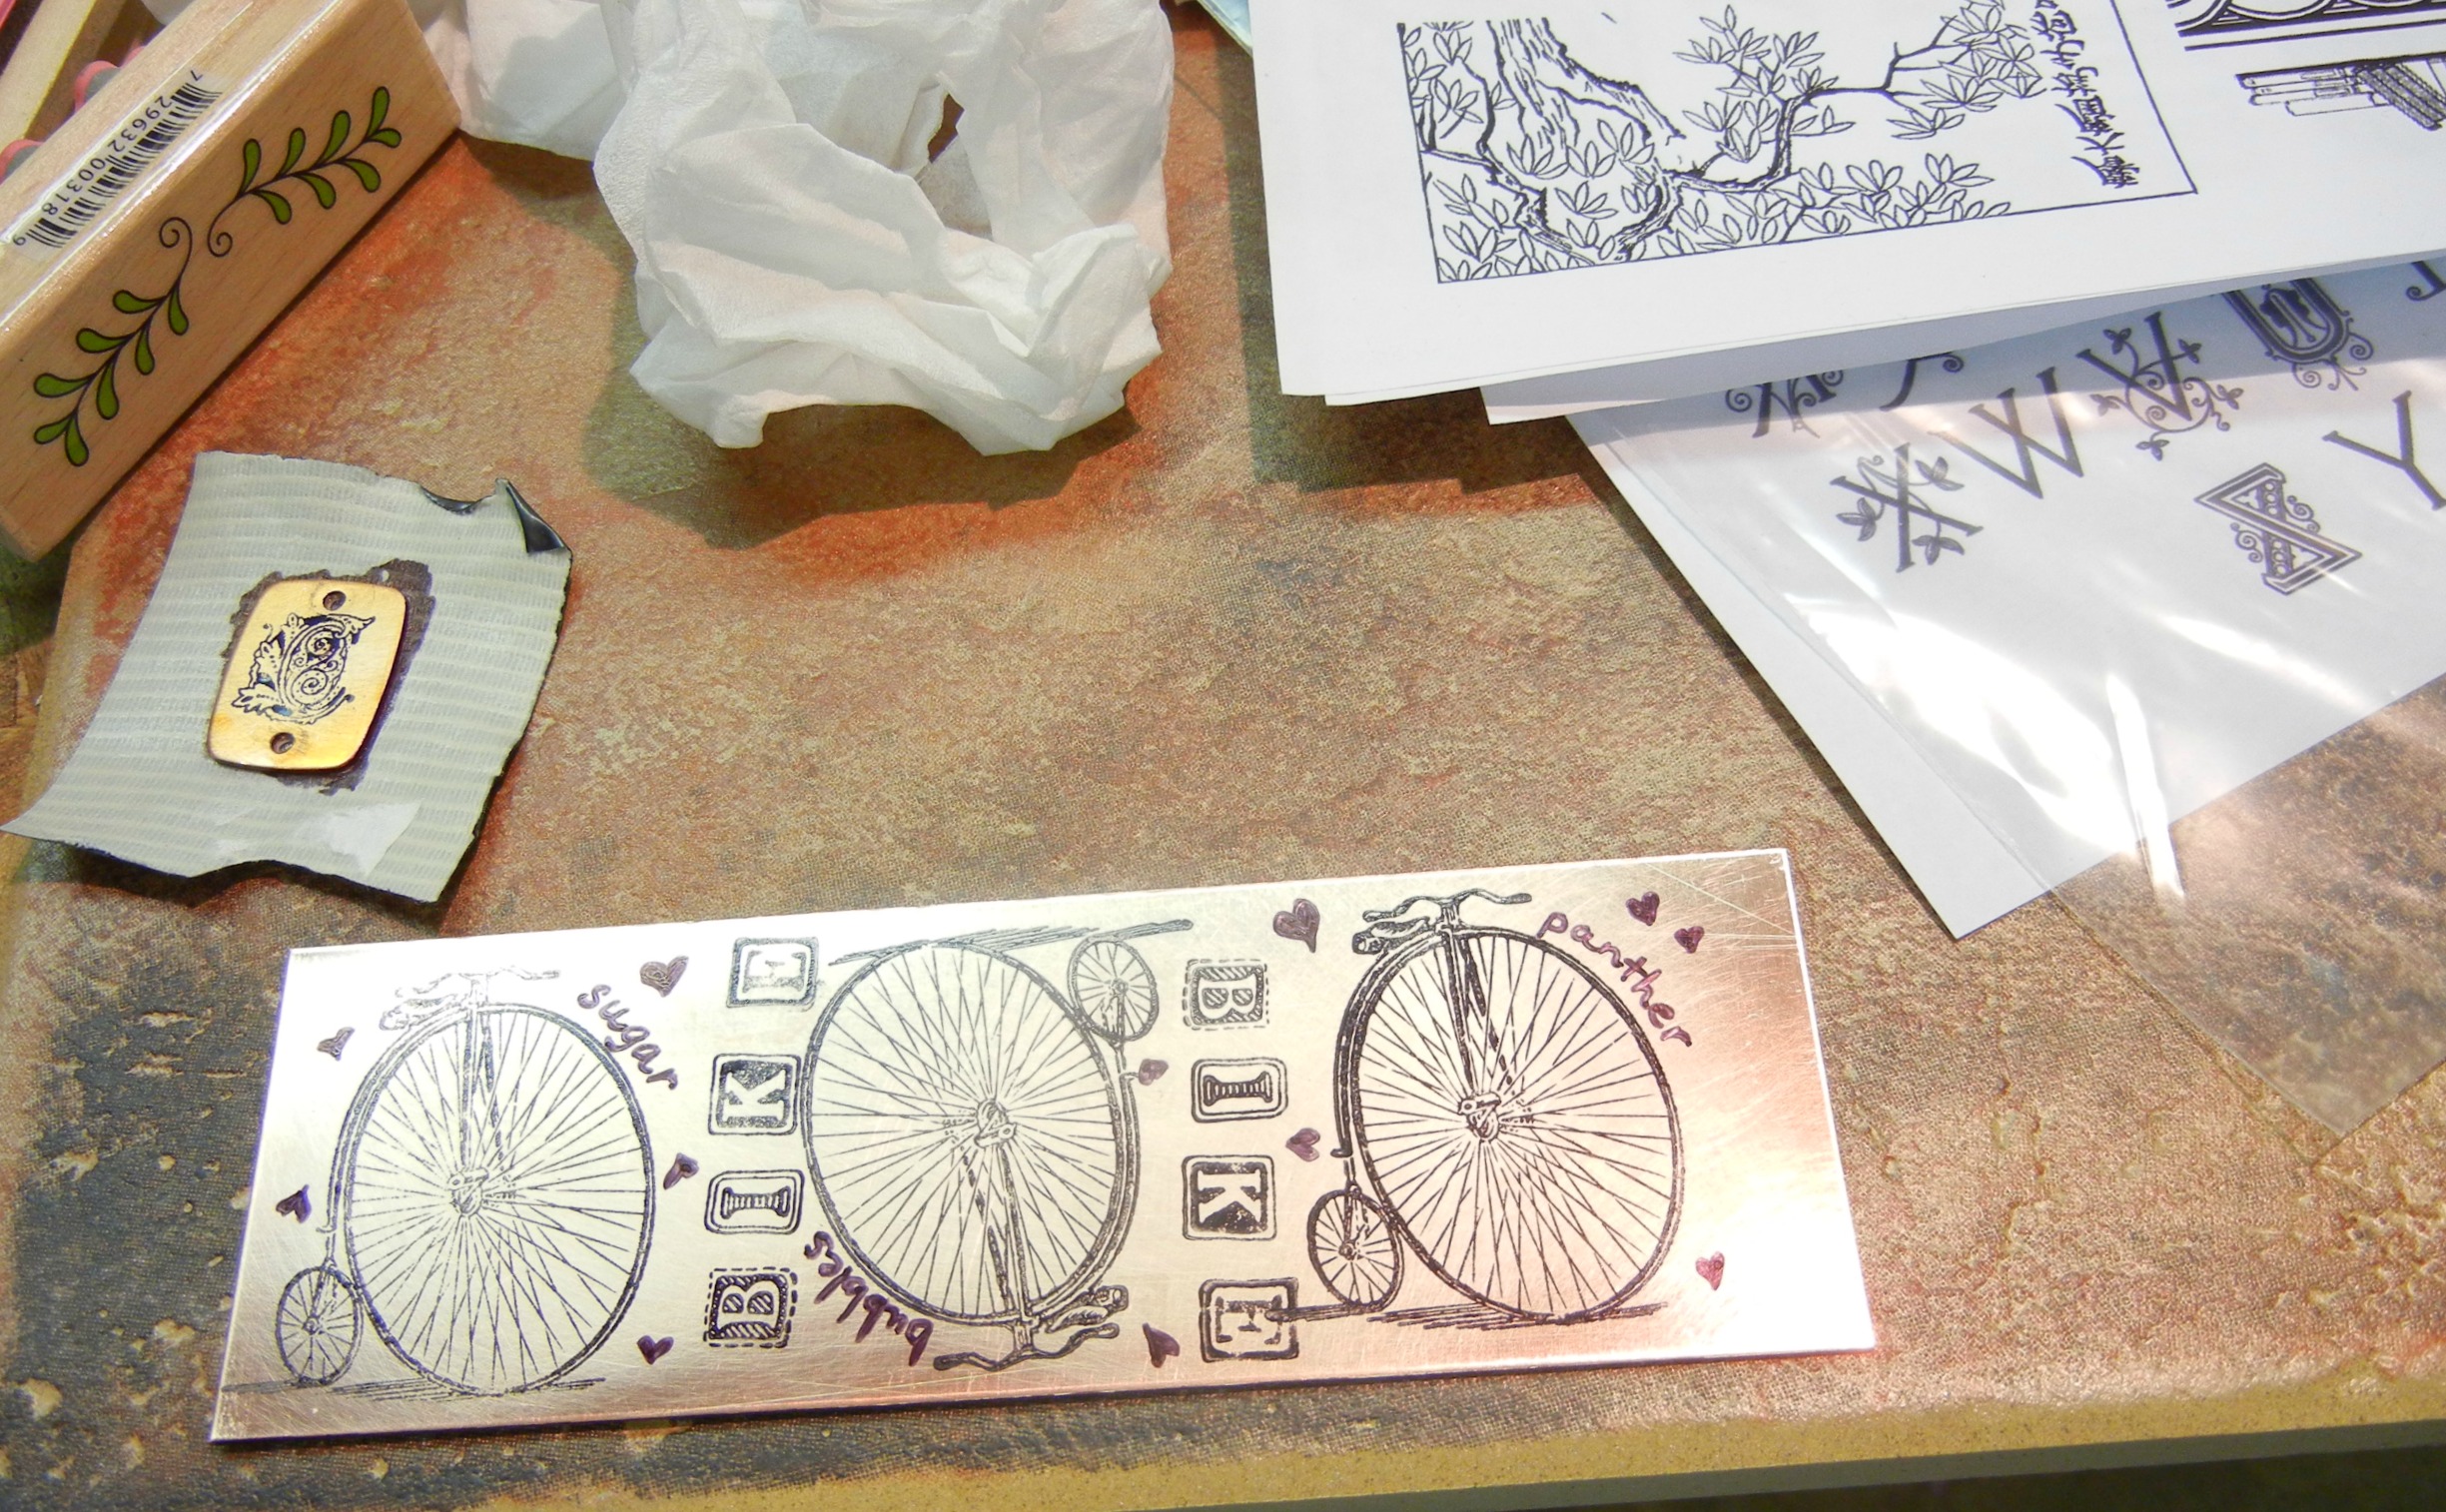
3. Apply resist. Stazon ink, Sharpies, toner transfers – there are many options! (Read the design considerations.)
4. Cover all areas that should not be etched with ink or durable tape. This includes the back, sides and inside any holes.
5. Pour 3/4 – 1″ of etchant into a non-reactive container (glass or plastic). If you are etching more than one type of metal, use a separate container for each. If desired, add a teaspoon of citric acid to “boost” the etching action.

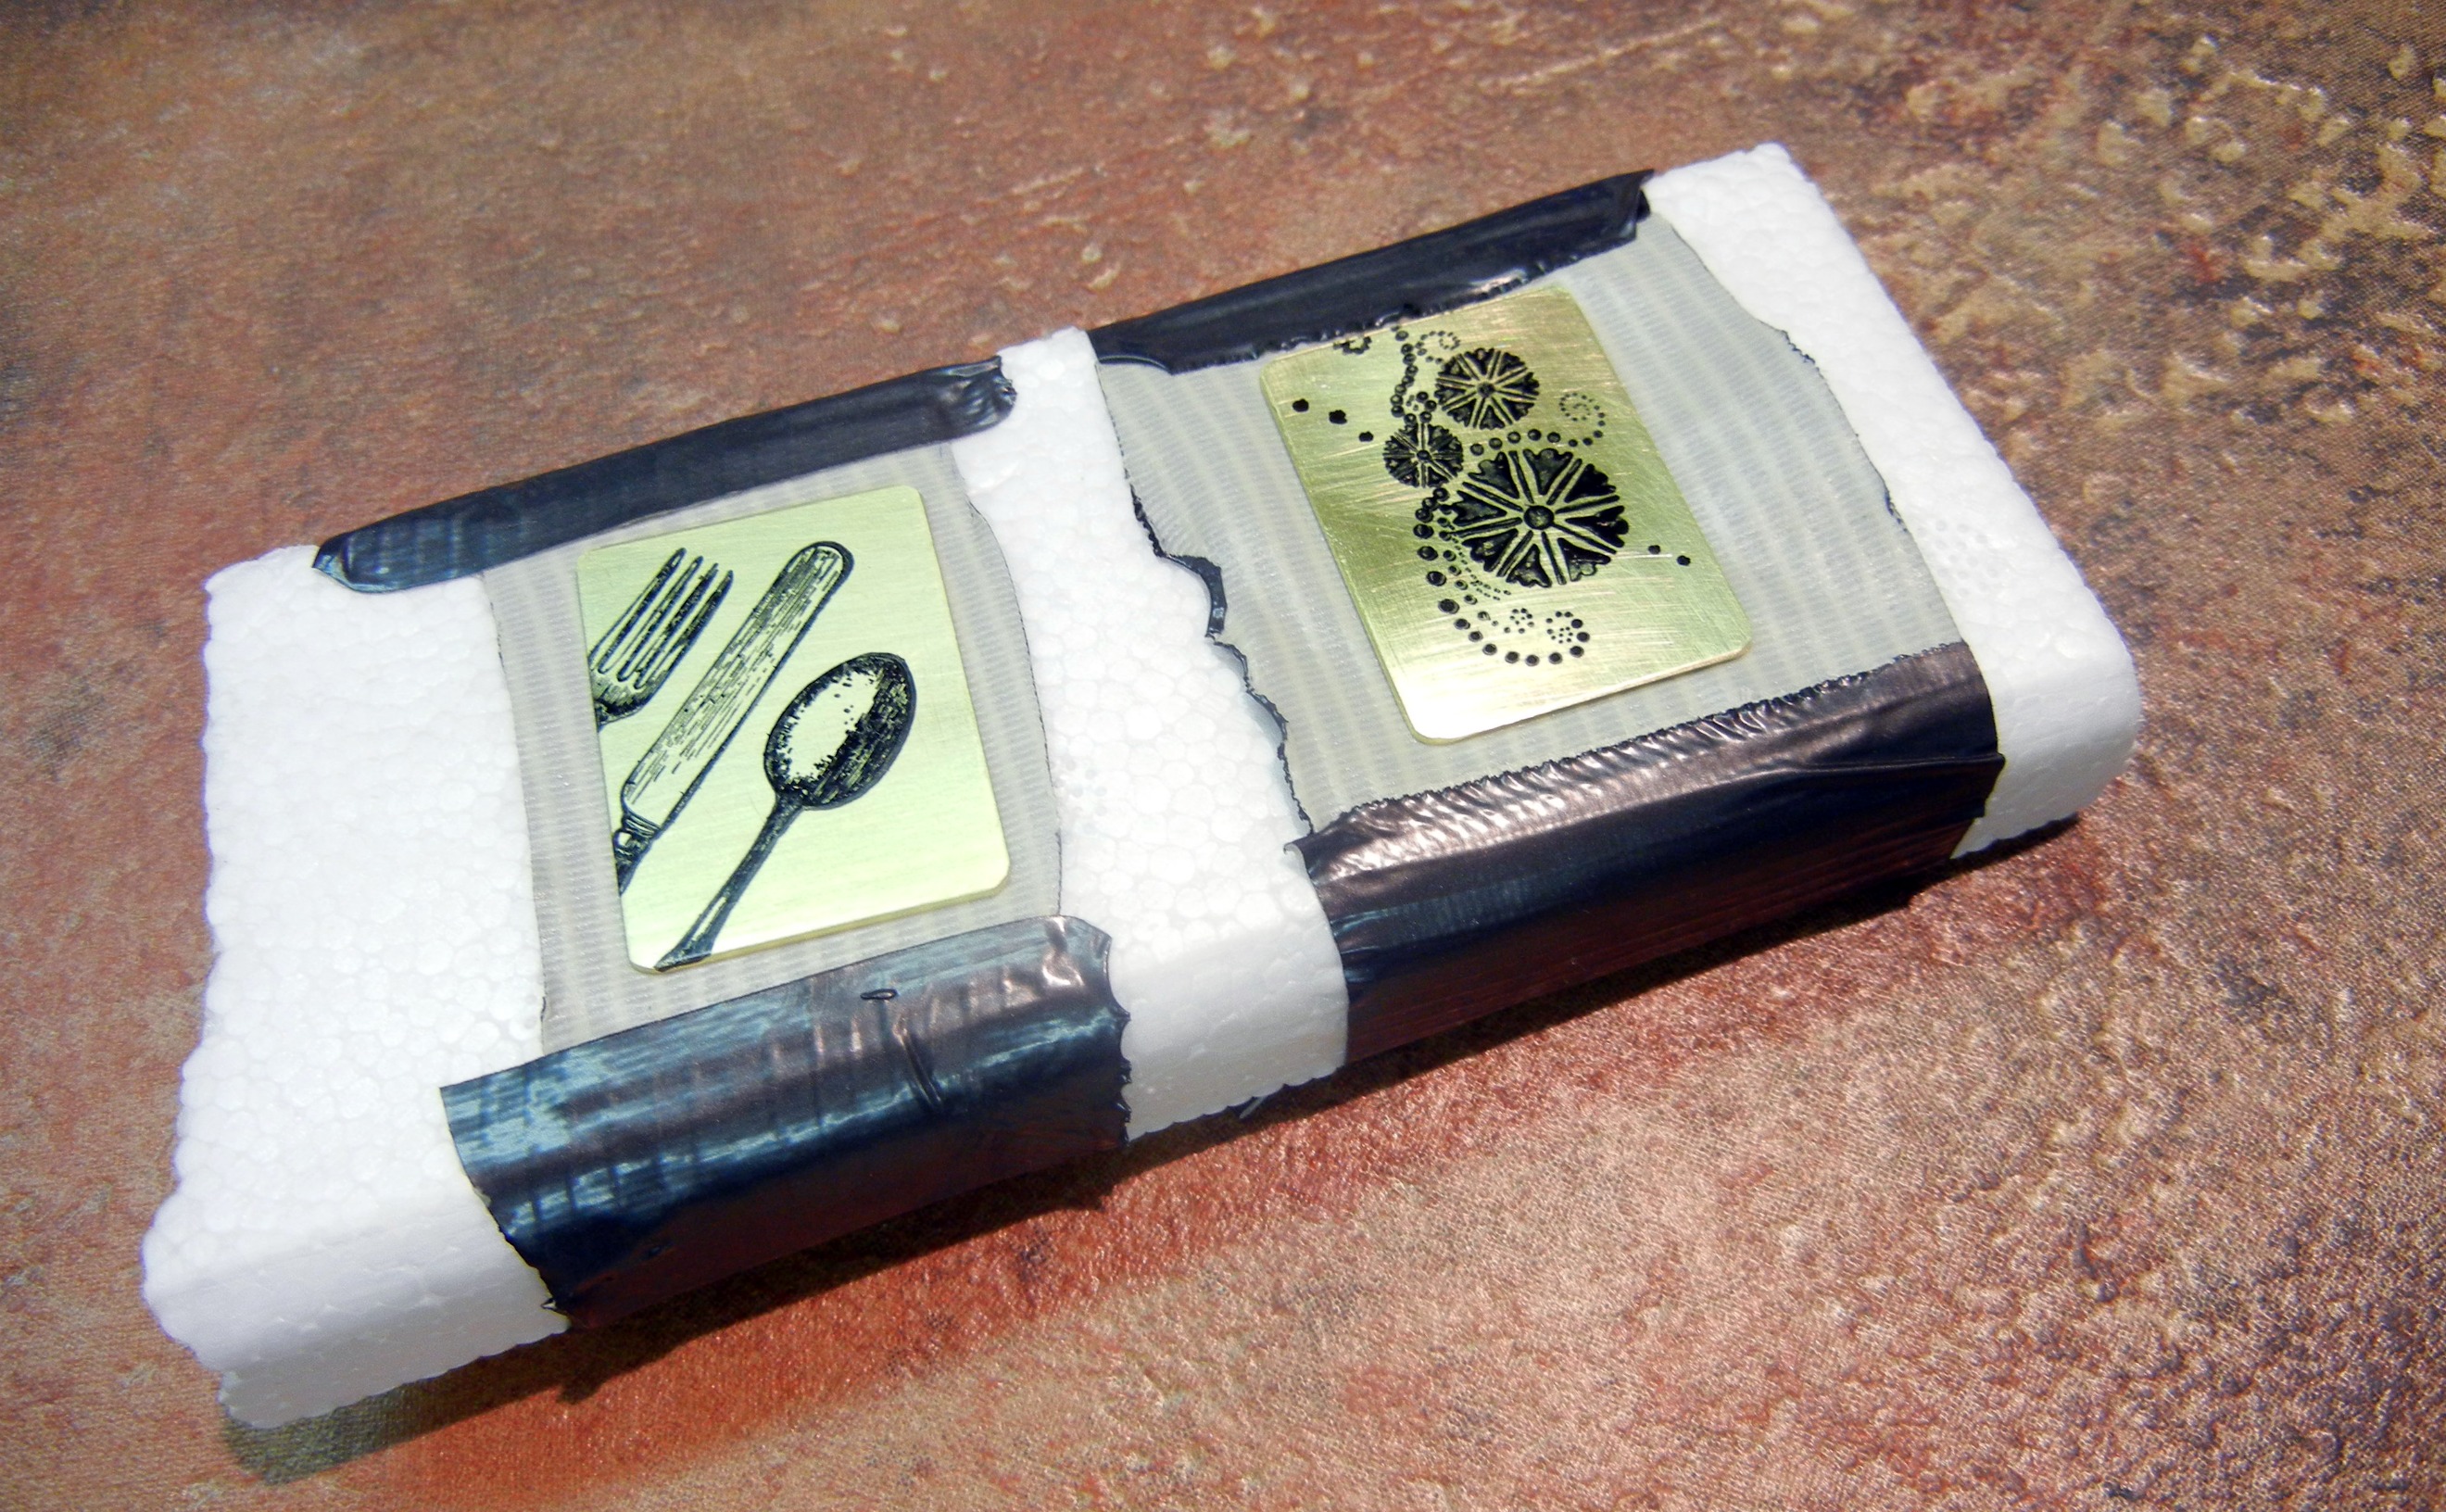
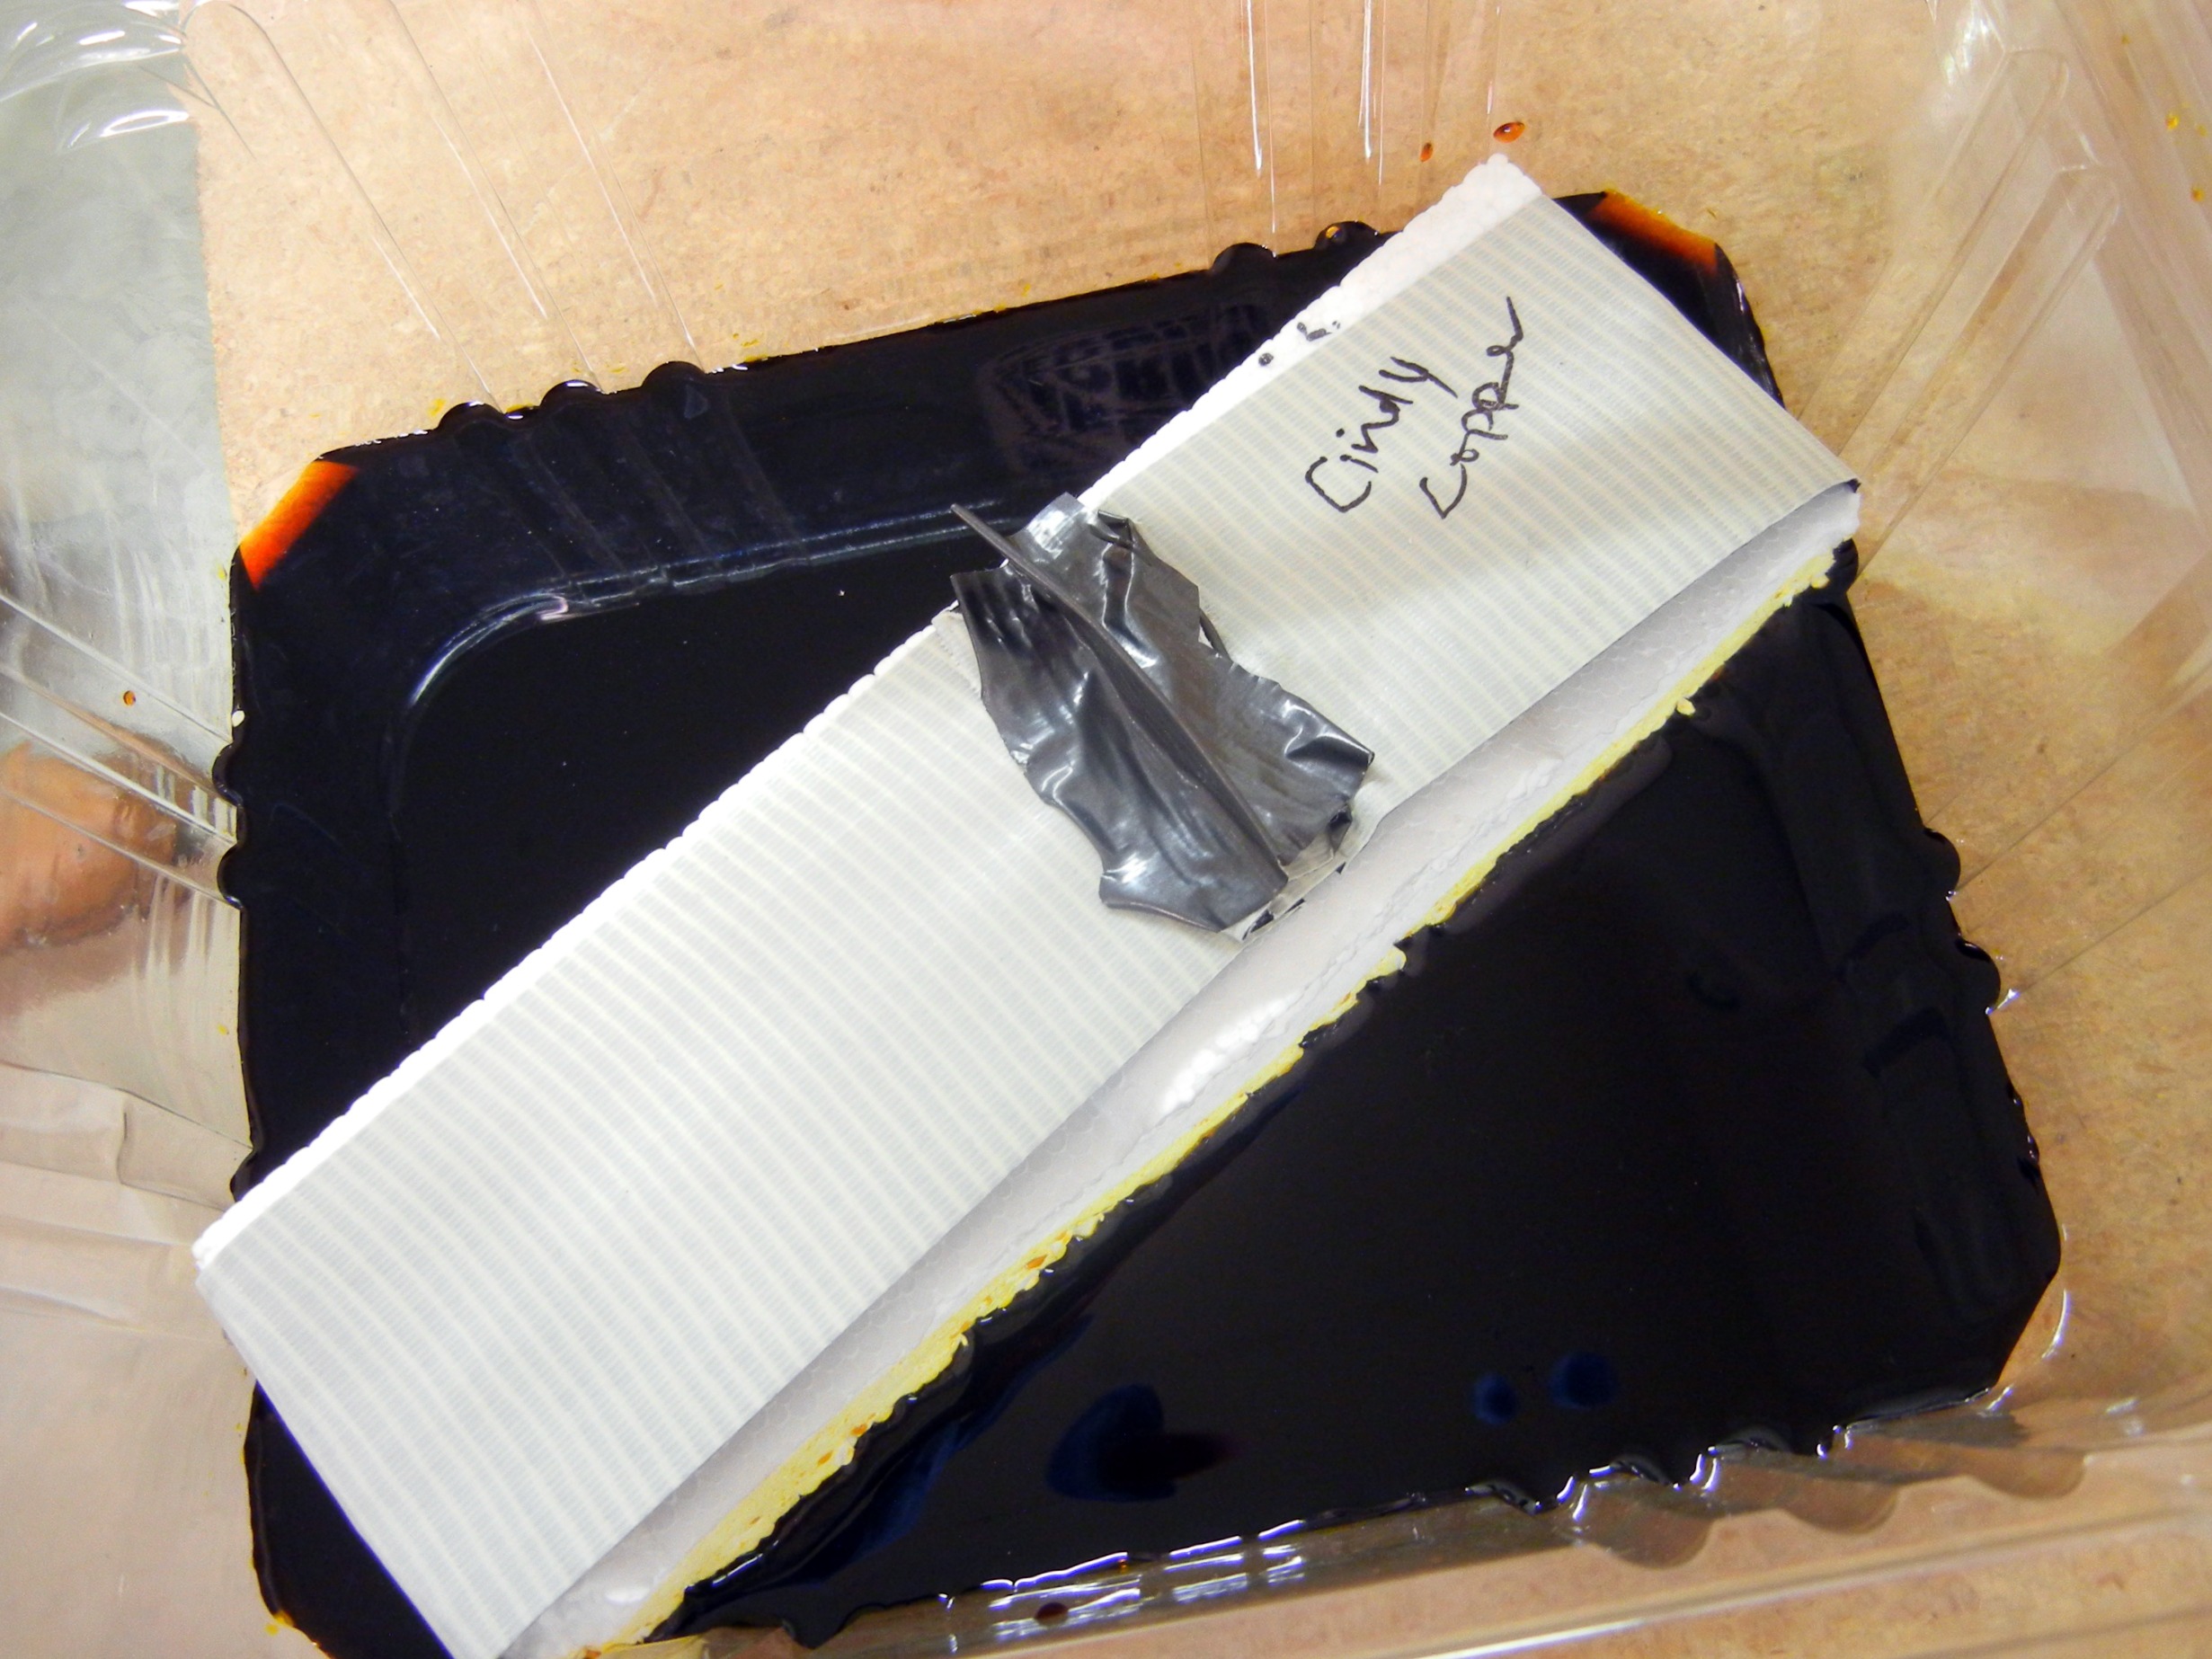
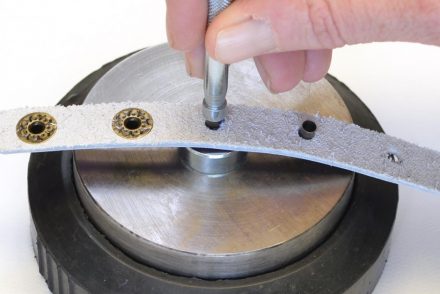
6. Attach metal to a styrofoam float “boat” and place in etchant. Suspending the metal into the bath with tape is another option. Just make sure the metal is submerged yet isn’t touching the bottom of the container.
7. Allow to float for 30-90 minutes, depending on depth of etch desired. Nickel silver tends to take longer than copper or brass because it contains just 65% copper. (The rest is nickel and zinc.)
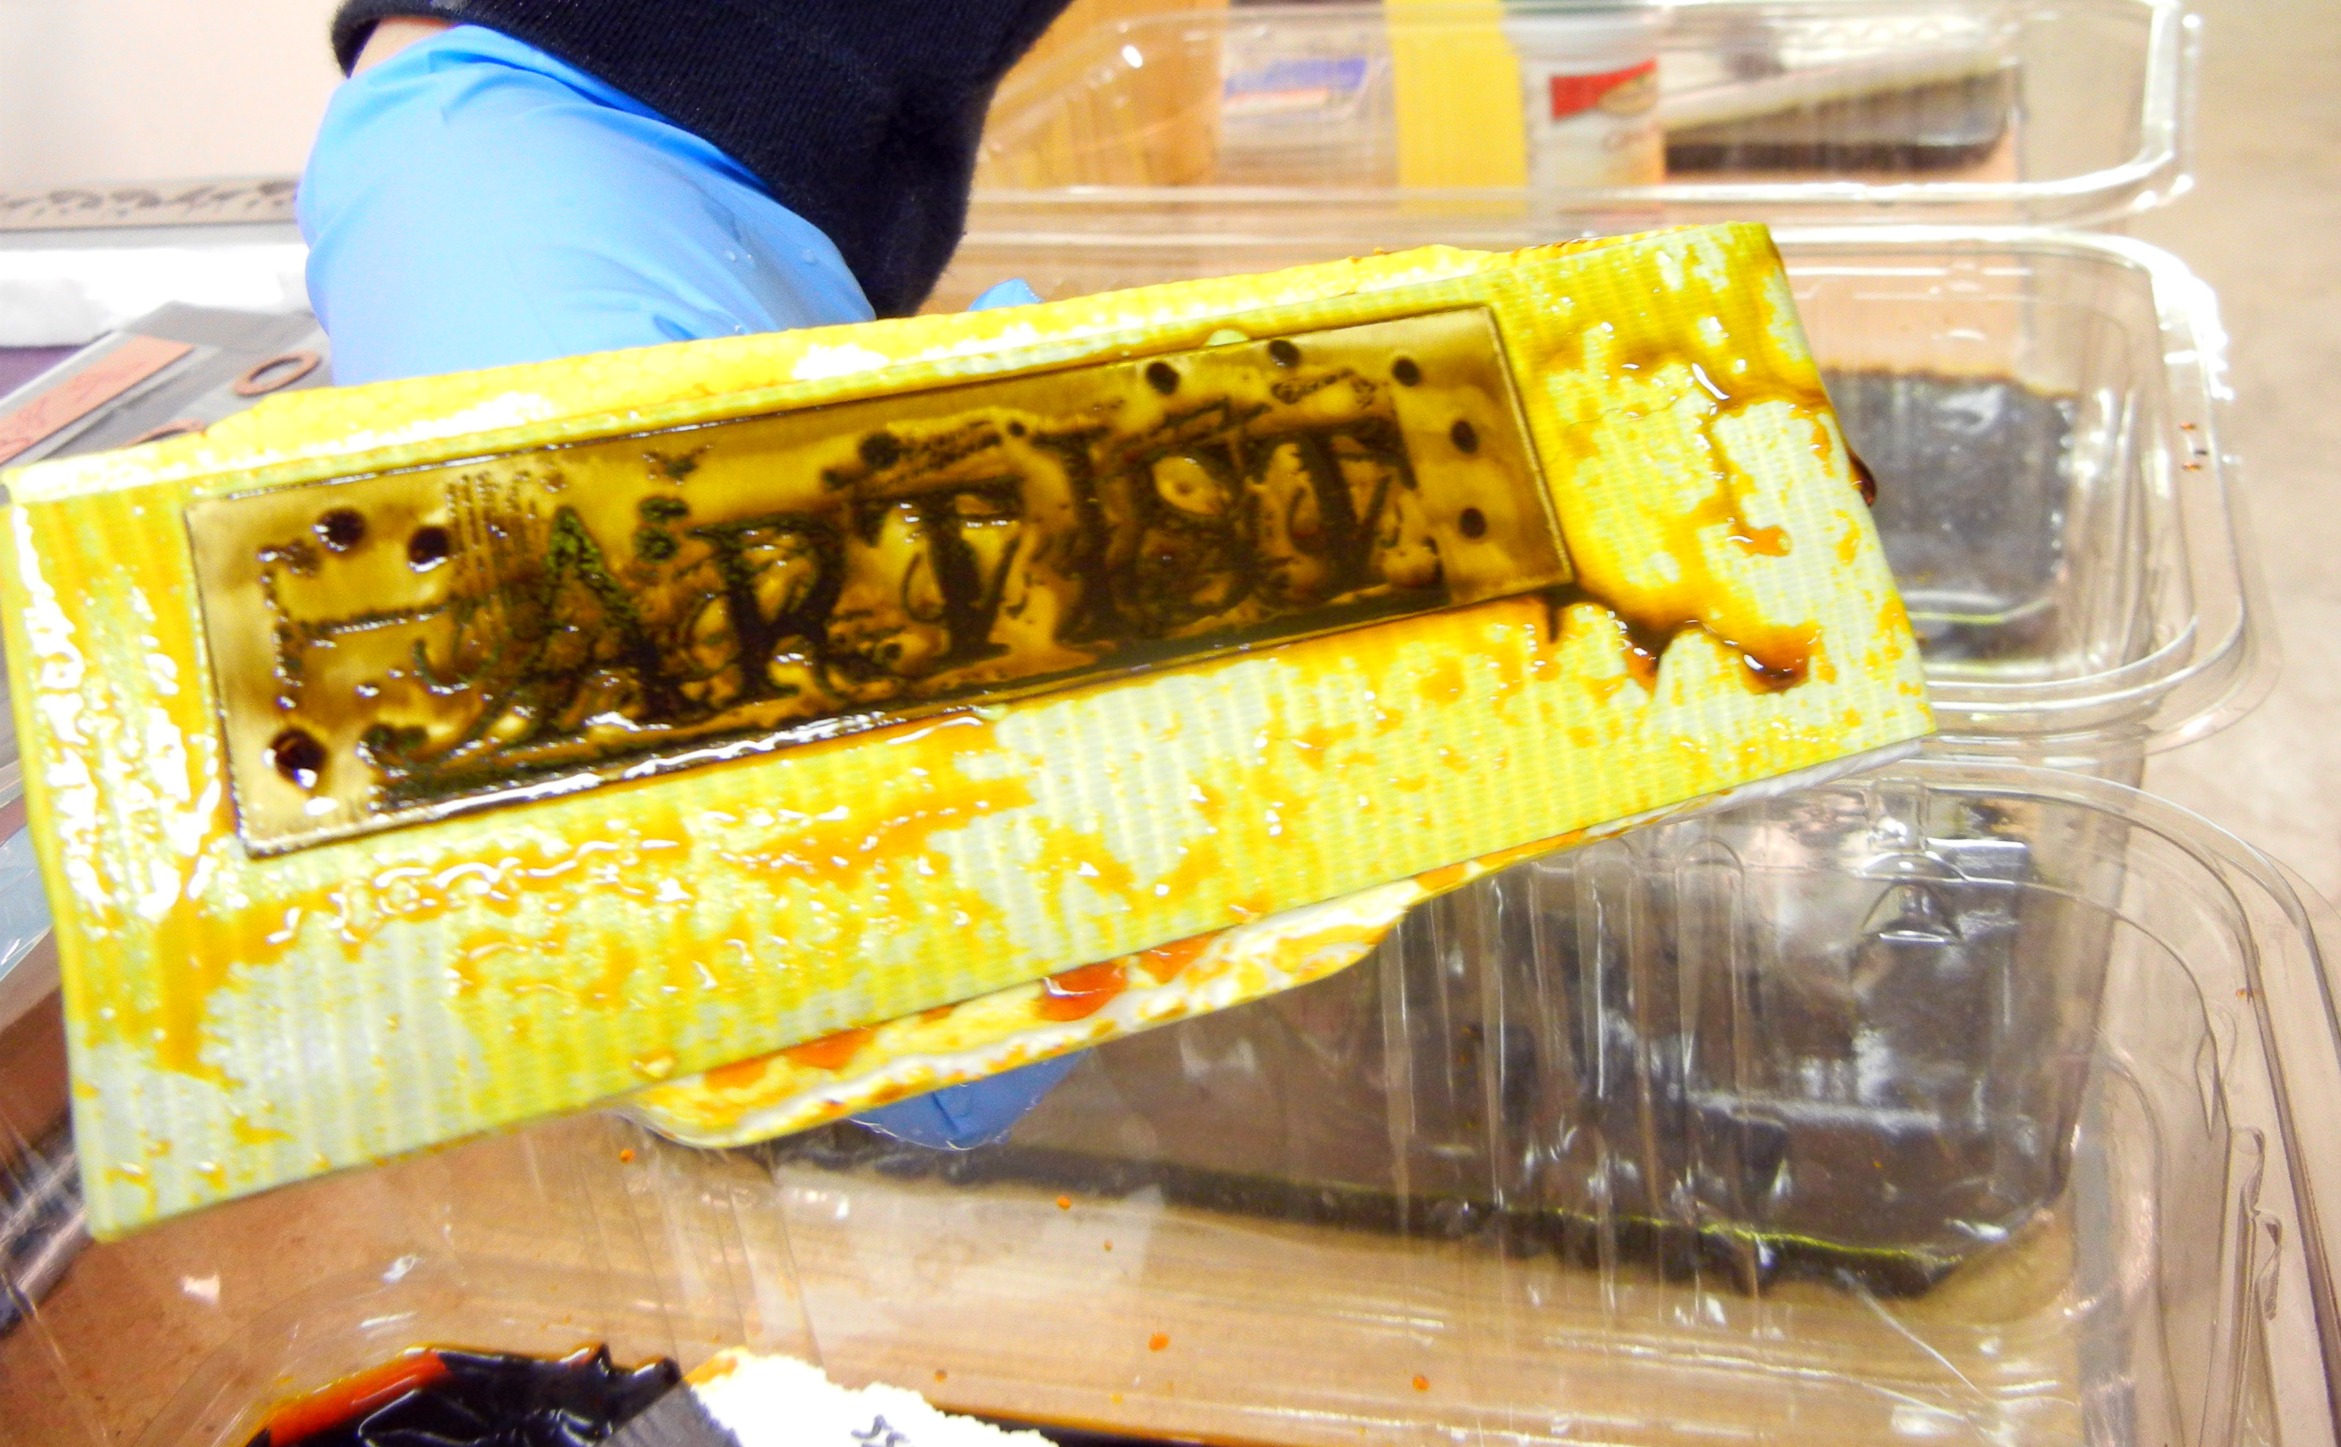
8. Scrub metal clean in a tub of water that has a few tablespoons of baking soda mixed into it. Scrub all your design elements with a brass brush (or an old toothbrush) and additional baking soda, to thoroughly neutralize the acid. Some people use a weak ammonia bath to really make sure the acid is removed. Cleaning all the etchant off is important, as it will stain, and may cause small pits.
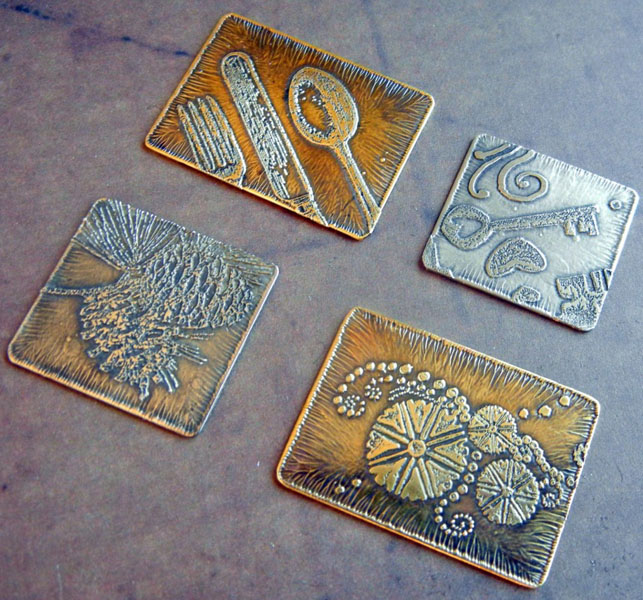
That’s it! You’ll probably want to patina the metal with liver of sulfur or another oxidizer to really bring out the definition in your design.

Ferric chloride can be reused several times. Once it is exhausted (typically after about 3 uses), consult your local waste management system for guidance on disposing of it.
Happy creating! Use the “print-friendly” option to print these instructions – with or without pictures! Questions are always welcome too. ~ Cindy
Editor’s Addendum: Many people have asked “Where do you find these supplies?” So here is a linked list of sheet metal and etching supplies:
- 6×6″ copper sheet
- Copper bracelet blanks for etching, stamping, riveting, etc.
- Copper washers
- 6″ sheets of brass for etching, stamping, riveting, etc.
- Solid brass bracelets — great for etching or otherwise embellishing
- 6″ nickel sheet metal for etching, stamping, riveting, etc.
- Ferric Chloride
Roofers use 19- to 27-gauge copper sheet, but surprisingly the prices from most roofing supply places are higher than our prices. Fortunately, you can often find left-over roofing scrap at a local recycler, like Earthworks Recycling. The size of reclaimed copper scrap can be random, so bring a measuring gauge and gauge conversion chart to make sure you get the size of scrap or remnants you want, such as 20-, 22- or 24-gauge.
For more tips about etched copper, brass or nickel jewelry: Various designers at Rings & Things have etched jewelry designs and posted free tutorials (no login required!) which you can browse in our Design Gallery. Or go directly to a few favorite tutorials by clicking the Related Products tab in the details of this Ferric Chloride.

83 Comments
Great tutorial, thank you! I did this once with a friend and would love to try it again on my own. Nice to have the step by step instructions. I like your idea for the float – that looks easier than how we did it. 🙂
This is pretty much what I did this summer, but I used a different etching chemical, and the name is escaping me at the moment. My question is this – we I tried using stamps (with red stazon ink) the stamp would slide around on the metal, creating an unsuitable stamping image – especially with the larger stamps. Is there a trick, or can you offer any guidance on how to do that? I found that my best etches turned out to be the ones where I used the sharpie resist.
Thanks!
Hi Angie! It might help to scuff up the surface of the metal with steel wool or a green scrubby pad first. That gives the metal a little “tooth” or grip to keep the stamp from sliding around so much. Amongst our designers, there are a few who are rubber stamping pros – and a few of us who are completely deficient! I think it must take some practice. We kept the Stazon cleaner close at hand to remove the oops and try again.
Thanks Jami! Hope you have fun etching. I think the floats are a nice idea – the other way (making a tape sling across the etching bath – is that what you did too?) is kind of difficult to undo, especially when you’re wearing gloves.
At the moment we are out of ferric chloride – but a new shipment is due in this week! Plus we are also putting together an Etching Kit that contains everything you need!
Will be very interested in the kit when assembled. Will you notify us when it it ready for sale?
Hi Joanne! Yes, I will update this post when the kit is available for sale. Also, the stock number (45-210-001) is already in our online store, so you can set a “notify me” email alert if you’d like to be notified directly once it is available! http://bit.ly/GFRVpq
Will these etching kits be available at the Rings ‘n Things upcoming bead shows, say the one in Trevose, PA?
Hi Barbara – no, sorry the kits won’t be at the show….but when you spend over $100 at one of our bead shows, you get a coupon for free shipping on your next order, which you could use to buy the kit!
The ferric chloride is back in stock! The ferric chloride is back in stock! 🙂
Can you etch stainless steel? It doesn’t seem to oxidize with liver of sulphur. Is there any other way you know to oxidize or etch stainless? Thanks for your great step by step tutorials.
Hi Sarah! I’m not sure if you can etch stainless steel, but I know you can’t etch it with ferric chloride. Stainless steel is formulated to resist tarnish (which is what a patina is) so yeah, liver of sulphur is powerless! 🙂 Ferric chloride only works on copper alloys. If it is the color of steel you’re after, try nickel silver instead. Despite its color it is mostly copper, so ferric chloride works great.
Fantastic tutorial. So many good tips! I love the fact that you use the foam boat to suspende it on the solution. So much easyer than using the tape on the container.
Thank you so much for sharing!!
Thanks Noemi! I hope the tips help you make some fantastic etched jewelry! Cindy
Thanks for posting this great tutorial.
Love the idea for the float.
I save the styrofoam “plates” from packages of meat from the grocery store, smooth ones are best but not necessary. Of course, wash them well. I can then cut them to size then use double sided tape to attach my metal to the foam boat. I also use tape to make a little tab to make it easier to lift the “boat” from the etchant. Wearing rubber gloves prevents staining your fingers. I have a separate container w/3tbsp of baking soda mixed into a cup of water to neutralize my metal and boat when the piece is etched. I found I can re-use the etchant several times but any remains must be completely neutralized with baking soda before washing it down the sink. (I use those square “zip-lock” type containers w/lids)
Sometimes when I use a stamp I too don’t get the desired imprint so will often use another resist to either enhance the print or add other embellishments. I too have found RED Staedtler lumocolor pens to be the best resist. Happy etching!
Hi!
I was just wondering what kind of chemical you would use if you where to etch silver? Siri
Hi Siri! Ferric nitrate is typically used to etch silver. It is considerably more toxic/dangerous than the ferric chloride used for copper, so make sure to do your homework if you decide to try it! 🙂
I have already done some etching, but this really helped with some of my questions. But how do you etch aluminium??
Hi Jenny! I haven’t tried etching aluminum. It sounds like the chemicals involved are not as safe as the ferric chloride we use for etching copper. Here is one article I found if you are interested. 🙂 http://www.instructables.com/id/How-to-etch-aluminum-panel-labelsdesigns-with-a-r/
Hi Cindy,
This is a great tutorial! The type of ferric chloride that I am able to get is the orange crystal type. Seems that we can’t get the liquid in Canada. My question is: what is the correct proportion of crystals to water? I’ve tried several amounts, up to 50gm crystals to 250ml water and it still takes 10 to 12 hours to etch.
I havent’t boosted it with citric acid yet.
Any suggestions? Do you know of a source for anhydrous ferric chloride that will ship to Canada?
Thanks,
Denny
Hi Denny,
Actually, Rings & Things can ship ferric chloride to Canada.
The only restriction is that it has to go UPS Standard, rather than through the post office, which means that UPS’ brokerage fees apply.
Click “brokerage fees” in the ferric chloride page below, to compare the rates for personal and business shipments to Canada.
We currently offer 1 liter bottles:
http://shop.rings-things.com/cart/pc/Ferric-Chloride-1989p32490.htm
and we’ll be stocking 4 liter bottles soon as well.
Our new Etching Kit is now in stock! It includes ferric chloride, Stazon ink, Penny Brite cleaner, copper and Novana Patina! http://bit.ly/IWaoxQ
Hey there! I love this post. One of my passions is metal smithing and these are great tips for doing etches at home, but I wanted to also suggest that if you can manage to get your acid to vibrate while you etch the image comes out much cleaner and there is way less chance of something sticking to the surface of the copper. I use an old rock tumbler but lots of stuff works. 🙂 You can get away with finer sharpie lines that way too! 🙂
Awesome tip, thanks Judy! I’ve heard of people setting their etching bath on top of a running clothes drier to get a bit of agitation, but didn’t know if it would really make a difference. I will use your tip on my next batch! 🙂
Hi Helen,
Can you be more specific on the Red Staedtler lumocolor pens. There are many on the art shops. Are they permanent, are they the Special pens, overhead markers, etc.?
Thanks
For some reason, red and black inks are the best resists.
They definitely need to be ***permanent*** markers of some type, and suitable for writing on metal. We use red or black Sharpies, but if you’re touching up a stamped design, the Sharpies frequently are too GOOD a resist, and make a sharper impression than the rubber stamp.
I bet the Staedtler pens have a better tip, that gives you more control than a Sharpie, and possibly more options for matching the line thickness of the rubber stamps well.
Radio Shack also sells an etching liquid that works. My question is ,does the styrofoam float on top of the liquid, there by keeping the metal off the bottom>
Yes, the styrofoam floats on the top of the liquid, niftily keeping the piece of metal on the top of the liquid. And there is usually a flat piece of styrofoam left over in nearly everyone’s house or workplace, from some electronics purchased in the last few years.
And yes, Radio Shack in some parts of the country does sell Ferric Chloride. Sometimes even online — but not always either. That’s part of why we decided to add it. Our designers couldn’t always find any when we wanted it!
I’m very new to etching (actually haven’t started yet) just accumulating all the supplies. My question is this: how small can you get with detail before it’s just too small? I have a few ideas that will require some larger areas with very tiny detail in them. while other areas will be pretty much solid. I hate to waste time and materials only to find out the image was just too detailed.
I have had good sucess with a regular and even an extra-fine-point sharpie, and any rubber stamp that I could get a good impression with. Some rubber stamps (especially with large solid spots) don’t make a good impression on slick metal, but roughing up the metal helps, and sharpies work surprisingly well.
i have been etching copper and brass for a number of years , and love it …However, do you carry any etchant for etching sterling silver ?
Hi Diana,
We do not. It’s a more dangerous etchant (usually a ferric nitrate solution, or sometimes nitric acid).
I purchased a plastic contain large enough to hold the floating piece of styrofoam, then purchased a small aquarium motor and attached it to the outside of the container to vibrate the solution. This works very well to help the etching process.
Hi Carolyn – That’s a very nice, easy-to-implement idea!
I’m sure it helps eliminate bubbles (which leave a small round un-etched spot where you don’t want it).
We haven’t done any agitation when we’ve made ours, so I’m curious – does the vibration from the motor affect/eliminate the little lines around the edge of the piece? Close-up picture here: http://www.rings-things.com/blog/wp-content/uploads/2011/12/etched-copper-bikes.jpg
I like those funky fingerprint-looking lines but if I was looking to make a very sleek, clean design I’m sure they would bug me.
Try etching something that is silver plated. When sanded it reveals the metal below ( usually copper) then when etched reveals the brass below the copper. The result is a beautiful copper and brass combination!
That sounds like a great look! But do be careful, because ferric chloride might have unexpected results with some metals, and you usually can’t be sure which metals are part of the plating make-up.
Hi, I have found that 2 parts hydrogen peroxide and 1 part Muratic Acid (both cheap) works great on aluminum but do this outside because it creates fumes. It also works on copper and brass if out of ferric chloride. It works FAST so don’t leave it in long before checking it.
Hi FunkyTwist,
Thanks for the tips.
That does sound a bit hazardous, so readers – be sure to read up on safety and disposal of Muriatic Acid (a form of hydrochloric acid) before trying it! (It is an acid commonly used for a lot of purposes, so you can find a lot of safety and disposal info on the web.)
I have been etching for about a year now. I make brass plates using etchant to use in my rolling mill. Lovd the idea if the stamps. I have some from years ago that I bought at a scrapbook party (had to buy something).
I’ve used several resists, PnP, nail polish, spray paint, sharpie. I Lind my Sharpies best.
I’ve even sprayed a piece of metal with paint – then scratched the design out using a stylus.
I love that you can change one design using the resist one way so the metal is embossed and same pattern altering your resist can look engraved.
Lots of great tips.. Thanks
Thanks Nan, I like the idea of covering the piece of metal, then scratching a design out using a stylus!
Have you discovered that any particular type of spray paint is best or worst?
We find with the Sharpies and Stazon stamp pads, that the black or red provide better resists than the other colors.
Hi – I ordered the Ferric Chloride and have been having so much fun. I’ve made four pieces so far but noticed a perfectly round defect in two of those pieces… within the etched area, it seemed like this perfectly round area did not etch quite as much as the rest of the background. In one piece, it was about 1/4 in. across… and in the other piece about 3/8 in across. Have you ever heard of that? The copper sheet that I used was new and didn’t look to be damaged in any way at the outset. Any ideas?
Hi Liz,
Yes, I know exactly what that is! It was an air bubble on the piece, and it prevented the etching solution from touching that part of your copper. Be sure to wiggle/swish the item when you set it down in the etching solution. Be careful not to splash, but do wiggle the piece enough to dislodge any bubbles. And then it doesn’t hurt to wiggle the pieces a few minutes later too, in case any micro-bubbles have coalesced into a larger bubble.
Thank you so much for your answer – I’ll be more careful next time!
This seems like so much fun, but I feel stupid. I’m assuming you use staz on if you have a rubber stamp. What do you do if you want to free hand a design? Is this when you use a sharpie and draw with it? Are there places you can purchase patterns to use?
Hi Jan,
Yes, if you want to free-hand a design, use a Sharpie. Some other black or red permanent markers might work too, but we know Sharpies work for sure!
I think you could any type of stencil that a Sharpie’s tip fits — you might be able to find some interesting stencils at a craft shop. Most stencils, however, aren’t specifically designed to be used with markers — they are often designed to be used with paint, so you might have to get creative in how you use or alter them.
I tried the etching and it didn’t work for me. I couldn’t find Penny Brite so I used Brasso and an SOS pad. I stamped with staz on. I submerged my brass piece into the Ferric Chloride. ( etchant i bought from Radio Skack) . I left piece in solution for over 2 hours and nothing happened. Any suggestions? Doyou think its possible the piece wasn’t reallybrass andthat’s why it didn’t etch?
I think you’re right. Either not brass at all, or perhaps brass underneath, with a plating on top that is protecting the brass from the etchant.
2 hours should have given you a good deep etch, on any material that has a lot of copper in it (brass is mostly copper — usually 50-75%). And Radio Shack is a good source for Ferric Chloride (but not all of them stock it, which is part of why we started stocking it!).
I haven’t used Brasso for this, but I looked it up and it should work fine. I thought maybe it leaves a “non-tarnish residue” like some jewelry cleaners, but instead it just says it leaves a smooth, brilliant shine — which sounds to me like it is just a good basic brass/metal cleaner that leaves no significant residue.
Can you tell me where to get copper sheeting? Both online and locally? Thank you!
Hi Gary,
I’m adding a supply list with links at the end of the blog post. I hope that helps! Let me know if you need more information.
~Polly
Gary, any metal fabrication shop in your area should be able to order you copper sheet, and may even have scraps that are nice sizes for your jewelry pieces…..I have yet to order metal from any online source because so far the local shop I frequent has had metal scraps in sizes and thicknesses sufficient for my needs. I have not done jewelry in silver yet, though…..I started with copper because I had some left over from building a bar top for a customer, and have been totally seduced by this wonderful medium, and my favored clients love it. It is perfect for the type of western products my clientele want…..
This is going to be fun- I can’t wait to free hand with the sharpie. What do you use to FINISH the copper jewelry so it doesn’t tarnish? Or turn green?
Thanks!
Hi Alysse,
There are a few things you can use. I use Renaissance Wax to seal my copper, because it is fast and easy and prevents tarnish while the jewelry is on display or lightly worn. But if you wear a piece frequently, you’ll need to re-apply it every now and then — which is fine if it is your own jewelry, or if your customers don’t mind coming back to have you re-seal it for them (Ren Wax just takes a moment to re-apply).
Pretty much any sealant that doesn’t visibly change the surface of the metal (like pouring a thick layer or resin over the top) will eventually need to be reapplied. This is why gold jewelry has been so sought after over the centuries — it does not tarnish or change color. But I really like copper, and the colors it gently changes to when worn, so I don’t worry too much about long-term sealants. I just like to coat them when they are brand-new, so they stay looking good while on display / for sale, and then lightly touch them up every few years or months, depending on how much they are worn.
Thank you Cindy/Polly; I wonder if anyone has tried to deeper etch and then use the etched piece as the “negative” with another metal silver-or the same) and placed the “sandwich” (so to speak) into a hydraulic press to make an exact mirror image. It might make an interesting bracelet. Lynn
Hi there, I am in New Zealand and use amonium persulphate for my etching (its in a powder and you mix with water) – it is clear so you can see the etch happening and is finished when the liquid turns blue – it is not as smelly or dangerous as the ferric chloride. Also I sometimes print a pattern from my computer onto cheap glossy photo paper and iron that onto my prepared brass – if there are any missing bits of ink i just color it in with a sharpie. For my copper, I keep an eye on local auction sites for people pulling out their old copper flues above the stove – not deemed fashionable anymore! but great to clean and cut up for jewelery. Cheers Leonie
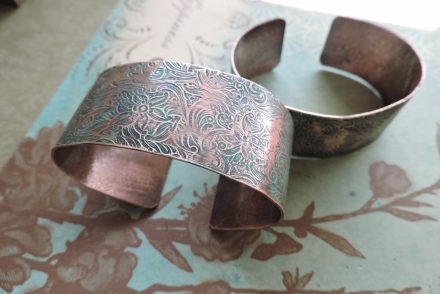
We did some acid etching a few months ago on copper and brass, and then were playing with some liver of sulphur in the workshop last night so decided to drop some of the etched pieces in. The liver of sulphur had no effect on any of the etched pieces – I am wondering if anyone else has run into this? I did have some cuffs fresh off the rolling mill that we did at the same time, and they coloured beautifully.
Hi Bernadette,
I have successfully used liver of sulphur many times on copper that was etched with ferric chloride. So I am thinking your batch of etched copper picked up some type of coating during the interim months, and just needs to be freshly cleaned.
However, I have very limited success with BRASS and liver of sulphur. The instructions on liver of sulfur often say to heat brass (or the water you use when mixing up your liver of sulfur) before using it on brass, but even so, I frequently I get no results.
~Polly
The author states that the ferric chloride will be exhausted after about three uses, but this is ABSOLUTELY INCORRECT. Typically it can be used many, many times. Your etch times will eventually become slower, but the solution will work for weeks or months.
Hi Talia,
I agree. I use my ferric chloride over and over, and you’re right, it gets slower after a few uses, but works for a LONG time. I was doing a lot of etching for a while, and then took a break for over a year before doing a mini workshop. I had stored the plastic bins of used etchant safely in a (dry) basement cupboard, and they still looked good so I brought them out. Our batch took about an hour, but still worked great! ~Polly
We have been etching copper for a couple of years using ferric chloride. Recently we are getting hundreds of tiny bubbles on the surface. We hang the plates vertically from monofilament fishing line. Can not figure out where all of the bubbles are coming from. When etching silver with nitric you can see the bubbles and whisk them away with a feather but because of the opacity of the ferric, you can not see the copper surface. Could it be the plastic container?
I look forward to your response.
Hi Dave,
I’ve never seen (or heard of) what you are describing, but your guess sounds like a good possibility. I’m simply re-using plastic produce (spinach and mixed greens) containers, and I get a few bubbles, but not many.
~Polly
I have recently begun etching with ferric chloride on copper but for some reason I am not getting a deep clear etch. I’m using black sharpies or staedtler pigment liner. All instructions on line call for 20 minutes up to 2 hours. I’m using 20 & 18 g copper. What can I be doing wrong?
Hi Jill,
I’m not sure you are doing anything wrong. Can you clarify what your results are?
Take a close look at the etched images in this blog, and you’ll see a lot of extraneous lines that you might think we sketched / added, but in reality they are “volunteers”. I happen to like the effect, but I will admit I was not expecting it at first.
Compare the clear stamps in the “A boat ready to float” image, to the results in the photo with the steel wool (click it for a close-up). Are these extra lines the lack of clarity that you are lamenting?
Or is something else going on?
More time, should give you the depth.
“Agitating” the bin of ferric chloride constantly (some people suggest a fish tank bubbler motor, but I haven’t tried that) can help prevent the extraneous lines and give you more clarity. I’ve also heard suggestions to place it on a washing machine while it runs, but that could be hazardous if it bounces off. Either way, if you agitate the container while it’s etching, make sure it can’t fall off and spill.
~Polly
Hi Polly, what I am referring to more than anything is that I don’t seem to be getting a deep etching. The photos you have here are much better than my results in which some of the design is barely distinguishable. If you have a chance to look at another blog deborahread.com. You will see how clear her images are after etching. The best way to describe my results is that the images are very shallow.
Hi Jill,
Try these – maybe one of them will pinpoint the problem and solution.
1. What are you cleaning your copper with before starting? Are you using a good copper cleanser and scrubbie? (It’s fine if the surface looks slightly sanded when you’re done — it actually helps the rubber stamp or Sharpie adhere better.)
2. When you rinse it after cleaning it, how well does the water run off it? Does it bead/ball up, or does it run down it in a nice smooth even sheet? If it is running down it in separate streams, it’s not clean enough yet.
3. Are you keeping the metal clean when you apply your resist, or are you getting oily handmarks on it?
4. Could it be your ferric chloride? Maybe it’s a weak batch or brand. Our ferric chloride is from MG Chemicals, and we’ve had great luck with it. However, I don’t know if all batches or brands are the same.
Try warming it up — our team etched outside on a HOT sidewalk in the summer once with a fresh batch of ferric chloride and in only half an hour there were holes all the way through the thinner pieces of copper!! Sort of like rough filigree. We’ve also heard that citric acid (might be available in the pickling/canning section of your grocery store) can help boost the etching power.
I’ve never had to leave my items in longer than 2 hours, even with old many-times-used ferric chloride, so I’m stumped what is making yours etch so lightly. Especially all over — I’ve had some weak spots that I could tell meant I hadn’t washed my hands well enough when I came back from snacking on some potato chips, but those were definitely fingertip-shaped splots.
So if you figure out what’s causing the problem, please post your results so others can learn from it too. I’m sure you’re not the only one with this issue.
Thank you. I’ll be sure to let you know.
Hi Polly, I’m not sure, but it may have been my resist. I have changed to black sharpie from the micron pens I was using for my Zentangle designs. I may have been given or misunderstood some information that these pens would work.
It’s still trial and error. Sometimes I get a great etch and then there are those other times.
Hi Jill,
There might be something in your other pens, that is spreading out and creating a film that prevents a good etch. (Just a guess.) I’ve had great luck with Black Sharpies, and “ok” results with Red Sharpies. Also good results with Stazon black or red permanent ink pads, as long as I let the ink dry before I set it into the etchant.
I haven’t used any other pens or inks. I did make a sample piece where I simply wrote “This is fine point Sharpie. This is Extra fine point Sharpie.” and made some doodles and dots around each to see how well each size of pen worked for etching. You might want to repeat that with a few of the pens you like to use, and compare the samples. This will make it easier to remember what worked and what didn’t, because you’ll have proof with words on it.
~Polly
Polly, one more issue. When I patina with color and try to sand off raised areas, I wind up removing everything. I was using steel wool and was advised to use sandpaper instead. I still wind up removing much of the patina from the recesses. How can I avoid that. Is it indeed that my etch isn’t deep enough?
What you’re experiencing with sandpaper and steel wool (or even a polishing cloth) is normal — patina normally gets removed from all larger flat spots.
Try a sanding block like this:
https://shop.rings-things.com/cart/pc/Vintaj-Metal-Reliefing-Block-p32486.htm
because it won’t dip into those flat spots you’re trying to avoid.
If you’re making jewelry, then the patina will still wear off naturally (over time) from these exposed spots, as the piece gets touched. But it will stay in the crevices.
~Polly
Thanks so much. FYI I was given some advice about this and it seems to give me a bit better results. Using a slotted mandrel and 220 grit sand paper, there is less removal of the patina in the crevices. I also used the sanding block and that helps too. Maybe one day, I’ll get it just the way I want it. Thanks so much for your help.
I am appreciative of the info. However, I found you while trying to remember how long I need to soak in baking soda, then ammonia, after etching; as I was taught in my small metal arts courses. You seem much more cavalier about neutralizing the acid than my instructors are! Do you not feel it is necessary?
Hi Jaik,
Thank you for asking. I hadn’t noticed how lightly the article touched on neutralizing the ferric chloride. After re-reading it, I edited it to increase the strength of that step. However, my instructors only used baking soda and water; I’ve never used ammonia, and had no problems. ~Polly
I have been using ferric and have noticed after quite a bit of etching (copper cuffs using ink resist drawings = etching lots of copper away) that the ferric I am keeping in an air-tight plastic container developes a film on the entire top. It is at this point that it is no longer worth using. The ink comes off before any quality etching happens (over 3 hours – the etching is barely noticable). Has anyone else had this happen? I assume it happens when the ferric is spent. Thanks.
Yes, that film seems to develop as the ferric gets spent.
~Polly
great information here! I’ve been a metal worker for almost 20 years and fell in love with etching metal the first time I tried it. By trial and error, you learn a lot. What works and what seems to fail. One time I tried these beautiful Egyptian stamps I purchased and I used the inkpad that came with the set. Nothing happened….the ink wasn’t the correct type and washed off in the enchant. Another time I took a sea sponge and Vaseline and dabbed in a piece of 20 g copper ( cleaned and sanded well) and the result was quite beautiful. ( the idea came to me when I had chapped lips and was using the Vaseline….crazy, right?) I got a deep etch, and I sawed out different sized pieces and made some beautiful work. All my metal head friends kept asking ” how did you get that pattern???” I broke down and shared even though I really wanted to keep my secret. Experimenting is the best way….take a risk !
Thanks for the tutorial and especially the tips on the different metals!! I will try it out on my copper disks today – so excited! I found other sites that suggest to tape the metals into the etching bowl upside down (since I don’t have styrofoam, I will try that). Have a crafty Monday!
Wow really amazing tut! I wonder, is it possible to make a diy hand stamp using this technique with a deeper etching? I’d love to hear it from you.
Hi Mint,
Seems likely that you could. I think it would be worth a try. If you do, please post your results!
For the deeper etch, use at least 20g metal rather than the thinner 24g that we’ve used in some of our jewelry.
On a side note, I’ve never seen “rubber stamps” made out of metal, and they sound pretty cool! But the fact that I haven’t seen any, means there might be a good reason I haven’t seen any, like maybe metal doesn’t hold much ink for good quality stampings.
I etch sterling silver using ferric nitrate. I learned that if I use my Silhouette Cameo and cut out positive OR negative images in the peel-off vinyl and transfer it to my piece (bearing in mind not TOO intricate unless you are a master with the Silhouette) the vinyl resists the acid perfectly. And it’s one step to just fold it over to protect the back/sides. I have cut out amazingly small texts. On a side note: I also have used the heat/PNP method and figured out that a FLAT IRON works amazingly well for this process.
What an amazing idea! Thanks so much for the tutorial!
Can I use Tupperware containers for the ferric chloride bath? I no longer use these containers for food storage. I’m just wondering if they are safe to use for the ferric chloride.
As long as you’re not longer using them for food storage, I see no problem with using the Tupperware. We usually use the spinach / baby greens containers which are a little flimsy but still durable enough. Ferric chloride doesn’t seem to affect plastic at all.