Let me begin by stating the obvious – this style of wrapped leather bracelet is EVERYWHERE this season. Everywhere! Even my athletic clothing catalogs – which only have maybe three pieces of jewelry – are featuring this style. Why? Because it is casual yet chic and infinitely customizable! The catalog (which shall remain nameless) priced each bracelet at $120. Needless to say, you can make your own for far, far less using supplies from Rings & Things!
The supply list is pretty short:
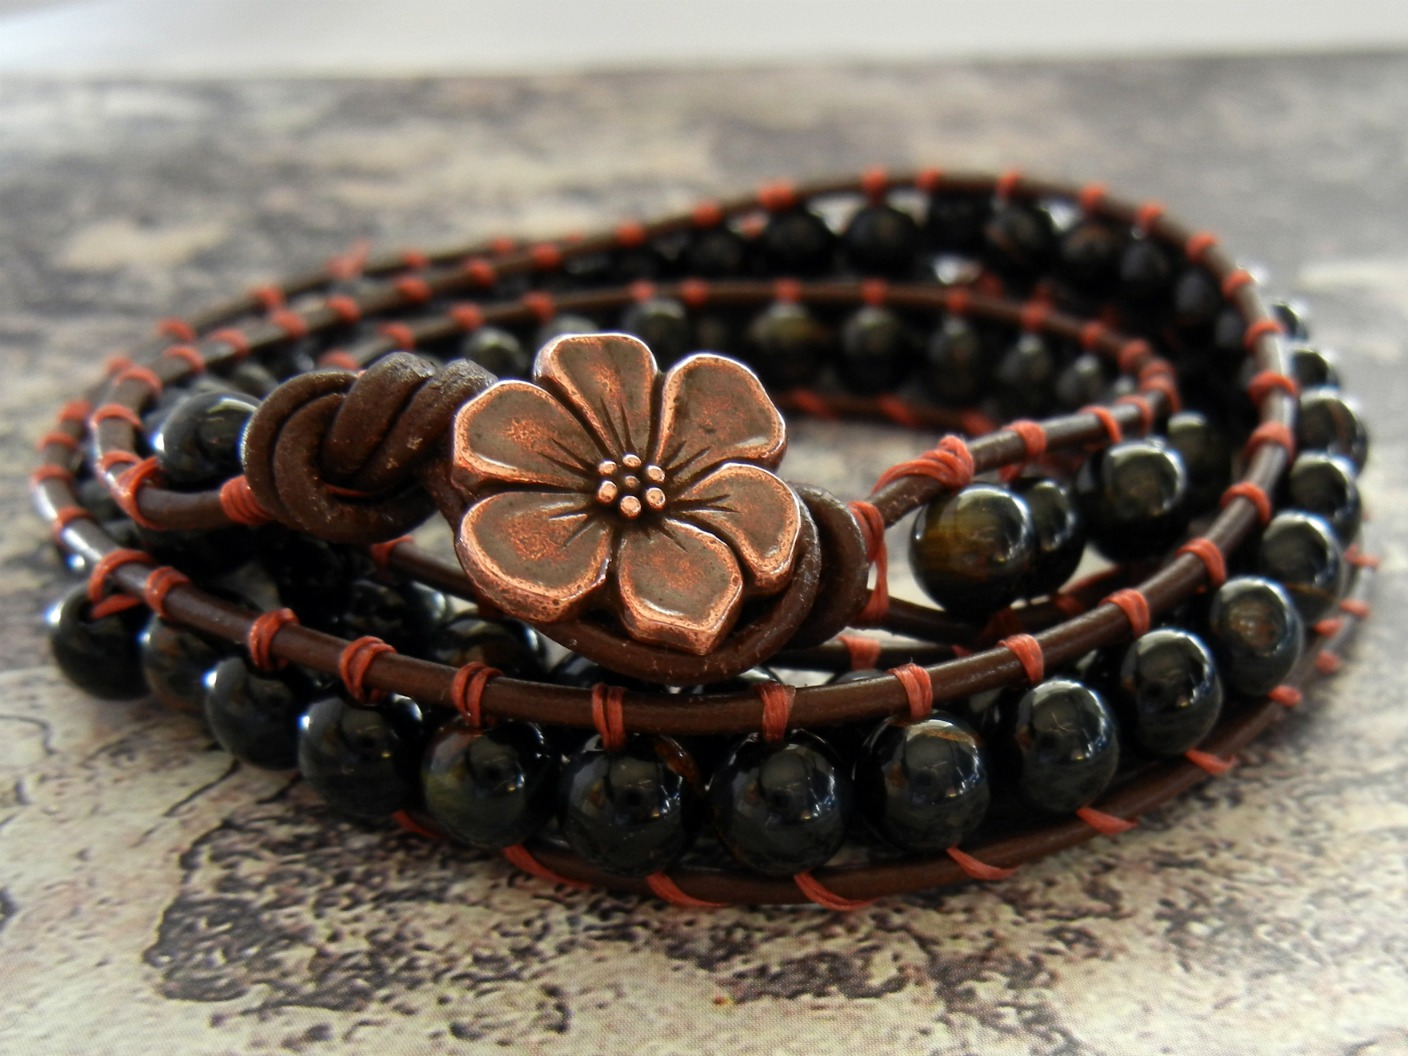
- 4-6mm round beads We used gemstone beads, but glass, crystal beads or pearls would also be lovely. The number you need depends on how many times you want to wrap the bracelet around your wrist. Larger beads work too – but they will start getting heavy on multiple-wrap styles. All the bracelets pictured in this post use 6mm. Our new wrapped bracelet kits use 4mm beads. <– The kits are great, because once you make your first bracelet, you’ll have plenty of thread and needles left over with which to make many more!
- Leather cord Our examples use Greek leather. Both the 1.5mm and 2mm worked great.
- Thread Needs to be sturdy and able to pass (doubled) through your beads twice. Pick a color that matches your leather or that provides a pretty contrast. We used earth assortment). We now have tubes with all black or all brown bobbins available too!
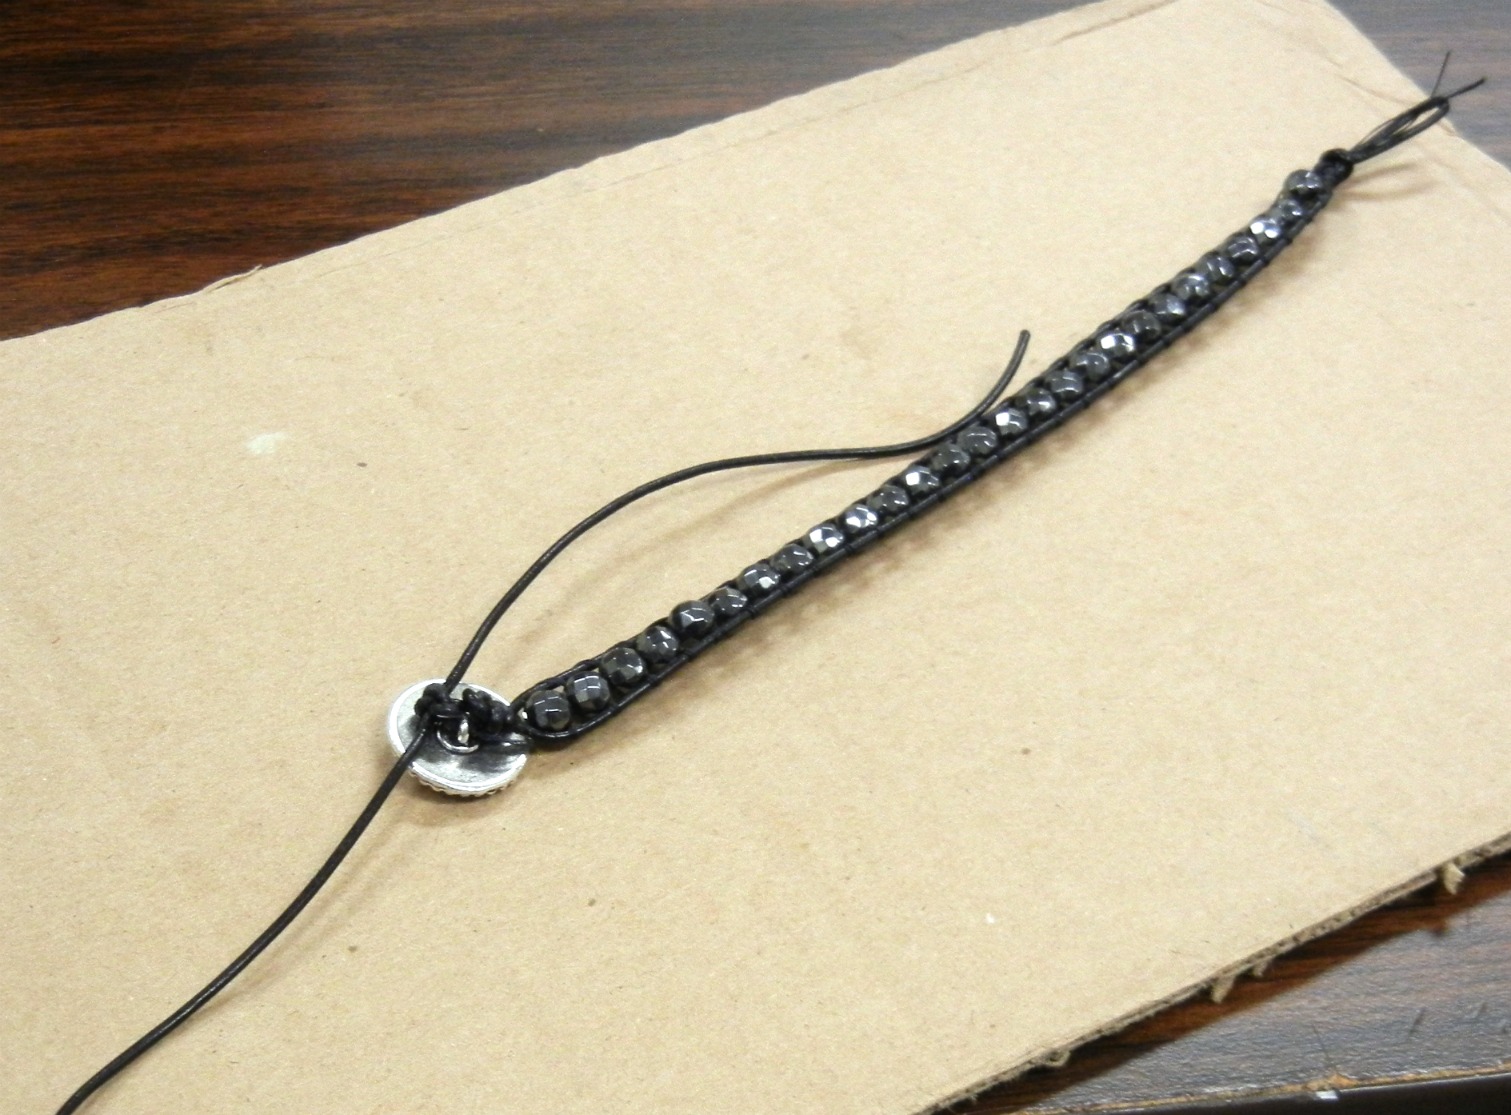
- Button or bead for the clasp. Rings & Things has some pretty buttons from TierraCast.
- Required tools: needle (size 12 is a good general choice), scissors, work surface with clips or clothespins.
- Optional tools: needle threader, thread conditioner, glue (GS Hypo Cement, Bead Fix or other fabric-friendly adhesive for extra security on your knots).
The technique:
- Choose your bracelet length and cut your leather. The formula is double your finished bracelet length plus extra for making the knots. For single-wrap bracelet, measure your wrist and then triple that number to get the length of leather needed (7″ wrist = 21″ of leather). For a triple-wrap, multiply your wrist by seven (7″ wrist = 49″ leather). It is better to leave your leather too long than to end up with not enough.
- Cut a long piece of thread (10-12 feet) and thread your needle. Knot the end of the threads.
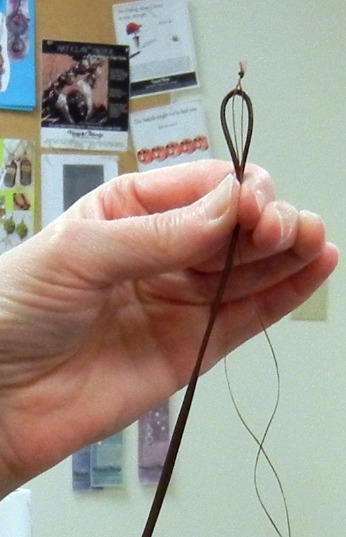
Holding the thread by the knot, let the needle fall to the ground so it is centered on the thread. Fold your piece of leather in half, leaving a loop large enough for your button to fit through. Holding the knot-end of the thread with the leather, tie an overhand knot so that your thread and leather are now connected.
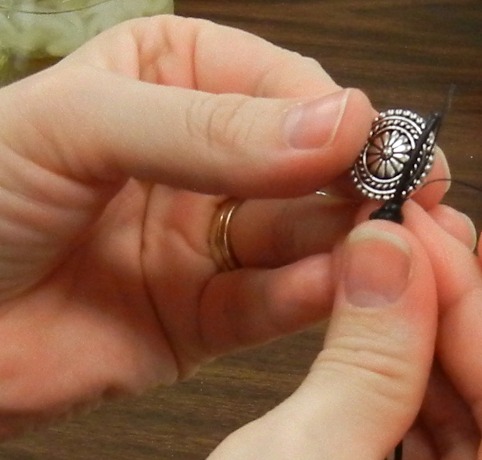

Using binder clips or clothespins, attach your loop to the top of a piece of cardboard. Use a second clip to attach the leather ends to the bottom of your board (leave the thread loose).

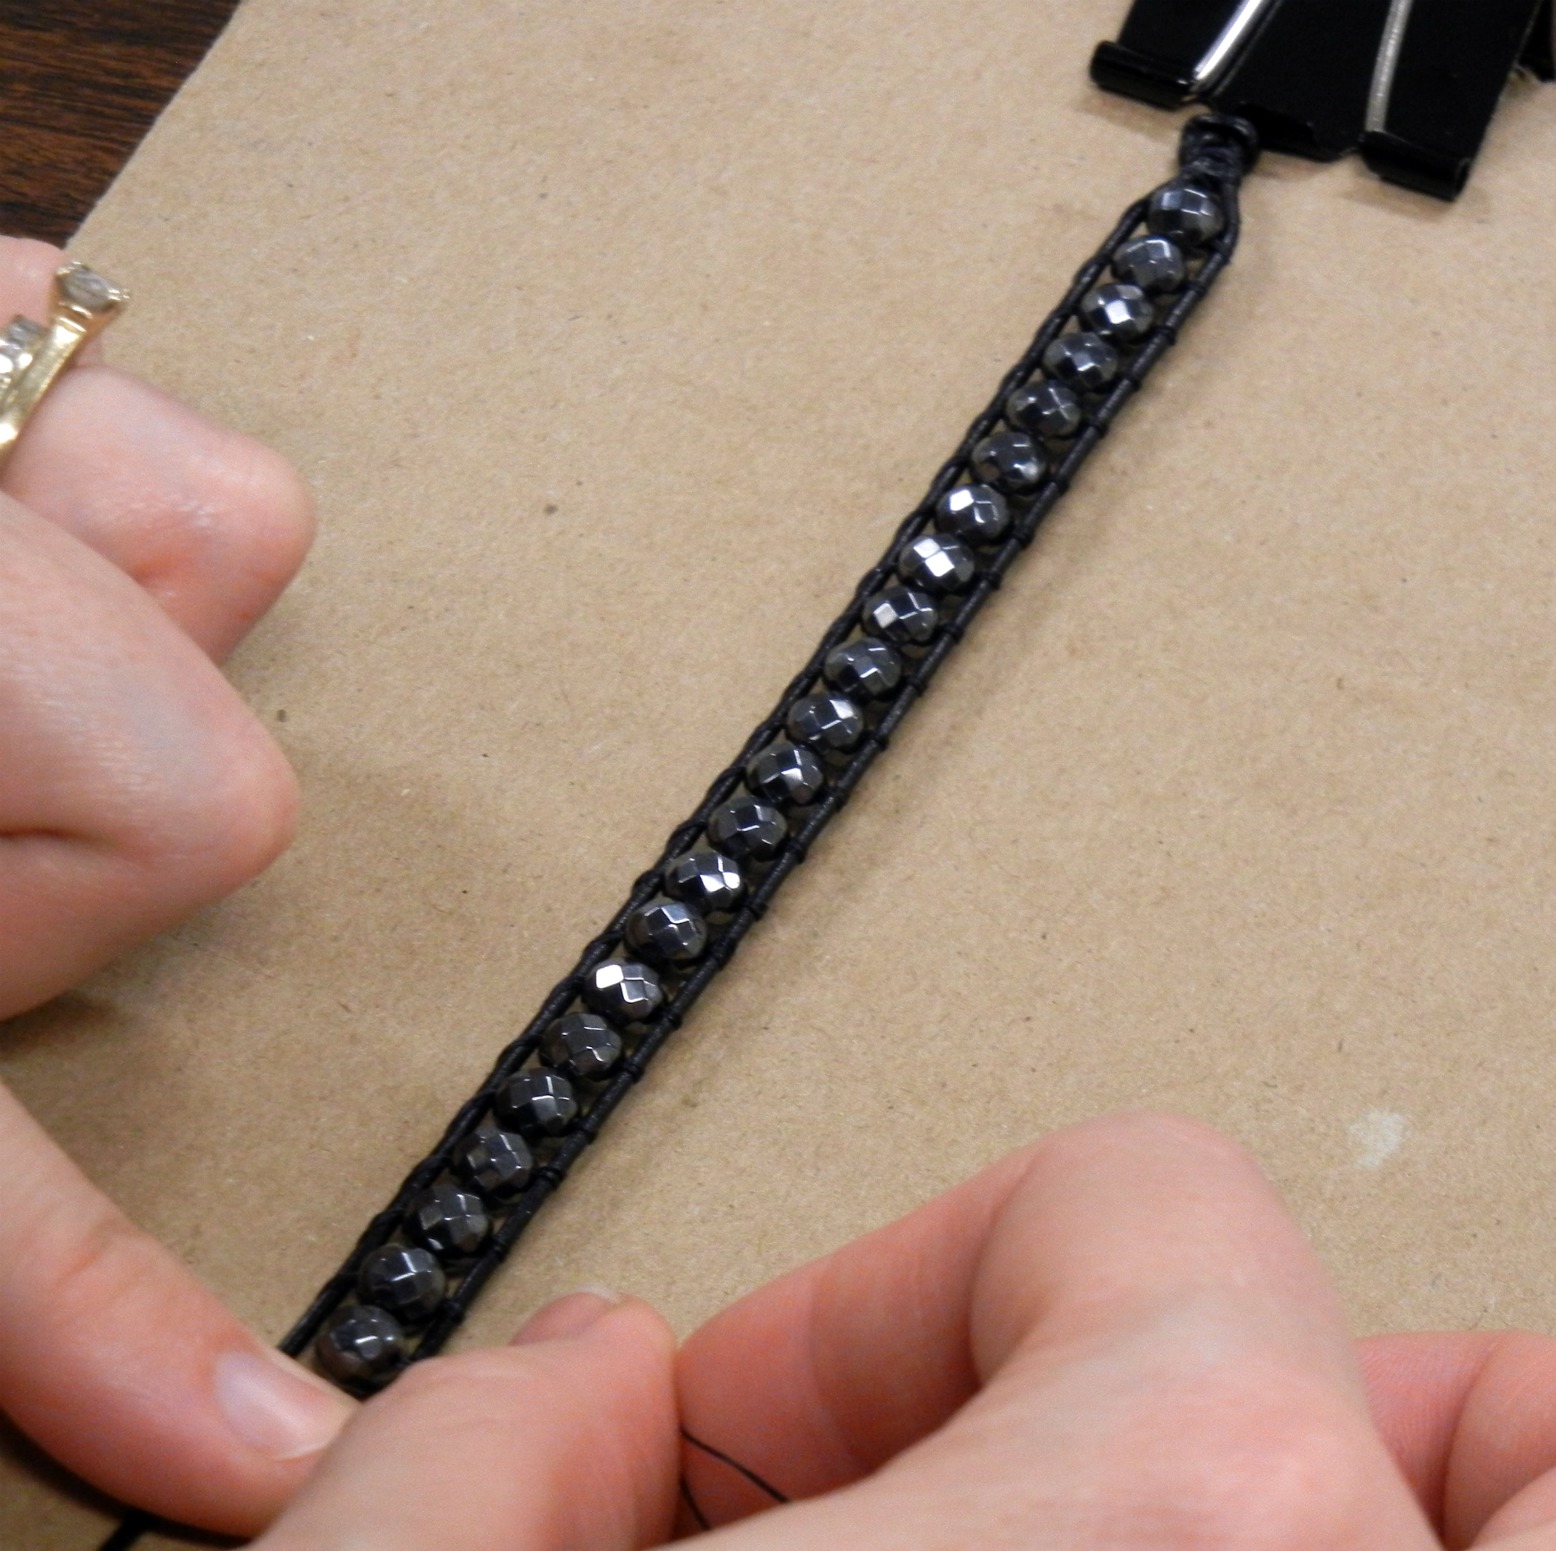
Do this 5-6 times, pulling the thread tight around the leather to form a binding. (The pattern could go either way, but since I’m right-handed I’m going to describe it this way. Reverse it if needed!) Here is a close-up of the lashing:
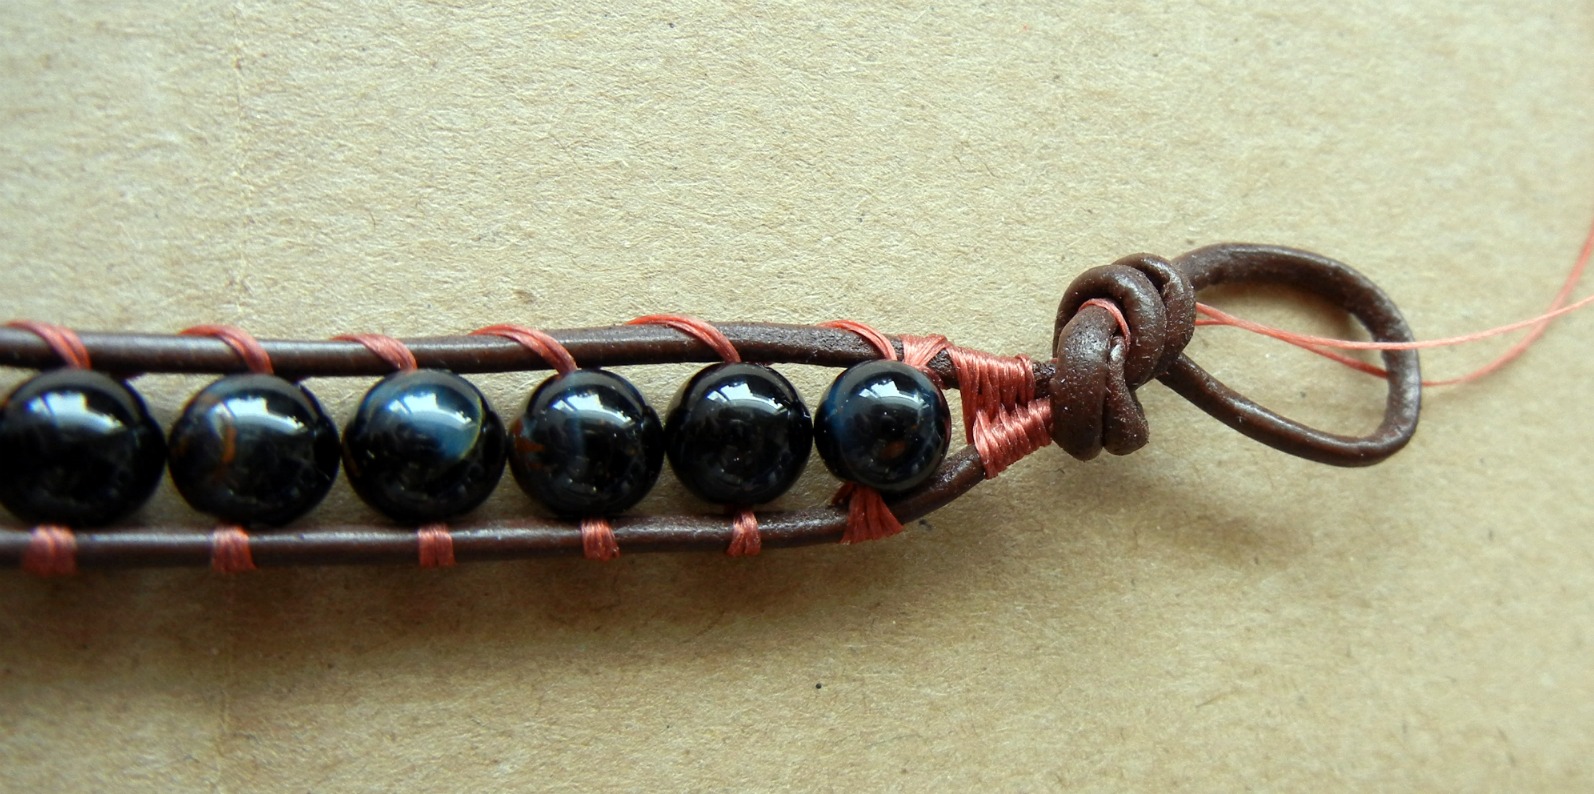


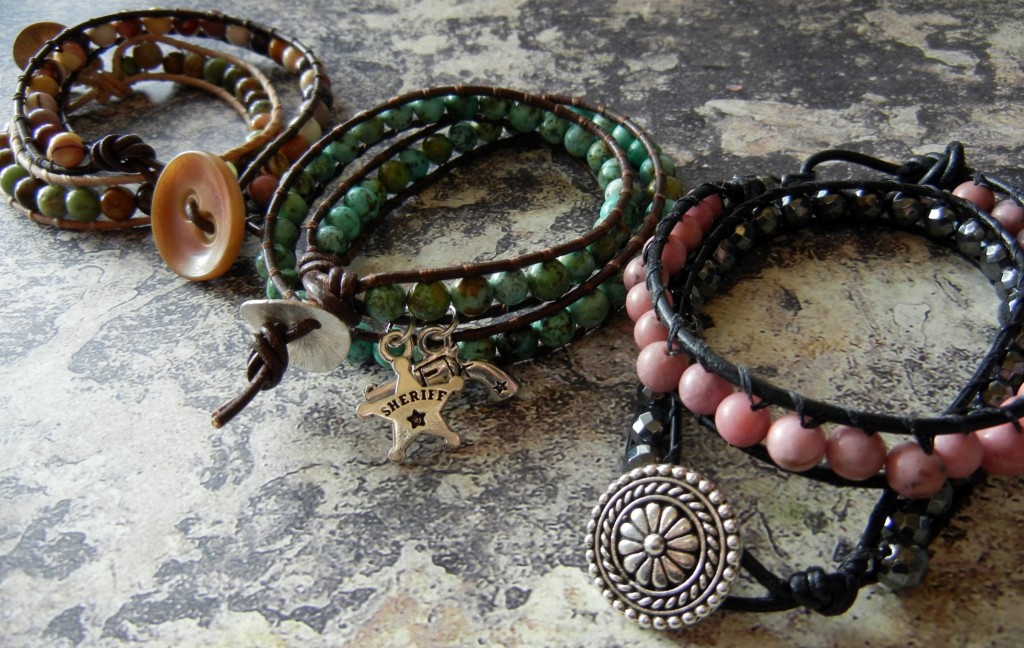
If somehow you come up short, all is not lost. You can tie a disk bead onto just one strand of the leather (use glue to enforce your knot), like on the 2nd bracelet from the left. Or if your ends are really short, use a hook-end crimp, as shown on the pink bracelet on the right.
Other design options:
- String your button or bead clasp first, then tie a series of knots on the end to make the bracelet length adjustable.
- Use jump rings to attach a couple of charms, like on Mollie’s Belle Star bracelet.
- Leave the leather tails long and add beads or decorative knots.
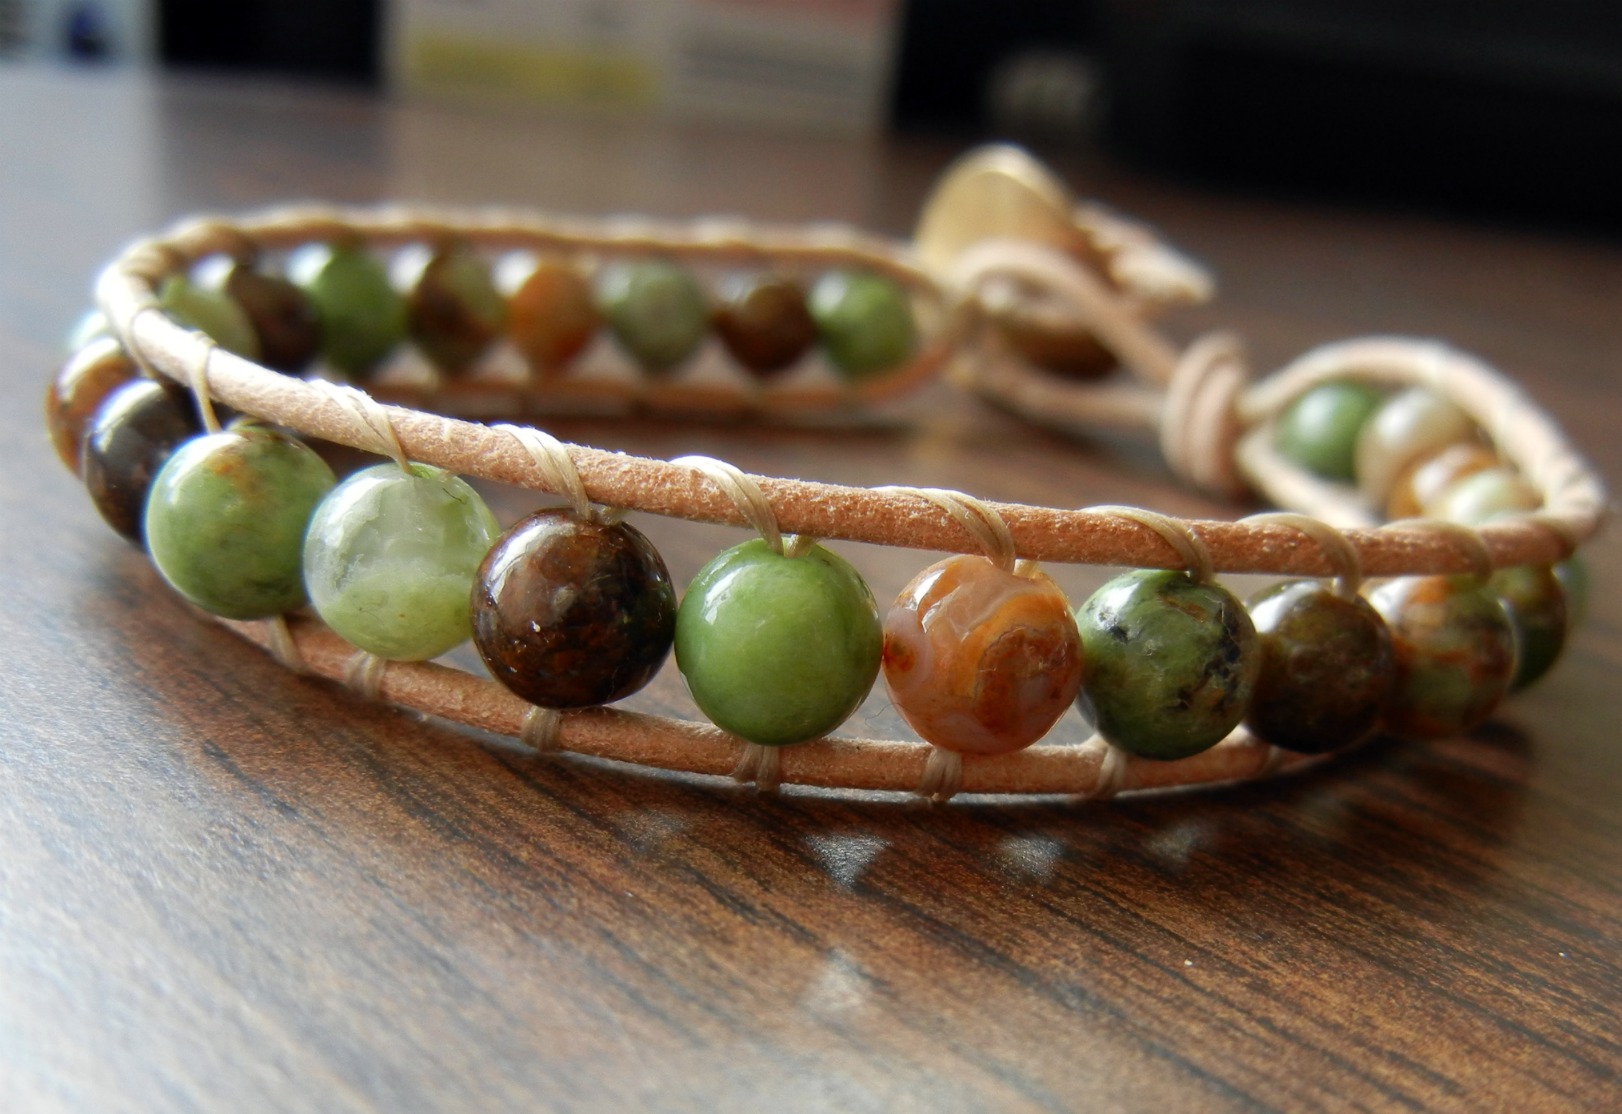
- Substitute a different type of cord for the leather, as in Tracy’s rattail and dragon blood jasper design:

Have fun creating your own wrapped bracelets! You’ll find it is quite addictive once you start. Please feel free to post questions – I will do my best to answer! ~ Cindy
Need supplies? Rings & Things ships around the world! The most popular wrapped leather bracelet supplies are:
- Round gemstone beads | 6mm round glass beads
- 1.5mm Greek Leather cord | 2mm Greek Leather cord
- Thread (size D Super-Lon)
- TierraCast buttons (to use as a clasp)
- Size 12 beading needle
- Or – complete wrapped leather bracelet kits!
Q: “How do you start a new thread in the middle of the bracelet?”
(answers selected from replies to blog comments)
A: It’s best if you can avoid running out of thread (start with 10-12 feet to avoid running out). But if you do, start a few beads back and go through them again. This means you’ll have to go through some of your beads 4x, which (depending on your beads and cord) might be impossible. Other problems are that your bracelet will be weaker than if you were able to use 1 continuous thread, and you’ll be able to see the section that has twice as much cord as the rest of the bracelet.
A2: Get really good at hiding knots in your beads. =)
A3: If you’re down to just a tiny bit of thread, it is going to be hard to tie the ends onto new strands, but if you realize you’re not going to make it and cut off the needle, rethread and knot the strands together, you can probably pull the knot inside of a bead. I hope this makes sense – basically, you’re not “starting anew” but pausing, adding on some extra thread, and picking up right where you left off. 🙂

Edited December 2021 to update links.

325 Comments
I posted this on my blog http://gemtrails.blogspot.com/2011/03/wrapped-leather-bracelet-tutorial-at.html
Great tutorial!
Thanks, Deci! Great job by Cindy; thanks for sharing this!
–Dave
This is a great tutorial for a beautiful bracelet!
Great tutorial. Thanks!
Hey you know what would be totally cool? Is if there was like, a link that you could click and all the supplies that you need for doing one of these would be instantly added to your shopping cart.
I completely agree, Deb. GMTA: we were just talking about that idea here yesterday!! It’s getting thought about 🙂
– – Dave at Rings & Things
Fantastic! I’ve been trying to work this out for myself. Thanks for saving me from trying to re-invent the wheel!
EXCELLENT directions!
This is wonderful!! I’ve been trying to think of things to do with this leather cord. Fantastic idea! Thanks so much. 😀 <3
could you possibley email pattern or is there a dvd to purchase or anyway to get tutorial i can watch at my own pace?
Sorry, Eileen – we don’t have a DVD or separate tutorial available. I would recommend searching You Tube for a “wrapped leather bracelet how to” if you’d like to see the whole process in action. Happy beading!
This is great! I’ve always wondered how to make these. It looks pretty easy! I can’t wait to try it out!
I Love the nails!!!!. what is the different between the greek leather and ordinary leather? I dont think I can find greek leather in New Zealand!!
Hey Mellisa! Greek leather is known for being high quality – it is very smooth and supple (and we do ship to NZ!). But any type of leather cord will work for this type of bracelet so whatever you can buy locally should be fine.
So I just made a couple of these and I have a question — how do you keep the long long thread from being a total pain in the tukus in the early stage of the bracelet?
Hi Debbie! I agree the long thread is a major pain, but I found that using a narrow (4″ wide) piece of cardboard as my work surface helped me to not get tangled so much. I also prefer dropping my needle off to the side after each stitch, and pulling the stitch taut with my fingers, rather than trying to pull the needle several feet out to the side. Hope that makes sense. 🙂
Love the tutorial but just wondered about how you clean these types of bracelets?
Hi Elaine – if your bracelet gets dirty I’d advise washing the surface with a damp cloth. This type of design isn’t meant to get submerged. “Natural” leather will darken since it absorbs oil from your skin, but the other colors stay the same.
Hope this helps! Cindy
I am doing the triple wrapped bracelet and I’m running short on thread but still have many beads to attach, is there a way to add more thread?
Hi Abbey! I would just knot some more thread onto your strand before you run out, and try to hide the knot inside one of the beads. Add a drop of BeadFix or superglue if you want to be really safe. good luck!
Wonderful tutorial. I’ve been wanting to try one of these bracelets for awhile and now I know how to do it.
Thanks!
Hello Cindy,
Awesome bracelts, I have seen these everywhere, especially for men. I saw this bracelet, http://www.karmaloop.com/products.aspx?ProductID=180802&VendorCode=SMIKB&iskazbah=true and I really really like it but think it is overpriced so I was looking to make it but looks a bit hard….
Would you happen to know how to make it or make a similar one? If not, do you know of a link that shows you how to make this or something similar?
Appreciate it!
-Brian
Hi Brian – it does look a bit tricky, but I think it is a macrame design made with larger cord (probably similar to our Chinese knotting cord) than the typical hemp macrame bracelets. We have some basic macrame instructions here: http://www.rings-things.com/projects/68002-10.htm.
I don’t know how to make the sliding adjustable closure, but I’m guessing one of our macrame books does: http://shop.rings-things.com/cart/pc/showsearchresults.asp?pageStyle=M&resultCnt=10&keyword=macrame+book&submit=Go+%3E%3E
Hope this helps!
I think the bracelets use a square knot closure. Here is a video link that shows how to do this: http://www.youtube.com/watch?v=ZdrV3T7dIIA
Good luck!
Thanks Jody! That looks exactly right. 🙂
Maybe I missed a part – what do you do to secure the thread at the end of the process. The directions skip from “form several stitches without beads” to “attach your button.” Should I just knot or tie it off, or should it be part of the knot that secures the button, like it was at the beginning with the loop. And at the top near the loop, do you just end up with a knotted piece of thread or do you secure that somehow, too?
Thanks for the instructions – I’m really excited about these!
Hi Emily! No worries, I understood what you meant even without all the punctuation 🙂
Your guess is a good one – since the thread is lashed around the leather securely at both the beginning and the end, I it is best to just continue the thread through the knot with the button instead of trying to knot it off sooner.
At the top, just trim the thread end and hide it underneath the lashing. Some people like to use a drop of glue to make sure it stays tucked away.
Hope this helps! Good luck on your bracelets.
I just realized I missed two question marks. 🙁
Thanks so much- great instructions and I am excited to try it. I particularly like that the design begins with the loop rather than the button. So much tidier!
Can you tell me, though, how closely to the knot you trim your ends after the button is attached, and if glue will actually secure leather knots? I have seen glue suggested in a couple of tutorials but I am doubtful about glue’s strength with the shiny leather.
Hi Christine! How closely you trim the ends is up to you…I’ve seen it done many ways. I like to trim the ends pretty close, but as you noticed, that does seem to work best with the natural (uncoated/less shiny) leather. Glue can work well – just make sure whatever you use includes leather on the list of compatible materials and you should be ok. Superglues tend to become brittle, and Amazing Quick Hold will destroy the leather, so I don’t recommend either of those.
If you don’t want to mess with glue, long tails can be a pretty design feature, too, like on this bracelet by Jaci: http://www.rings-things.com/gallery/displayimage-1941.html
Hope this helps! Good luck!
Thanks for sharing, I am just loving these bracelets right now.
Cloe 🙂
Really a great post on making of Wrap Bracelets and the picture you used adds worth to the post. Thanks for the share. Keep posting!
Thank you so much for the tutorial on how to make the wrap bracelets! I’ve been looking for one all over, and yours was great. I just made one for my wedding, and it turned out perfect due to your post.
Yay! I’m so glad. Congratulations on your wedding!
I love these bracelets and love the tutorial! Can you tell me what kind of beads you used in step 6 (black) and do you sell them on this site? I’ve been looking everywhere for those! Thanks!
Thanks Janine! Sondra made the black bracelet using 6mm faceted hematite beads. They are available in our online store: the stock number is 21-896-015.
This is great! I’ve always wondered how to make these. It looks pretty easy! I can’t wait to try it out!
Reply
i love these braclets! they are easy to make yet cute to wear! the supplies isnt very expensive at all either! i made one for me, and all my friends at school were asking me to make them one to!
its very nice
Just Stumbled this, loving the craftista action! Looks pretty easy, but I’m sure i’d make a mess of such simple task!
x.o.x.o
This is so great.. thank you thank you for this tutorial..
Hugs
Anne
Hi. Great Tutorial! Very clear and easy to understand. Got my bracelet done, now having a hard time figuring out how to tie my bead/button on.
http://www.etsy.com/listing/71619449/4-aqua-skull-beads-flat-20mm-dyed?ref=sr_gallery_18&ga_search_submit=Search&ga_search_query=flat+skull+howlite&ga_view_type=gallery&ga_ship_to=US&ga_search_type=supplies&ga_facet=supplies
Want to use one of these for the end but not sure the best way to tie it , So I keep trying different ways but my knots keep covering his face up, which I would like to show.
Any suggestions?
And thanks for the great how-to!
Oooh, that skull bead looks tricky. I see how the eye holes make it look like a button, but you’re right, tying it on that way covers up the face. My only idea is to put wire through the regular bead holes, and make some kind of loop on the back to string the leather through. Good luck! Hope it turns out one way or another 🙂
Hi Beth!
Not positive on this as I’m just learning myself, but what if you used your two loose ends (at the end of the bracelet) and thread each end up through one eye and down through the other eye ( like a button) and tie your knot off underneath?
It will cover the “nose” bridge a bit with the leather but that’s the only way I can think of to make those beads work.
Otherwise you could thread your ends, one each through each eye and tie a knot on top like a disc bead but I think that would cover more than you’d like.
Just a thought, hope it helps!
I have more faceted acrylic beads than I know what to do with. I noticed one of your patterns used faceted beads. I’m wondering how comfortable that would be. Is it a lose fitting bracelet or should I add an inch or so to make it looser?
Hi Lisa! Faceted beads work great. Each of us made our bracelets to fit our own wrists with enough slack to be comfortable. As long as the bracelet has a little wiggle room on your wrist you shouldn’t be bothered by the faceting at all.
Hi Cindy, This all looks pretty clear, but I’m wondering what you do with the thread you knotted in the beginning, at the loop end?? In one of the last pictures, labeled “long tails make it easy to tie on a button closure,” I can see the knotted thread at the loop end. Do you snip it off?
Thanks!!
Hi Tracy! Yes, just snip off the thread close to the knot. This is where some people like to add a droplet of glue for security, although I’ve found that the knot and lashing holds it together just fine. Sorry for the oversight in the instructions. Hope your project turns out great!
Thanks for the great tutorial! I made this: http://craftyjules.weebly.com/1/post/2011/09/leather-gemstone-wrap-bracelet.html
That is beaufiful. Great job!
Do you know how to make a three-row, or triple-row bracelet? I found one on YouTube (http://www.youtube.com/watch?v=TO3KCls53Ec&feature=related), but I only want three rows of beads, not the silver rows that make it a five-row bracelet.
Thanks!
Hi! I’m not sure exactly how they knotted the ends together, but that bracelet looks like it is stitched together the same way as our wrap bracelet. They just made three wrist-length pieces and then used the silver beads to stitch those pieces into a cuff. You could probably do a 3-row version by making 2 wrist-length sections and stitching them together with the same beads. Good luck! Looks fun 🙂
I used this this tutorial today and made two amazing bracelets! A 1 and a 3 wrap. Thanks for your simple instructions it was so fun and easy and I can’t wait to make more!
Hello. Have you had any experience with the beads slipping (thread slides on the leather after wearing, and the bracelet starts to twist up) on the leather? Am I not securing it tightly enough to the leather? 🙁 Help….
Thx!! I really love them!!
Oh my goodness, we LOVE this! Thank you so much for sharing.
Hi,
I’m going to try to make some of these for gifts – i’m totally new to the beading game and am ordering supplies direct from your site – I’m wondering what size needle to get if I’m going to use the recommended thread? I see from your picture that the needle is slightly curved too. I honestly have none of the supplies on hand so I need to get it all. Also, if I were to do a triple wrap for an average adult woman’s wrist – how many bracelets would I get from one roll of the greek leather (need to figure out how much I need).
Thanks!!!
Nancy
Hi Nancy! Hope I’m not replying too late. I recommend the size 10 sharps beading needles (although most sizes of beading – not sewing – needles will work). Don’t worry about the needle being curved. Based on average wrist size (7.5″ wrist x 7 triple wrap = 52.5″ for each bracelet) you can make three bracelets with 5 meters of leather, or 13 with 20 meters. Good luck!
Thanks so much for your reply – ordering now – I’m so excited to try this!!
Do you sale these? I would love to buy some but the ones I’m seeing online are like you said, overpriced! I especially love the first one on the page with the flower!!
Hi Jaime!
Search etsy.com for “wrapped leather bracelet” and you’ll find a bunch of great handmade designs, for a variety of prices.
Thank you so much for sharing – I have been looking all voer for the how-tos for these fun bracelets!
Thank you so much for posting this! They look amazing! With the type of thread you used, can you use gemstones that have 0.5-1 mm holes?
The size D thread should work on *some* of those beads, but not all of them. You’ll probably end up with some set aside for matching earrings. =D
The size D thread is .15mm, then you double it, making it .3mm, and then you go through the beads twice, so that makes .6mm … but cord is a little squishy, so that doesn’t mean it is a total fail … but the math does say it is larger than the smallest .5mm holes. Especially when you add in a bit more for the thickness of the needle’s eye. So use the thinnest needle that you can stand to use.
Thanks for the reply! Just wanted to say I found these for sale on a certain website. They were wrapped 5 times and going for almost $300 😉
Thanks so, SO much for sharing this tutorial. I, too, like many others have been searching high and low for these instructions. While I do plan on purchasing the leather you used, currently I have many packages of leather I got from your typical craft stores (e.g. Michael’a, AC Moore, etc) and I’m sure they’re of lower quality. If using them, do you recommend using the same kind of needle? The leather I have is rather stiff, so I wonder. Also, besides the thread you’ve used, have you used any other brands that work as well? And just for giggles, do you think this type of bracelet can be made sturdy with Rattail? Thanks for reading, Happy Holidays…..Andi from Eclecticajewelry.artfire.com. (can’t wait to make these and hopefully sell some – I’ve actually bought these before and they’ve always come apart!)
Hi Andi! Since the thread just wraps around the leather, rather than piercing it, the any beading needle is fine. Any beading needle and any thread that is small enough to fit 2x through the bead holes (and looks good!) is fine too. Tracy here made a version with Rattail – it has held up fine, but it does have a more fluid, less “sturdy” feel than the leather versions. Happy holidays to you too! 🙂
If the leather is too stiff, it might also be brittle and break while your customer is wearing it, or the colored coating (if any) might flake off.
To test it, you might try wrapping a few strands around your wrist and wearing them as a “plain” bracelet for a few days or a week, to see how it holds up.
Personally, I think rattail would be too squishy — you’d be able to see indents where the cord wrapped around it. But, it might look cool and patterned that way. I haven’t actually seen one made with rattail before. Rattail is pretty tough, and I love the colors and shinyness, but it might fray.
how add a beading string if i run short in the middle?
Just tie a new piece on – knot it securely and try to hide the knot inside a bead if possible.
The most common method is to knot some more thread onto your strand before you run out, and try to hide the knot inside one of the beads, then add a drop of BeadFix or superglue if you want to be really safe.
I just finished making one of these 🙂 made a couple of mistakes at the beginning but I got there in the end. Thanks for posting the tutorial! I really enjoyed making it and I’ll definitely be making a few more.
Great! I made some mistakes on my first one too. The second (and 3rd, and 4th…) were more fun!
I started making one of these the other day with 7-8mm river shell beads. I love the colors…but quickly ran into the problem that my BEADsmith no-stretch nylon wont fit through twice when it is doubled. It says it is size6 18yards. Should I run out and buy another brand/size? Some people are saying their bracelets stretch out and their thread breaks over time. I am making this as a gift for a friend so I would like it to last. HELP!?
Hi Angela – yes, size 6 bead cord is about 4x as thick as the size D SuperLon thread we used for our bracelets. The only breakage any of us have experienced was when we added more thread and didn’t knot securely. However, if it just seems too thin for your liking, you might try size 2 nylon cord – at about .3mm, it will most likely fit. With any thread or cord, you can “prestretch” it just by tugging sections with your hands before you start the project. Hope this helps! Good luck 🙂
Thank you so much! I will go out in buy some different thread. Some of these things you can’t know until you try/ask.
Wonderful tutorial! I am halfway through my bracelet right now ^^
Thanks Bela! Hope you are having fun with it 🙂
Awesome bracelet! Just made it and I love it! Fairly easy written tutorial, nice job with photos and explanation. Thanks for posting this tutorial.
Crazy, I just took a class in making these and the instructions had a statement that the design, technique was copyrighted!! So I began googling and saw your great tutorial. Can they sue for copyright infringement if I sell a few? They seem to be everywhere and they are fantastic and fun to make.
Hi Pete! Copyrights are confusing. As you can see, this style of bracelet is everywhere, so it seems doubtful your teacher – or anyone really – has a legal right to the design. What he or she probably could protect is their version of the instructions (i.e. the handout you received in the class). Each designer who uses a technique like this adds their own personality and style to the mix – which is what makes jewelry design so fun!
Hi, I’ve made two of these bracelets and am having trouble with them twisting after wearing them a couple of times. Am I stitching to tight or to loose?? HELP!!! Thanks
Hi Cindi! It is hard to try to diagnose without seeing – either too tight OR too loose could be the problem! The beads need to be held firmly in place by the thread. Where I had problems was at the end – lashing too tight caused my last bead to want to “pop” out of the leather, and too loose is just a mess. Clipping the bracelet down close to the end while I did the final lashing is what helped me – maybe other readers can share what works best for them? Thanks all!
Hi Cindy! Thanks for the great tutorial. I read through all of the comments for the extra tips, which made this bracelet a breeze. I used brown leather cording with topaz and rainbow seed beads, stacked 2 in each row to make it a little wider. I made it long enough to wrap around my wrist twice, which just so happens to be the right length for a choker as well. I’m so stoked with this pattern and I’m about to start another one! Thanks again!
Andrea
Thanks Andrea! I love jewelry that can be worn more than one way – glad your bracelet/choker was a success!
I cannot figure out how to finish the bracelets. What do I do with the thread and the leather cord? Other than this, it was an excellent tutorial.
Hi April! Sorry about that. The directions are a little vague about the end because there are several ways you can do it. The end is kind of like the beginning – after you’ve added all the beads you want, make a bunch of whip stitches with the thread around the leather. Then knot the thread and trim off any excess. How you tie off the leather depends on what type of button or clasp you are using. As you can see from our examples, we found 5 or 6 different ways of making it work…and there are probably more! Hope this helps 🙂
hi omg this bracelet is gorgeous!!! i will definitely try it this weekend~ It’s a style for human personality
Thank you so much. I have been making these all day! Just love them! Great advice!
Hi, do you think it is possible to use embroidery thread for the leather and the thread? Thanks a bunch!
Hi Lona Rose! As long as the embroidery thread fits through your beads 2x, it should be fine. I’m not sure that embroidery thread would be sturdy enough to substitute for the leather though. Rattail cord or even heavy waxed cotton might be a better choice if you are looking for a non-leather option. Good luck! 🙂
Great Instructions! I love the design, and just made one and its was super easy! Thanks!
I’m using Nymo Size B thread and a big eye needle. Unfortunately this needle has frayed my thread and broke during the making of my bracelet. What kind of needle would work best?
Thanks!
I’m using Nymo Size B thread and a big eye needle. The needle has frayed my thread and broke. Can you suggest what needle I should be using?
Thanks!
Hi Debbie! I used size 10 sharps beading needles for all of my bracelets and didn’t have a problem. Here’s more info on beading needles if you are interested http://bit.ly/w0sEyA. Thanks and good luck! 🙂
Hi Cindy!
Thanks so much for the info and chart. Will have to pick up some size 10 sharps. Love the chart – so glad I’m not an electron microscope therapist!
Hi–
Thanks for the instructions. Do you have any suggestions for starting a new thread in the middle of the bracelet? If the bracelet is long, it’s hard to use thread that’s long enough to go all the way to the end, so I have had to try and start new ones partway through, and it’s not as smooth as I would like. Thanks!
That is a problem, isn’t it?! I try to hide the knot where I’ve added more thread inside a bead. If you add more thread before you are really and truly *out* it is a littler easier to disguise it. Good luck!
Do you have instructions for hiding the knot inside the bead and starting anew? Can’t visualize how it stays together!
Hi Wendy! Sorry, no illustration…I’ll try to explain better: if you’re down to just a tiny bit of thread, it is going to be hard to tie the ends onto new strands, but if you realize you’re not going to make it and cut off the needle, rethread and knot the strands together, you can probably pull the knot inside of a bead. I hope this makes sense – basically you’re not “starting anew” but pausing, adding on some extra thread and picking up right where you left off. 🙂
Is it possible to make a leather knot closure at the end instead of a button, disk or maybe a sliding knot closure? And how would you do that, do you then start different with a macramé knot perhaps?
Don’t have the thin cord yet so have not started yet to try out
Hi Saskia! Yes, there are many ways to customize this design. I think if you left long enough leather tails at the beginning and end, it would be possible to make a sliding knot closure like this one: http://bit.ly/xzVVnu. Hope this helps – I’m not 100% sure I understand your question exactly so if I’m off base, just let me know! 🙂
Great information thanks for sharing!!! If you were going to do a 5 wrap what formula would you use? Ex. wrist size 6 5/8 inches.
Hi Michelle! The formula I use is [wrist size] x {number wraps} x 2 + [wrist size] – kind of funky, but that extra wrist size addition gives you the extra length needed to tie knots. I would round your wrist size up to 7″ just because the math is easier and it is always better to have too much leather vs. too little. So a five-wrap would be 7 x 5 = 35″ x 2 = 70″ + 7 = grand total of 77″ of leather.
What moss green beading thread did you use on the rattail and dragon red bracelet? It does not look like normal beading thread. I would like to try that thread! Love that design!
Threading needles frustrates me so I avoid that whenever I can. I used the 61-514-52 sage green needle end beading cord. I really liked how it turned out.
This kind of bracelet is really nice – and your photos have an awesome style too.
Keep up the good work…;-))
What do you do with the thread at the end of the bracelet? do you tie it through the button as well?
Hi Annaliese! As long as the thread is knotted along with the leather at the end, it doesn’t need to go through the button. Just trim the thread close to the knot and add a dab of glue for extra peace of mind if you like.
Cindy,
Great instructions and photos. Made my first one last night, but the beads are “popping” out from between the leather strips. Did I weave too tight or too loose? They lie okay on the work surface, but when I pick it up the beads (towards each end) do not stay in line. Help? Thanks! ~Nan
Hi Nan! I would guess that those end beads are maybe a bit too loose. If the holes are large enough, stitching through those beads an extra time helps keep them in place. I just made a bracelet with 4mm beads and didn’t have to struggle to keep the end beads inline the way I did with 6mm, so that might be an option for the next time. Best of luck! 🙂
Thanks! I’m going to start over – I like the idea of double stitching the first 2-3 beads. I used 6mm – it’s really pretty – just needs a little tweaking! ~Nan
I could not wait for the supplies to come in so I tried 3 with some white bead tread I found. 1 with 4mm beads and 3 with 6mm beads and on all 3 the first bead (and last one) comes popping out. The first bead the most (like Nan0. I start with a button clasp ( from a silver blank made 2 holes in it) So i can make a adjustable closure at the end, maybe that’s not good??
I used 1 mm, 1.5 mm and 2 mm leather cord
I am not double stitching the first few bead so try that for the next one. Also when i roll my fingers over the beads they move very easy making the first bead to go up even more. I can make big holes between the beads. I have the idear that I have them very tight when i am putting the beads on I pull very hard and they stay in line.
When I put the tread to the bead for the second time my bead is not laying between the cord but i hold the bead between my fingers. My fingers hurt a bit and this makes it easier but maybe thats the problem?
I also did it righ-handed and i am left handed but don’t think that could be it.
Hope you can tell me what of the 3 things (or all 3 lol) is the problem so the next one will be good and don’t have to spill any more leather cording;o)
I will try a sliding knot closure when all beads stay in place.
Hi Saskia! Yes, double-stitching the first/last beads can help. Rita, one of the designers here, likes to start/end with slightly smaller beads (for example, 4mm when the rest of the bracelet is 6mm). Both of these things can help, but the biggest factor is definitely tension.
Keeping the beads flat and tight between the leather is really important. If you’re left handed, why not do it left handed? I know I struggle doing things opposite. I hope this helps. Good luck! 🙂
Hi Nan,
My daughter makes bracelets for women but husband wants one for men.
This tutorial looks awesome and I am going to try tonite. I was wondering if you thought 8 mm beads were too big. I have some emerald beads that I think would look cool, but if they are too big, I don’t want to waste my time making it too hard.
Thanks, Rene’
Hi Rene! 8mm beads can work – I would suggest using smaller beads and the start and end since that will help prevent the beads from “popping” out of the leather. Also, a single wrap bracelet with large beads will have less stretching/distorting issues than a triple – and will probably look more “manly” too. Hope your project turns out great – have fun!
Hi! Thanks for the fantastic tutorial! One question..what kind of glue do you use for the leather knots?
Thanks!
I am about ready to make a bracelet, I have made a few practice ones….I am not sure how to attach the button when there is just one hole on the apple blossom button and two cord ends!!!
Help!! Cathy
Hi Cathy! The first image after step 7 (kinda) shows this – tie an over hand knot with both strands of leather, add the button to one strand, and then tie another knot. Hope this helps!
Hi Omega! There are a lot of glue options … just make sure whatever you use lists leather or fabric as a compatible material. Super glues get brittle so try to avoid those. This is my favorite – Hypo Cement. https://shop.rings-things.com/cart/pc/Adhesive-GS-Hypo-Fabric-Cement-2070p26158.htm
Hi I’m going to be making NINE of these as bridal party gifts. So I was ok with getting enough cording and buttons for closures, but having trouble figuring out how many beads to get. For a double wrap bracelet how many 6mm crystals would you recommend for one bracelet?
depending on the wrist size… personally I do the following
5.5 wrist= 48 6mm beads
6″ wrist = 50 beads
6.5 =52 beads
7=54 beads
and so on, hope this helps 🙂
Ashley – this is great information. I’ve only made ONE bracelet, double wrap, and I’ve got all the dimensions for cutting the leather cord. I just don’t know when to stop with the beads! Do you have (or Cindy) any kind of guide for how many beads (in inches, so it doesn’t matter what size you use) for single, double, 3, 4 and 5 wraps? I have a 16″ length of beads in the one bracelet (not including the button or the ties at the opposite end? I flunked math every year – and still have to ask my husband questions like: how many little sticks in 5/8ths of an inch?
Hi Bobbie! I’m not much for math either, but it is pretty easy if you figure the knot/button clasp adds about 1″ to the bracelet, so the beaded section should be 1″ shorter than your desired bracelet length. So, single 7″ bracelet = 6 inches of beads. Double = 13″ beads. Triple = 20″ of beads. Or thereabouts 🙂 Happy beading!
Ok………I can NOT get this needle threaded……size 13 Beading needle and the thread the instructions said to use…. i have tried the needle threader I final get it in the eye of the needle… and then get the thread through that… it wont go through the eye without shreading the thread……………errrr
HELP….. Cathy
Sorry you are having trouble Cathy – needles can be so frustrating! Try a size 10 needle. It has a slightly larger hole. http://newnativenation.info/guide.html
Hi Melissa! I’m going to round up quite a bit – always better to have too many than not enough … If you figure 14″ of beads per bracelet x 9 bracelets that is 126″ … so eight 16″ strands. Swarovski crystals aren’t sold by the strand, but there would be about 70 on a 16″ strand. So… 70×8 = 560 beads … divide by 144 (# in a gross) and you get about 4GR of 6mm crystals to make your bracelets.
Long answer to say: about 60 6mm beads per 2x wrap bracelet! 🙂
I am trying to find a tutorial that takes this bracelet to the next level with a row in the middle… I found it here and would LOVE to know how its done…
http://www.etsy.com/listing/82872423/custom-single-leather-wrap-cuff it seems to me that they made one bracelet the length of a double wrap. bent it in half then did the figure 8 between the two rows… what I cant seem to figure out is how they are finishing the piece!? How to attach the what would be 4 strands of leather onto the button. Any help would be GREAT!! Thanks
Hi Ashley! I think you are on track with how that bracelet is constructed – I’ve seen a lot of similar ones online and my best guess is that they use buttons with large shanks so those four leather ends can be knotted, probably in two knots, two strands each. Antique buttons or coat buttons might be the key.
Ok.. so got all my supplies.. Have worked learning various knots, been playing with styles and such.. having one issue. Bought 4 ply wax thread and can’t get it through the beads twice. also have a pretty small needle, so not sure if that is a factor. I even pulled the thread down to make it 2 ply, and still can’t get it through the bead. I have a very large selection of beads from over the years, and seems most of them won’t work with this type of thread.. but i really like the look of the waxed.. any suggestions to what will pass through a smaller bead easier ? I tried a thicker cotton thread and it passed thru ok, but just couldn’t keep the tension on the thread to keep it tight enough. HELP !!
Hi Kim! Yes, getting the right thread for the beads is the hardest part. We use Size D SuperLon thread – it is about 0.15mm, and most gemstone bead holes are around 1mm, so it easily fits most. I’m not sure how thick your waxed thread is, but I imagine if you used a single strand of something like our 0.4mm imitation sinew (which is waxed – I think the look you’re after) it should be able to pass 2x through the beads. You could also try using a fairly heavy coat of beeswax on your cotton thread to make it a bit grippier. Hope this helps! Good luck 🙂
SuperLon: https://shop.rings-things.com/cart/pc/showsearchresults.asp?pageStyle=M&resultCnt=10&keyword=superlon+thread
Sinew: https://shop.rings-things.com/cart/pc/showsearchresults.asp?pageStyle=M&resultCnt=10&keyword=sinew
Hi Cindy,
I just wanted to say thanks so much for this clear and detailed tutorial! As soon as I saw this post I knew I wanted to try it out. I made two bracelets back-to-back. The first one took about 1hr 30 min and the second one took 25 min lol. I used leather and acai seed beads which gave the bracelets a really organic look. I am in LOVE with them and I plan to do more.
Thanks so much again!
Excellent! Glad to hear it Laurie – and I love the idea of acai beads – sounds gorgeous!
Cindy! I am very thankful for this tutorial. I am excited to try to make one…This is so clear,I just might be able to make one:) Wish me luck!
Good luck Marilyn! You can do it!! Just stay calm at the beginning when the thread is really long…it gets funner and faster as you go! 🙂
Hi
I’ve been reading this for a while and getting my supplies together and i was wondering, do the size of the beads matter? I got 6mm, 8mm and 10mm.
And btw, this is so amazing, i hope to do these once i finish my exams and have nothing else to do 😀
Hi Bumble! 6mm work great. I’ve become a fan of 4mm too – I have small wrists so they look more in proportion. I’ve seen designs with larger beads, or with small AND large beads – they all look great! Just make sure the holes on your big beads are too big, and consider the total weight if you’re doing a multiple wrap. Have fun!! 🙂
argh… bought all the supplies the article links to, and can’t get past the first step.
i bought size 10 needles.
i bought s-lon cord (via the link above)
I cannot thread my dang needle. even a threading tool won’t work. how are y’all doing it???
I know this is a bit late but I hate hate hate threading needles – so I use our needle end bead cord 61-514-xx. It comes in various colors so you aren’t forced to chose between black and white and you don’t have to thread it! 🙂 which is my favorite part.
Sorry you are having trouble Jenny! I guess I’m just lucky and am able to (usually!) thread needles with no problem…I ended up threading several for other jewelry team members who were struggling! All I can suggest is: holding the needle up to a bright light and/or use a magnifier – use super sharp scissors so the thread doesn’t fray at all – and if all else fails, beg a friend or a stranger at a coffee shop to thread it for you! Good luck! 🙂
Hi Cindy!
I recently began making these wrap bracelets and am hooked on them as well. However, I did a Google search for making these and came upon your blog, which just was so informative even for someone who has been making them already. You provided great information for estimating the length of the leather and threads as well as the number of beads required and the best tip I’ve found was how you wrap the threads 5-6x at the start and end as well as starting and ending with a smaller bead and double stitching them. Terrific! So glad I found your blog!!!!
I love this tutorial. Ladies the bracelets do get easier as you work them. I have 2 of 10 done and I did them in about 2 hours. Cindy thanks for responding to my question, unfortunately I didn’t see it until I started so I ended up with 52 on each one, they could use a little more but the wedding is too close and I can’t wait any longer. I also had to make mine with the bead(button) first and offer several openings to close due to the varying sizes of us in the wedding. I love them. To those that are having trouble with threading I use the big eye needle and Wildfire bead weaving thread size .15 and had no trouble with threading or fraying. It also (don’t ask how) but it seems to help with the tension too, once you pull in tight it stays I had no trouble with loose beads. Again thanks for the tutorial and my best friend is a happy bride, and with any luck the rest of the bridal party will be too when they get their present.
I’m sure they were all thrilled Melissa! What a great gift. I just made one that was a bead too short (because I ran out of thread) but it is my favorite to wear since it doesn’t slide around on my wrist.
Hi,
How do you fasten the thread off at the end of the bracelet? I’m having terrible trouble with it!
Hi Naomi! I like to stitch back through the lashing after the last bead, then tie a knot in the thread and THEN tie the thread and the leather together in an overhand knot. I wish I could sketch this for you. A dab of glue on the leather/thread knot can also be helpful. Hope this helps! 🙂 Cindy
Hi,
The bracelet looks beautiful and the tutorial is so helpful. We featured it on our blog to help crafters who like to make the leather wrapped bracelets. Check out the link here: http://www.handmade-jewelry-club.com/2012/05/free-chan-luu-style-wrapped-leather.html
Cheers!
Jane
I love this bracelet! I’m gonna make one to wear this summer.
I would love to make this and I have everything but the leather cord. Is there any other substitute I could use? Would shoelaces work?
Hi Joy! A shoelace bracelet sounds really fun! You can sub any type of cord for the leather – the resulting bracelet just might be floppier, like Tracy’s green rattail version above. Good luck!
Thanks so very much for the tut. I’ve been eyeing these for a while. I just ordered my leather cord yesterday and will use supplies I have on hand. A great way to use your stash. Thanks again. When I make mine I will post online. 🙂
Awesome, I can’t wait to see it! Feel free to post it on our Facebook page too – we love to see your jewelry creations! https://www.facebook.com/BEAD.FANS
I love the tutorial. I am working on a mens bracelet with onyx 6mm beads and small skull beads for my first attempt.
My question is with regard to thread tension. I am using micro c-ion and am having problems keeping the tension on the “left” sided cord as I thread over the right, around and back through. The right side seems to hold good tension but not the left threads. Any suggestions how to add tension to the thread?
Hi Peter! I think it is natural to have one side seem easier, depending on if you are right or left handed. The only solution I’ve found is to take the time to pull each stitch in tightly by hand. I hope I’m understanding your question correctly, and that my answer makes sense. Basically, it just takes a little extra effort on the loose side to make it tight. Good luck! The skulls and onyx sound great together!
For everyone struggling with threading a needle, here is the answer! I can’t find the label on the package, but they are long, 3 or 4 inches, pretty thin, very flexible and have a huge hole right in the center of the needle. You can’t see the hole. It’s as though 2 thin wires are attached at the ends. The needle separates in the middle. The separation in a 4 inch needle is about 3 inches. You can almost stick your hand through! You just open it up and stick the thread through. Although the needle is quite thin, I have never had one break and they go through the bead holes like a dream. You can get them at your local craft store in the beading section.
Thanks for sharing Kathy! I’ve used those needles before, but it was a long time ago and I thought they’d be too flimsy. Glad they work! We have some from Beadalon in our online store too http://bit.ly/KHbHUF.
hello Cindy.. i love the tutorial its really easy t understand – but im having one absolutely mammoth problem which is getting me fustrated!! I need to buy enough beads to make a triple wrap bracelet. I am making them in swarovski beads, so they are expensive and i dont want to buy too many.. and i dont want to be left with too little.. I know it says 20″ of beads for a triple wrap but that doesnt mean much until im actually making the bracelet 🙁 Would you please be able to count how many beads you have used on a triple wrap bracelet you have made and let me know what size they are too? It would help me so much i cant find information on bead quantitys anywhere!! 🙁
Louise Marie xx
Hi Louise Marie! I use 120 4mm beads or 80 6mm beads for a triple wrap. It takes just two or three beads to lengthen the bracelet by 1/2 inch. Usually you get a MUCH better price on Swarovski crystals when you buy them by the gross, which is 144 beads, so I highly recommend doing that!
For anyone who wants to do the math, there are 25.4 mm in an inch. Just divide 25.4 by the size of your bead (for example 6mm) to figure the number per inch (6mm = 4.2 beads per inch).
Good luck! Happy beading 🙂
loved the bracelet
Great insturctional, and your bracelets are beautiful thank you for the post.
Jewelry Rage
Cindy-
Do you ever have problems with the leather cord finish cracking? Have you ever tried saddle soap or other oil? Haven’t gone to the store to buy it yet, so thought I’d ask if anyone had any thoughts/suggestions first.
Thanks,
Donna
Hi Donna! I haven’t had a problem with the leather cracking on bracelets, but in general I know saddle soap is good for cleaning leather. However, it will dry out and lead to further cracking unless you then seal it with an oil. My concern would be that the oil might stain clothing, so it is probably a good idea to test a piece first and see what happens. Greek leather is less susceptible to cracking since it is very supple and has a durable finish, but any leather that gets nicked could then dry out…so I’d love to hear if you or anyone else figures out a good solution!
Hello Cindy!
Instead of using regular thread for the beads, if I wanted to use the “twisted thread” such as in Tracy’s rattail and dragon blood jasper design (not talking about the leather cord), how would I go about the technique for threading the beads onto the twisted thread? Is it any different from this tutorial which uses regular thread?
Thank you for your help!
Hi Veronica! Yes, the technique is exactly the same, no matter what type of thread or cord you use. Just make sure that the twisted thread can pass through the bead holes 2x before you get started! 🙂
How about using shoelaces instead of leather?
Absolutely! I’d love to see how it turns out – share a picture on our Facebook page if you’d like! https://www.facebook.com/BEAD.FANS
Hi Cindy how are you I am 12 and my mom is 33 and we were wondering if you can help us with the DIY and especally me because I am 12years old but my mom knows how to.So can you please help me and my mom.p.s. just to let you know I am watching your shows on YouTube for the DIY braclet and it looks confusing so can you please help us.From Sapphire Eden,Summer Abernathy
Hi Sapphire! I’m sorry you are having trouble but I’m not sure how I can help. Is there a specific step that you need help understanding?
When I am making my bracelet some of my beads pop up a little and I cannot get the beads to be in a smooth line. Not sure how to clarify this. I think it may be how tight or not tight enough my thread is.
Hi Mandee! Yes, that is the hardest part! Thread tension is definitely key. We’ve found double-stitching through a bead every so often and using smaller beads near the ends to create a taper effect help us keep those little buggers in line. Good luck!
In the jasper rat tail design, how did you do the end? did you make that the alternative way with the button first? do you have another angle? 🙂
thank you!
Hi Justina! I believe the rattail button started with a loop – it just looks different because the button had two large holes and Tracy knotted the cord on the outside to create the “tassel” like finish. 🙂
Hi
Can you tell me what thickness in mm is size D Super-Lon thread?
Thanks 🙂
Hi Katy! For some reason no one – including the manufacturer – seems to list thread thickness…frustrating! Size D is considered “medium fine.” I can’t find an official exact measurement anywhere, but with my calipers it seems to be about 0.19mm. Hope this helps!
Great, thank you!
Size D is .15mm
Lovely bracelet! What do you do with the knotted end of the thread that is “hanging out” with the leather loop – at the very start of the bracelet?
Hi Liz! We just snipped it off close to the leather knot…some people use a bit of glue here. You can also knot it off before the leather knots by stitching back through the lashes before the beads. That probably doesn’t make much sense unless you have already made one though! Good luck 🙂 Cindy
Cindy! This is so clear and you are so good at explaining the steps 🙋🏼♀️🌟🌟🌟 will try it soon❣️Thank you so much
Thanks for the tutorial! What do you do With the thread once you make the final figure eight knots without the beads? Thanks!!
Hi Kendra! I like to stitch back through the lashes that don’t have beads a couple of times and then tie a knot, but everyone seems to have their own method. Hope your bracelets turn out great!
I’ve made one of these bracelets for a male friend of mine and he loves it. I used 1.5 mm black Greek leather with 4mm black onyx round beads.
My problem is that after a couple of weeks of his wearing the bracelet the beads shift along the leather cord causing them to bunch up on each end, which looks horrible. I’m thinking my thread (Nymo D) tension is too tight, but maybe it’s the wrong thread. I don’t wax my thread either.
Any suggestions? Thanks.
Hi Linda! Yes, the tension can be an issue. I think the best solution is to double stitch through a bead ever few inches – that way when the beads shift a bit due to normal wear and tear, they only shift a bit, instead of all the way down the bracelet. Stretching the thread before you start can also help reduce that problem. Even “non-stretch” thread seems to stretch a bit with the weight of that many beads. Hope this helps! Thanks for sharing your results too – it helps us all! 🙂
Is there a way to attach two or three rows of beads at the same time? I would like to make a stacked bracelet without having to make one long row and overlapping? Does that make sense?
Hi Kim! I understand what you are asking but I haven’t made one like that myself. It would take some fiddling to figure out how to end the leather, I think…but there are tutorials out there for sale by people who have figured it out! For example: http://www.etsy.com/listing/74510025/five-and-seven-row-leather-bracelet
Good luck! 🙂
Cindy, thank you so much. I will check it out. Have a great one!!
TOO CUTE!!
Hi Cindy – Can you tell me approximately how many 6mm beads are on a “strand” sold on the rings-things.com website. How many for 5mm beads as well? I was figuring about 30 6mm beads for a single wrap and how many if using 5mm beads. Thank you so much. My girls and I can’t wait to try these!
Hi Heidi! There are about 67 6mm beads per 16″ strand and about 81 5mm beads. Just 2-3 beads difference can really change the fit of the bracelet, so I tell people just to go with what fits best rather than a formula. With the average woman’s wrist being under 7″, it is pretty safe to bet you can make 2 single wrap bracelets with just one 16″ strand of beads. Happy beading!
Thanks for the quick response- here goes!
I want to thank you for posting these directions! I just finished my first attempt at making one and am very happy with the result. I am going to make a bunch as gifts! I would love to send a pic of my bracelet to share. Thanks again!
Yay! Glad to hear it Alexis! If you are on FB you can post the pic to our wall: https://www.facebook.com/BEAD.FANS
🙂
Thank you so much for this!!! I just finished mine and I will use it for my 4-H project!
I found a great book that helped me learn this technique on amazon. Now I finally feel comfortable making a wrap bracelet.
http://www.amazon.com/dp/B0067NOBEA
Hey! Great tutorial! Do you know where I can find the buttons, disks, and charms to clasp the end of the bracelet? Is there any good online website? Thank you so much!
Hi Brooke!
We sell all the parts separately, and also have kits now: https://shop.rings-things.com/cart/pc/showsearchresults.asp?keyword=45-204
Here are a few lists of parts for single leather wrap bracelets: https://shop.rings-things.com/cart/pc/viewCategories.asp?idCategory=4291
https://shop.rings-things.com/cart/pc/viewCategories.asp?idCategory=4146
And we have about 75 different styles of metal, crystal and bone buttons!
https://shop.rings-things.com/cart/pc/showsearchresults.asp?keyword=buttons
I love the bracelets! I got the leather and beads that I need to get started, but still looking for thread. I couldn’t find SuperLon at a craft store such as Michaels or AC Moore. I wanted to buy it physically from a store so I can get started making them right away! I can order if I have to, but was wondering if you have any recommendations for a type of thread that would be sturdy enough for this project and size that I could find at a craft store. I’m not familiar with sizes or types. Any help appreciated! Thanks!
Hi Rosa,
Show your beads to the craft store or bead store staff, and ask which beading thread they recommend, that will go through the beads 2 times.
Also – I remember there is a beading site that does a great job comparing various beading cord sizes. I’ll try to find it and post it here.
I also had trouble finding Super-Lon or Nymo thread at craft stores. I looked at the regular thread display and saw that upholstery thread was 100% nylon. The colors are limited, but I found one that matches. I’m working on my first bracelet now and it seems to be going well with the upholstery thread.
Amazing tutorial, I have a bracelet I have been dying to fix for years, the beads gave way from the thread. Wondering if there is any alternative to the leather cord? I do my best not to buy or wear leather.
Any advice?
Thanks so much.
I was at the craft store & found lots of waxed cotton string & hemp cords, maybe those would work in place of leather?
Hi Kendra,
They won’t give you quite the same look or feel, but they should work. 1.5mm – 2mm waxed cotton should work very nicely in place of the leather. Most hemp cord is a little thinner, and more flexible, so it might be trickier and/or give you a different look.
Thanks so much Cindy, great tutorial and love the photos. I have a bracelet I have wanted to fix for years, a number of the beads gave way from the thread.
Wondering if there is an alternative to the leather cord?
I do my best nowadays not to buy or wear leather.
Thanks so much.
Hi Julie,
I would try the cotton cord in the first row here:
https://shop.rings-things.com/cart/pc/Cable-Cord-Ribbon-Thread-c510.htm 1mm might be a little thin, 2mm would be about right, and 3mm would be ok, especially for beads 6mm and up.
Or maybe the Linen Cord (but only for tiny gemstone beads, maybe 3-4mm).
The 2mm rubber cord might also work, but I think wouldn’t be as durable with cord wrapped tightly around it. Vinyl bolo cord could be interesting, but finishing the ends would be problematic.
Hello!
I’m making a bracelet for a friend’s birthday, and I was wondering how long the leather needed to be for a double wrap bracelet?
Hi Savannah,
The formula is double your finished bracelet length plus extra for making the knots. For single-wrap bracelet, measure your wrist and then triple that number to get the length of leather needed (7″ wrist = 21″ of leather). For a triple-wrap, multiply your wrist by seven (7″ wrist = 49″ leather). So for a double-wrap, somwhere in between – like 3.5 to 4.x
er, I mean between 3 and 7, so about 5x. Sorry.
How do you start again when you run ought of your length of thread before you finish beading? Do you again start the figure eight? Thanks so much.
It’s best if you can avoid running out of thread (start with 10-12 feet to avoid running out). But if you do, start a few beads back and go through them again. This means you’ll have to go through some of your beads 4x, which (depending on your beads and cord) might be impossible. Other problems are that your bracelet will be weaker than if you were able to use 1 continuous thread, and you’ll be able to see the section that has twice as much cord as the rest of the bracelet.
Can you tell me exactly what type of cord and thread was used in the rattail and dragon blood jasper design? I love the way the cord looks instead of leather and the thread looks heavier than other threads “ve seen in these bracelets but I like it. Thank you!
Hi Pam!
I used the 61-741 series rattail and the 61-514-52 Jade Green needle end cord. We do not have the exact color rattail I used anymore, but we still carry a number of colors to choose from. I do have a bit of bead wiggle since my cording is not as stiff as the leather, but I put extra lashing in my design and just smooth out the ends once it is on my wrist. I like how soft it is and it’s really comfortable to wear.
Thank you so much for the response!
if you are making a triple wrap bracelet what formula do you use for the length of the thread. I don’t want to run out, but I don’t want to work with it ridiculously too long. Thanks.
Hi Dr. Baba,
You’re right – you definitely don’t want to run out. Although this length may seem difficult, cut a long piece of thread (10-12 feet), then double the cord after threading the needle. (See steps 2 and 3 above).
How fabulous!
When you say Double stitch, do you mean to go through the bead 4 times?
Yes, normally you just go through each bead twice (once from the bottom, then over the top cord, and back through from the top). To tighten things up, repeat that whole process.
If your bead holes are too small to repeat that process, then your bracelet is *likely* to not need any tightening anyhow.
These look so cute! I stopped by Michaels last night and got everything I need to make a triple wrap bracelet. My question is this: as a homeschooling mom, this is going to be my nap time/after bed time project; any thoughts on the best way to “pause” the process, as well as how best to store it? Thanks in advance for any and all help!
Hi Danielle,
I think you should be able to gently coil it up, perhaps a separate coil for the needle & thread, and put it in a tray or small box.
If you want to get fancy, you could even use these nifty Bead Stoppers:
https://shop.rings-things.com/cart/pc/showsearchresults.asp?keyword=69-14+bead+stopper
They’ve saved many projects from terrible spills.
Hi I was wondering of the thread that is 10-12 ft long is for a triple wrap bracelet? I’ve made a triple wrap (my favorite) and my thread seems to always be too short, and I have fairly small wrists. How much would you recommend for a triple wrap? Thanks.
Hi Jennifer,
I thought the 10-12 feet should work for a triple wrap, but there are a few variables that could change it. I have a few questions to try to narrow this down:
a. Roughly how much of your bracelet are you completing before you run out? (How many wraps, or how many inches?)
b. What size/shape beads are you using?
c. What diameter is your outer (heavy) cord?
Hi. I also ran out of thread for a triple wrap. I cut 6 feet of size 2 Beadstring (not doubled) and got 2/3 of the way through. I’m using 4mm beads and 2mm leather cord. I’ll try starting my new thread a few beads back, as was suggested to Rachel.
What went wrong? Any do you have any other tips, both for starting a new thread, and avoiding this problem in the first place?
Hi Tricia and Jennifer,
I’ve asked around and we’re stumped!
Quite a few people here have made triple-wrap bracelets using this math for the leather: multiply your wrist by seven (7″ wrist = 49″ leather), and then 10-12 feet (doubling it, so it’s 5-6 feet doubled) for the bead cord, and had no problem. For a larger wrist, you’d need to add a bit more cord of course.
But you have excellent company in blog-comment-land. We’re just not sure what is going on differently, since it’s not an issue we’ve run into.
Any suggestions for starting the new thread?
Hi Tricia,
Sorry, no fresh tips (just the ones in the suggestions to comments above), for starting a new piece of thread.
Other than this one from Jaci here at R&T who says “get really good at hiding knots in your beads”. She doesn’t mean that in any negative way — it is what she’s had to do with other projects, but for some reason she hasn’t needed it with this style of bracelet.
I’m wondering if some of the 2mm leather cord out there in the world, is really 2.5mm and this makes enough difference? I know that our goatskin leather cord from India varies +/- 0.2 or maybe even 0.3mm on rare occasions, but not 0.5mm.
Thank you for this tutorial! I Just made my first one with leather cord and beads from other projects. I used a strong thread I had in my sewing kit so I’m not sure it will last too long, but we’ll see! And the leather is wide, so it lays differently than a round cord, but it still looks pretty good for my first attempt! Not sure if my ends will hold, but with a dab of glue, I hold out hope. I can’t wait to hit Michaels and purchase some of the right materials to make more of these.
Thank you for sharing this!!!!!!!
~Cindy N.S.
Thanks for the tutorial! Going to try to make one 🙂
Great tutorial!
I used the metalic leather cord on one yesterday, it looks real nice but the leather is already cracking on the knots and button loop, any suggestions?
If anyone gets really stuck I know that my local Michaels has a class on how to make this.
Hi Amy,
That may simply be a limitation of the finish/coating on the metallic leather cord. I recommend asking your supplier, partially in case they have a good idea, and partially to make them aware it cracks when used that way. The only “repair” I can think of — but I’m not sure how well it will work — is to use metallic pens to touch up the leather where it is cracking.
~Polly
Hi, I am looking for thread to use for my bracelet and i would like to order from only one site! So the types of threads they carry are C-Lon Cord and C-Lon Thread in size D. The C-Lon Cord does not come in any sort of Lettered size. So if you don’t know what im talking about, C-Lon Cord is a heavy, twisted nylon light cord that is fairly stiff. It is small enough to fit though most beads 6 mm and up, including 6 mm Swarovski Crystals. Then there is C-Lon Thread which is Size D – Standard weight beading thread for peyote, square stitch, brick stitch, beadweaving, loom weaving, and all types of bead work with seed beads.
Which material do you recommend?
Hi Malee,
What types of beads and leather cord are you looking for? Maybe I can help you find them on our site (http://rings-things.com)
We have links to all the recommended cording and many, many gemstone beads up above in our blog post.
Hi, another question where can I find the button on your:
“Wrapped bracelet made with green opal gemstone beads and natural Greek leather.”?
Hi Marabella,
The button-style closure on the green opal bracelet is a 16mm wavy disk bead:
https://shop.rings-things.com/cart/pc/Bead-Wavy-Disk-16mm-421p26903.htm
I want to learn to make these beautiful bracelets. What size needle do I need to order? Thanks.
Hi Jonette,
Size 12 beading needles
(https://shop.rings-things.com/cart/pc/showsearchresults.asp?pageStyle=M&keyword=65-000-12)
work great with the Size D SuperLon, and work with most gemstone beads.
We use them in our kits
(https://shop.rings-things.com/cart/pc/showsearchresults.asp?keyword=wrap+bracelet+kit)
Thanks for asking! I’ll go edit the article right now to add that note.
Thanks!
I love the beads and leather together! beautiful!
I have searched for two days for a tutorial on these bracelets. Your tutorial is by far the simplest and best explained that I’ve found so far! I’ll be going to Michaels this weekend because there isn’t a craft shop within 30 miles from where I live :(. Thanks so much for this tutorial!
Thanks Brenda!
If the quality at Michaels doesn’t work out for you (they vary!), you can of course buy from us (http://www.rings-things.com/). All the links above lead to the items in our online store. But I understand wanting to see the items “in person” before buying, so hopefully one of our Bead Shows (http://www.rings-things.com/show) is near you in the Spring or Fall and you come check us out!
What a great tutorial thanks so much for sharing Im going to try and make one now,I wasnt confident before now I am. Thanks
Thanks Jen! Let us know how it turns out.
p.s. Those are awesome photos from Art n Soul on your blog!
Thank you SO MUCH for this tutorial! I found this on Pinterest, and pinned it awhile back. Although I went out and purchased the supplies I needed, I put off making it. I thought it looked a bit complicated. I was SO wrong! I made my 1st one last night and I LOVE it! It was really easy, and snappy. I finished it in nothing flat! I’m already making my 3rd…in less than 24hrs! I always wear lots of bracelets and cuffs and I am really grateful that I don’t have to spend loads of cash on my obsession. This bracelet IS my new obsession. Thank you. Thank you. THANK YOU, Cindy!!! :))
Just started making some bracelets to give away as Christmas presents, and let me tell you, they are turning out BEAUTIFULLY! They are super easy (and yet entertaining) to make, and there are infinite customizing possibilities. These wrap bracelets are the first kind of jewelry craft I’ve done, and yet they look deceptively complicated once finished. The hardest part about the whole process is keeping the thread from tangling (but that is most likely a user error). Thanks for this great how-to post!
Hi Pearl,
That’s great to hear!
~Polly
Hi there. Have you tried making these bracelets with 1mm leather cord? I can get a whole roll really cheap so would prefer to use that if I can. Great page, will be making some of these tonight, thanks heaps!
Hi Stephanie,
1mm can also work, but make sure it is good quality, or it may crack and break.
~Polly
Hi Stephanie,
Although I haven’t done it myself, I’m sure you can use thinner leather. I’d suggest using smaller beads with the thinner leather (4-6mm instead of 8mm or bigger.) I think your end result will be more flexible than if strung with a thicker leather base. ~ Rita
Hi. I dont’ understand the most basic thing: how to make a loop to put a button thru for closure. Can you recommend a website or video on youtube that might explain for me?
Hi CeCe,
Fold your cord in half, so the loose ends hang down together at one end, and the other end has a loop (like in the picture marked “step 3”). About 1 inch from the curved end (with enough room for your button to fit through once the knot it tight), tie a plain basic knot. The most common knot is a basic overhand knot, but simply tie any knot that will stay in place. You now have a loop at the top.
Oh hey – I didn’t think I could provide a link, but I googled “overhand knot with loop” and actually got some decent google image results!
Hi, i was wondering if there is a way to somehow incorporate a small silver plate or something of the kind in the bracelet?…sort of like beads, then tie the string through holes in a small silver plate and then beads again…sorry if its confusing i dont really know how to explain it haha 🙂
Thank you, and sorry if it was misleading!
Hi Sarah, I’m sure there is a way!
You might even be able to add the silver plate after the entire bracelet is done.
I’m betting you mean something like a stamped nameplate.
If the plate is very long, you’ll want it to be a bit curved, to match the curve of the rest of the bracelet.
Yeah that’s it! Except im hoping to engrave names in Ogham (an old Gaelic thing). Do you have any suggestions on how to make one of them? And how to attach it to the bracelet? Thank you!
Hi Sarah,
I’d rather mount a nameplate to this type of leather bracelet: https://shop.rings-things.com/cart/pc/Leather-Bracelets-c889.htm
You could stitch it on with a needle and tough thread like Super-Lon, or if it were me, I would rivet it on. But then again, I rivet everything! All you need are 1/16″ or 3/32″ holes for my favorite riveting system, and you can attach them like this: https://shop.rings-things.com/cart/pc/Solar-Power-Riveted-Leather-Bracelet-c4957.htm, or with larger holes you could use Rapid Rivets.
Hi! I am stuck on step 3!! Knot the leather and thread together? It doesnt say how?! Please help!!! Thank you!!!
Hi Kim,
See if this helps:
http://www.rings-things.com/blog/2011/03/08/how-to-make-wrapped-leather-bracelets/comment-page-3/#comment-6114
how long do these wrap bracelets take to make? The triple wrap and the single?
Hi Diane,
The first one may be a bit slow, but after you get the rhythm down they are pretty quick!
One poster said she was a bit worried before she started, but when she posted, she was making her 3rd in less than 24 hours!
Im thinking of making some of these bracelets for my ETSY store and was wondering one could find such cute buttons and charms? I have searched high and low and have no clue where to look.
Thank you
Karen
Hi Karen, Everything in this blog post is available from Rings & Things! I’ve gone through to add a few more links. You can also try searching our store (www.rings-things.com) for TierraCast Buttons, and you’ll see most of these, plus some newer styles.
If there is any particular item that I miss a link for, and you can’t find, let me know and I’ll supply a link for that too.
Thank you, a great tutorial, followed really easy and first time I have made anything like that.
Hi !
I’ve made some cylindrical paper beads 10mm in length, and was wondering if they would still work if they were the only thing altered in the bracelet ?
Thanks ! 🙂
Hi Madison.
One thing that will definitely be different is the length of thread needed. The thread goes through each bead and wraps around the heavier (leather) cord, so if you change from a 4mm or 6mm bead to a 10mm bead, you need roughly twice as much thread — possibly more if the beads are also narrower. Because if your beads are only 2mm wide compared to a 6mm wide round bead, you’ll need to use 3x more beads to fill the same bracelet! (So everything would then be tripled, since you’d also wrap around the leather cord 3x more often.)
But what I would be more concerned about is strength. Gemstone beads are basically fancy rocks, so are strong. And, round beads are strong, whereas tubes and cylinders are more prone to breakage along their length. I would be concerned about any 10mm tube or cylinder forming the “ribs” of a bracelet like this.
However, if you make some smaller/shorter bicone shaped beads from a long skinny triangle/pennant shaped paper, I think the design would work with no significant modifications. Aim for roughly 4-6mm in all three dimensions, and you’ll have a sturdy design.
je ne parle que francais et je m’interesse a ce genre de bracelet car je suis actuellement hospitaliser et donc bloquer parler vous francais merci
Salut, je ne parle pas français, mais j’utilise Google Translate: http://translate.google.com/ J’espère que cela aide!
Essayez Google Chrome, car il a un traducteur intégré:
http://www.rings-things.com/blog/2013/01/24/an-easy-way-to-translate-websites
I’ve made a few of these now & love them. Instructions were easy to follow. Only question I have is what type of glue / adhesive should be used to secure the leather knot / thread. I’m too nervous to leave it as-is, & feel more comfortable with some type of glue on the knotted ends as a safety net. What brand is best? Thanks.
Household white glue (like Elmer’s glue) is fine.
Most superglues are brittle, and not recommended. You might want to try samples of glues you have around the house, on sample knots, to see which glues glob up, or change the color of your leather, etc.
GS Hypo Fabric Cement is nice, because it is flexible and adheres nicely to nearly every type of textile and plastic.
Thanks, Polly! I’ve been using Elmer’s white glue up to this point, but wasn’t sure if there was a better solution. I appreciate your assistance!
Wouldn’t Ellmer glue dissolve if it got wet by accident after a few times?
Thanks for this tutorial! I was wondering if it is possible to use cotton instead of nylon to thread the beads? Do you think it is sturdy enough?
Hi Marisela,
It depends on the quality and the thickness of the cotton cord/thread. Some are great, but others may stretch out over time, leaving the bracelet a bit odd looking and gappy. Others may break or fray. To see if it is strong enough, simply unspool a foot or so, wrap it around your hands and try to break it. And to discover if it frays, start making the bracelet, and if it starts getting too fuzzy after going through a few dozen beads, you know it will be a mess by the time you get to the end of your bracelet.
Sorry I couldn’t give you a definitive answer, but there are so many possibilities, that even if you told me the exact brand, weight and type, it would probably be one I’ve never tried.
~Polly
I just want to say, “I LOVE YOU!!!” haha. There is a pink jade wrap bracelet that I just fell in love with from ‘Sundance’ company. However, I was NOT in love with the $190 price tag…. By using your tutorial, I can get enough pink jade and all the leather and thread components for around $30….+ my time….THAT is a beautiful thing….THANK YOU A MILLION TIMES!!!
Heather
Hi Heather,
There is some great jewelry in Sundance’s catalog … and I like that it is handmade by artisan craftspeople … but oh yes, if you know how to make it yourself, you can usually cut your cost to 1/4 or even better.
i use quilting thread or upholstery thread, in the thread area you can find it. very very strong.
I was wondering if you had a tutorial for a bracelet using two different types of beads. I have a bracelet with pearls in the center and two smaller beads on the outside. I’ve been looking everywhere and cant find a tutorial.
Hi Erin, Can you link to an example similar? There are a few ways I can picture the bracelet you’re describing, and want to make sure that if we write a tutorial its for one that matches your bracelet.
I am looking for instructions for this type of bracelet with 3 rows. Can you post something like this? Or tell me where I can find this? I’ve been looking everywhere. Thanks.
Hi Elaine, can you link to a photo of the type of bracelet you want to make? ~Polly
Very pretty:) Thank you very much))
This was exactly what i needed! Thank you, the directions are very clear and easy to follow. 🙂
How do you hide the knot of thread from the beginning in which you made the button hole?
Hi Kristen, Usually you don’t. Just practice making a nice knot. Take a look at some of the ones you see people wearing — If they have a button, they also have a visible knot. You just don’t really notice it, since it is on the backside, and is part of the handmade charm.
~Polly
Hi, This doesn’t answer the question. We want to know about at the beginning, where you tie the leather with the thread, when done what do you with the exposed thread in the loop?
Thank you.
Sonja
Pull the thread knot tight against the leather knot, and clip the tails off (a little glue can be added to reinforce the knot). The thread knot is still visible, but only if you look closely.
I realize this knot is the other end (not the loop end), but it shows the process well due to the contrasting thread color:
http://www.rings-things.com/blog/wp-content/uploads/2011/03/rattail-option-1024×791.jpg
This image shows the same thing at the loop end, but not yet finished. The threads are still hanging out — they need to get tied off against the knot, and trimmed:
http://www.rings-things.com/blog/wp-content/uploads/2011/03/start-or-end.jpg
great tutorial ! if I am making a 5 wrap bracelet what length of thread should I use? How do you keep the thread from tangling up? thanks !
Hi D’Ann,
A 3-wrap uses 10-12 feet, so multiply that by 5/3 to get a 5-wrap. That gives you about 17-20 feet.
How do you keep it from tangling? That’s certainly going to be a challenge!! You might want to try these thread bobbins that are popular for Kumihimo.
~Polly
I have made lots of these wrapped bracelets using both glass and stone beads. My most repetitive problem when using the two needle procedure, is that when I pass the needles through the bead, I either spear through the big eye needle or through the other thread, which is a headache. I have tried using the one needle method and even using a sewing needle but then I am still splitting the previously strung thread. I am using either “Nymo” size D or “Purely Silk” size 3 and I do use beeswax. Can you tell m what I’m doing wrong?
To the best of my knowledge, when going through the same small bead multiple times whether using one or 2 needles, you will invariably go through your previously strung thread at least some of the time. Your best bet is to try different types of cord, and find one that frays less when you go through it. We’ve been quite happy with SuperLon. I’ve used Nymo in the past for beadweaving, and although beeswax helped, it certainly did not eliminate the fraying and shredding that arose from going through the same bead too many times.
Hi, when beadin, do you add the beads one at a time, or string them all before you start?
Hi Jenni,
You string them one at a time.
~Polly
Like Elaine, I want to make a 3 row bracelet but unsure as to how to finish the ends since there will be 4 strands of leather. Just thinking that the knot will be too large, any suggestions?
Hello and thank you for this tutorial it is very helpful but instead of leather is it possible for me to use say friendship bracelet string or some other types? Thanks again!
I wanted to make multi-row bracelets too. I found a video on Youtube about how to make a triple row beaded wrap bracelet. It was exactly what I needed to see. I hope it helps those who were looking for info on how to do them. http://www.youtube.com/watch?v=9G7_EU6_QuA (Not my video, I just found it via Google…)
I am curious what type of knot you use to tie off a button that has a loop in the back rather than a through hole button.
Thanks!
Hi Charlie,
Use the same type of knot if possible. But if the button loop is too small, then you will have to experiment to find a knot that works for your combination of components. ~Polly
I cant fit the needle and tread through my bead as the hole in the bead is small. what size hole or bead do you suggest? is it possible to enlarge the hole in the bead?
Hi Cindy,
Yes, you can enlarge the hole in the bead … but it is a slow process (it would take too long to enlarge ALL the holes in ALL your beads). Usually when just a few beads from a strand (or bag) don’t work, you set those aside for another project. If the whole strand doesn’t work, then you can buy a strand from us (see links in article above), or you can buy smaller needles and thinner thread (if you can’t find them locally, we’re happy to ship to you — see links above to recommended items).
We also have kits which include all the parts you need: https://shop.rings-things.com/cart/search/search.asp?keywords=wrapped+leather+bracelet+kit
~Polly
I have made a 32 inch bracelet and after a short time it gets all twisted and bunched up. it seems the leather on one side is not even with the other side after a while and the beads are really getting twisted up. how do you prevent this?
thanks…
Hi Linda,
It sounds like your string tension is not consistent, but this could be either because sometimes you’re stringing tighter, and other times you’re stringing looser — or, it could be the quality or type of string or leather. If you’re sure you are keeping your string tension consistent while you’re working on it, then the type of thread might not be the right quality. We use thread that says “no stretch”. Cheap leather cord can stretch or deform too.
~Polly
I love these bracelets, and your instructions are very good. My question is – what do you do if you run out of thread before you’re finished? Can you knot more thread onto the original thread? The amount of thread needed for a 5-wrap bracelet is unmanageable! Thank you for your help!
Adding more thread is kind of a pain, but is sometimes unavoidable. If your bead holes are large enough, you can knot more thread onto the original thread. But if the bead holes are very small, the knot won’t go through.
“How to add more thread” is our most commonly asked question, so you are definitely not alone =) It’s been answered in a few ways in the previous comments… but there are 292 comments to this article now so it’s harder to find than it used to be! I personally have not made these bracelets, so I don’t want to try to answer it myself, but I will try to provide links to the previous questions and/or I will copy the replies into the original post, so no one has to scroll through 292 comments to find the answer =)
~Polly
Hi! I selected some of the best tips about starting new thread, and put them at the end of the blog article so they are easy to find.
I am new at beading so I think I have the right needle now.. I was unaware of beading needles verses regular needles.. I feel really stupid.. I paid almost $200.00 for my wrapped 5 bracelet . I am sure I can make one now.. thank you so much .
Hi, I’ve been beading for many years. My questions is I always used beading thread called Nymo. I finally found Superlon, but it is only in white and black. I wondered if I could use sharpies to “color” the Superlon to match my leather? Since Sharpie’s are permanent I wondered if it would work on the white Superlon….this would be great with sharpies having every color under the sun? Thanks, Joni. My beading line is actually called Firelon. Haven’t found Superlon.
Sincerely,
Joni
Hi Joni,
We carry several color mixes for superlon “D” cord here at Rings & Things
https://shop.rings-things.com/cart/search/search.asp?keywords=61-719+superlon
and the colors that we use for the kits we sell are available individually
https://shop.rings-things.com/cart/search/search.asp?keywords=61-718+super-lon
I can’t say if using sharpie on the firelon would work, but if you test it out, please let us know your results.
~ Rita
Hi, how can you stop beads popping up, I’ve made a few 5x wraps, and every time I get disappointed , please help!
Hi,
I made my first beaded wrap bracelet today. Thank you for your easy to follow directions and the pictures. I was so happy on the way mine turned out. I love Tracy’s rattail and dragon blood jasper bracelet and I was wondering what the color is of the rattail cord she used was? I really want to do something with that color cord. Thank you.
Hi Kristin,
I believe that is Size #2 Rust Rattail.
It’s special-order only, but that doesn’t mean you have to jump through any special hoops to order it. It just means it takes an extra 3-4 weeks to receive it.
~Polly
Great tutorial! I’ve made a couple of wrap bracelets and I have an issue with a couple of the beads puckering up out of alignment after it’s all finished. And my leather bracelet seems to have a bend at both or one end! Am I pulling the thread to tight? How can I fix this problem happening again? Thanks!
Hi Sofia,
We’ve found that double-stitching through a bead every so often and using smaller beads near the ends to create a taper effect help keep the beads from puckering.
The bend at the end(s) is probably just what you’re thinking, caused by pulling the thread a bit too tight. Try 2-3 smaller beads at the ends of the bracelet instead.
I’m just starting out and I’m wondering if I could double the thread to make my bracelet stronger. My beads are 6mm and I am using size 6 nylon thread for now. Thanks
Hi Kris,
It’s certainly worth a try. We haven’t tried every brand, size or manufacturer yet =), so please keep us posted on how well it works out, or any tricks you learn while doing it.
~Polly
Hi! I was just wondering if it’s possible to use beading wire for this project instead of the thread?
Hi,
It’s possible, but there are a few drawbacks. Beading wire is a lot stiffer, so the entire bracelet will have a different feel. And beading wire doesn’t knot as well as beading thread, so you’ll need to figure out an alternate way to start and end your piece. Beading wire is also usually thicker, so be sure to see if you can run it through your beads 2x before you begin stringing. ~Polly
Hi There
I love this tutorial – and I hope you don’t mind but I have linked to it on my blog where I featured the bracelet I made from it? If you’d like to have a look, the blog post is here: http://wp.me/p2zUoA-56
Cheers
TJay
It looks great! Nice job (and your experiment using materials on hand (tiger tail), nicely answers the question “can I use beading cable?”)
~Polly
I am going to buy beads for a camp I am teaching for middle school girls. If we were going to make a two wrap bracelet, can you give me an estimate of the amount of beads I would need?
Hi Roseann,
What size beads are you using? There about approx. 67 round 6mm beads per 16″ strand, or 102 4mm beads per 16″ strand. (Most gemstone beads are sold on 8″ or 16″ strands.). I can’t see the article from where I approve and reply to questions, so I will check the article to see how many beads are used in the triple wrap and then finish replying later today. ~Polly
ahi, I wanted to know how to calculate a 5x wrap
Hi sara,
It is wrist size x the number of wraps x 2, + approximately 7″ for knots.
So for a 7″ wrist:
7″ x 5 wraps = 35″
35″ x 2 = 70″
70 + 7″ for knots = 77″.
~Polly
They are all great kits that would make fabulous pieces of bracelets that would go with most outfits. Thanks for explaining easily. Nice post
I’m also curious how you keep beads from popping up? I’ve been using a double-needle method (because I like the symmetry of having both threads at an angle), but occasionally some of the beads want to pop up a little. Is it an issue of tension, or is it a problem with using the double-needle method? Thank you!
Hi Catherine,
I don’t think the double-needle method is causing a problem. The tension is a good possibility (it can be tough to keep it perfect), but also, some beads aren’t always drilled through the center, or may have tiny flat spots on the ends and these spots can mess with the bead(s) next to them. I personally have not made these bracelets although I’ve done similar work – please check the other comments for some advice from others here at R&T who have made these exact bracelets. ~Polly
Thanks for the great tutorial. I’ve made a few of these wrap bracelets with Greek leather cord, and I’m left disappointed after all that work when the leather where the button goes through starts to disintegrate. This has happened with each of my bracelets after wearing them only 3-4 times. I’m not getting them wet. Does this mean I was sold junk instead of real leather cord? I recently bought some cotton cord so I can redo these bracelets, but I like the look of leather and would like to use up the rest of my supply. I’m afraid to use it though if they are only going to fall apart again. Do you have any suggestions for how I can treat the leather where the button goes through so it doesn’t fall apart?
Hi Julie,
I thought I replied months ago but I don’t see it now. My apologies for not checking to make sure my reply actually saved and posted! There are a lot of qualities of leather cord. Usually the Greek leather is sturdy (cured better than most other leather cord), but it sounds like yours is just not as good as it should be. That is frequently the case with leather cord purchased from “big box” craft stores (and occasionally bead stores that don’t know who to get good leather cord from). Before making a bracelet you may be able to test your cord by tugging hard on it. Most of us shouldn’t be able to break it with just hand tug strength, but the color will probably crack on some colors when stretched like this (white is often the most fragile color). Maybe find a local store that specializes in leather supplies and ask them what their best leather cord is, and try that. And of course, we’re happy to ship our Greek leather cord (http://www.rings-things.com/Products/Greek-Leather-Cord-Superior-Quality/) anywhere in the world! ~Polly
I used embroidery thread to make several wrap bracelets. I was upset when the one I wear often broke at the thread. I intend to redo mine with silk thread like you use when stringing pearls.
Good idea, Nicole! I love the colors and textures available in embroidery thread, but it’s not really designed for “standalone” tensile strength. The silk thread for pearl stringing should give you the strength you need, to keep wearing that bracelet for years (or decades!). ~Polly
[…] Handmade Leather Wrap Bracelet […]