How to solder custom frame pendants
Soldered glass pendant frame necklace created with R&T’s soft soldering kit.
Solder is a confusing topic. There are two completely different soldering methods used in jewelry making, yet people rarely explain which type they’re talking about – much the way people say they spent the weekend simply “at the lake.” (If they are your friends, you do know which lake … and hopefully this post will help you make friends with solder!)
Solder is a metal alloy that is melted to connect or coat metal pieces. I think of it as hot metal glue. Soldering is the act of melting and applying solder. The two soldering methods are:
- Soldering with a torch. Often called hard soldering, brazing or silver soldering, although copper, brass, gold and other metals can be torch soldered. There are different grades of hard solder (which melt at different temperatures, and just to confuse things further, are called soft, medium and hard). We’ll talk more about this type of soldering in a future post.
- Soldering with a soldering iron. This is often referred to as soft soldering, and is used with base metals (like pewter) and plated metals. The solder is made mostly of tin and has a (relatively) low melting temperature. Never use a soldering iron with precious metal jewelry: it will ruin the jewelry.
Therefore, if jewelry is made of silver or gold, it has to be torch soldered. Successful soldering requires heating the metal pieces, not just melting the solder, so if the piece is very large or thick, it’s probably torch soldered as well. Now that you know the general soldering landscape, we are ready to jump into Lake Soldering Iron!
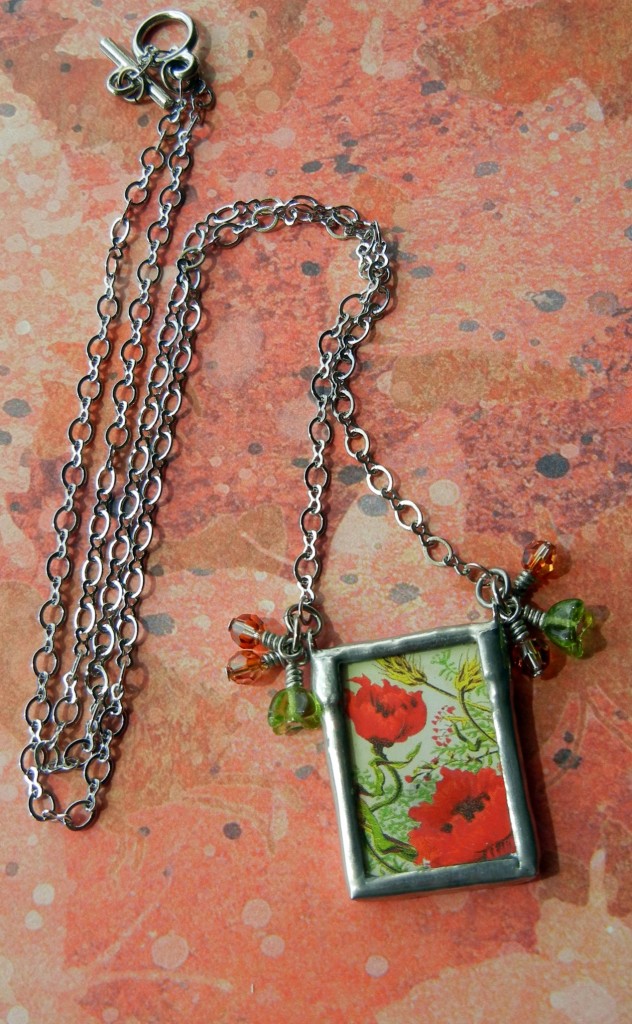
Mollie’s Poppy Field soldered pendant necklace uses two #41-254-1 fold-over crimp ends instead of jump rings as hangers.
First off, not all soldering irons are created equal. There are many varieties on the market and most were not designed for jewelry making. The two most important things to look for are tip style and wattage. We recommend a 60-watt chisel-tip soldering iron. The pointy tip irons are designed for tiny electronics like circuit boards and are of little use for jewelry, other than sealing jump rings. Lower than 60 watts might not heat up enough. The 100w Choice soldering iron and 60w Hakko soldering iron meet both requirements! (Simply Swank no longer produces soldering irons and soldering accessories.)
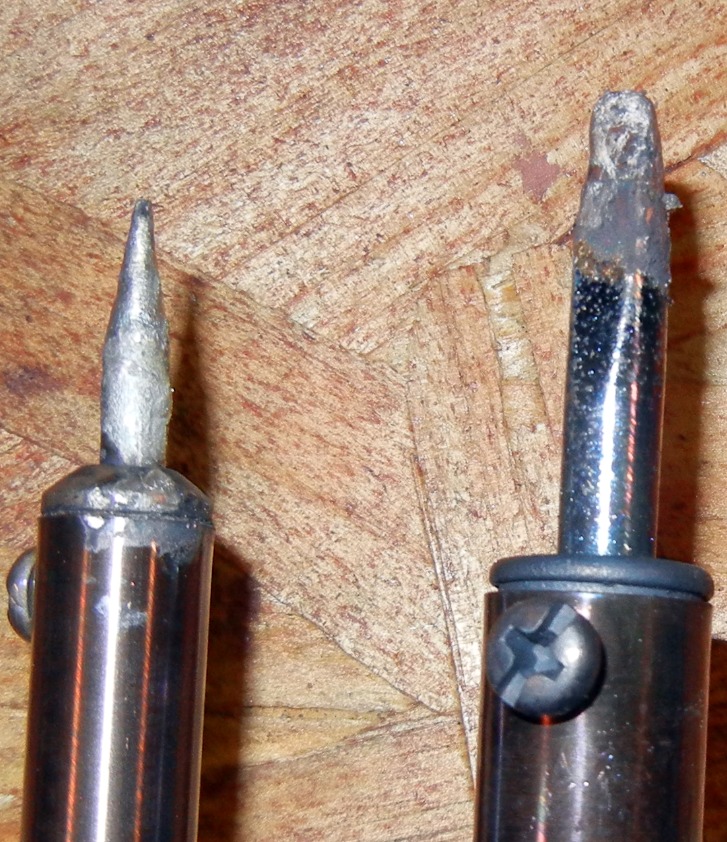
The iron on the left has a pointy tip (not recommended). The iron on the right has the recommended chisel tip, but needs to be cleaned! Soldering is difficult when the tip is black and crusty – if the wet sponge doesn’t help while you are working, let the iron cool and then file off the gunk.
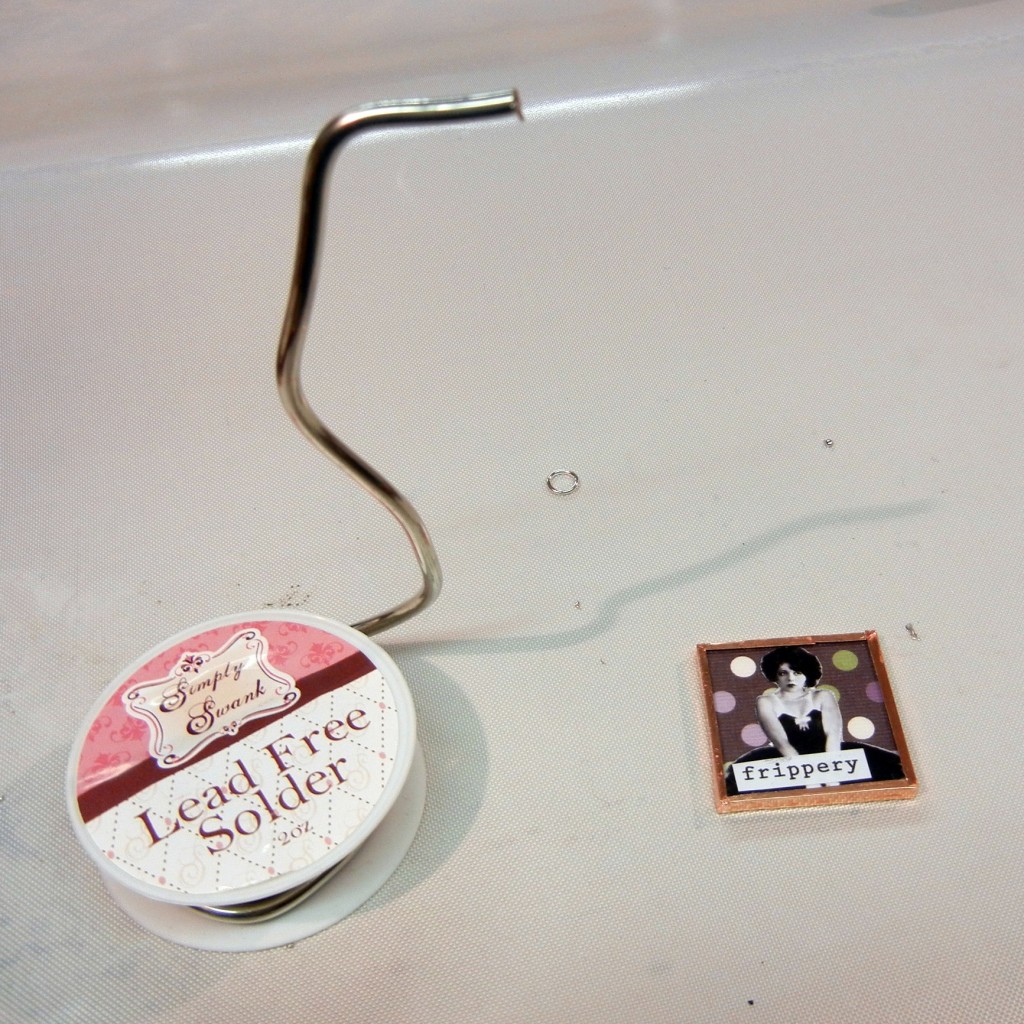
Next, the solder itself. It is important to use lead-free solid-core solder. Avoid solders that have rosin or acid cores. Rings & Things sells Choice, SILVERGLEEM, and Staybrite silver solder. All 3 work great with soldering irons; Staybrite is more expensive because of its higher silver content.
Third, flux. All solder requires flux in order to melt and flow. Flux is included with the Staybrite solder. LA-CO Brite flux is a packaged in a 4oz bottle, and is designed to be dripped or brushed onto your project.
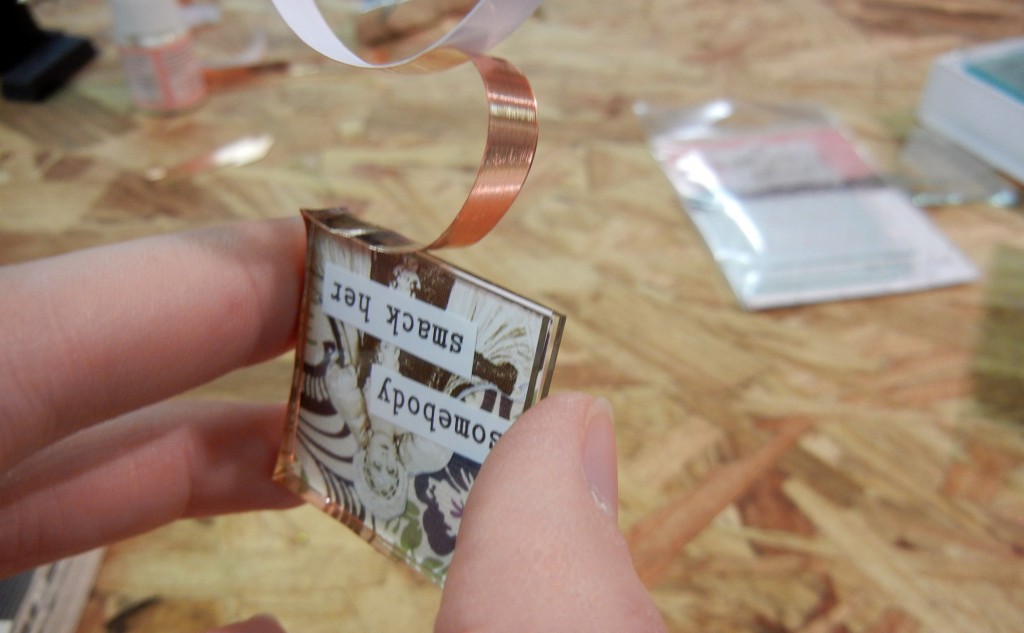
Copper tape creates the metal base needed for the solder to flow onto.
Sandwich images between 2 pieces of glass and wrap edges with copper foil tape. Burnish smooth.
Clean with alcohol to remove any oils from your fingers – a clean surface is the best soldering surface!
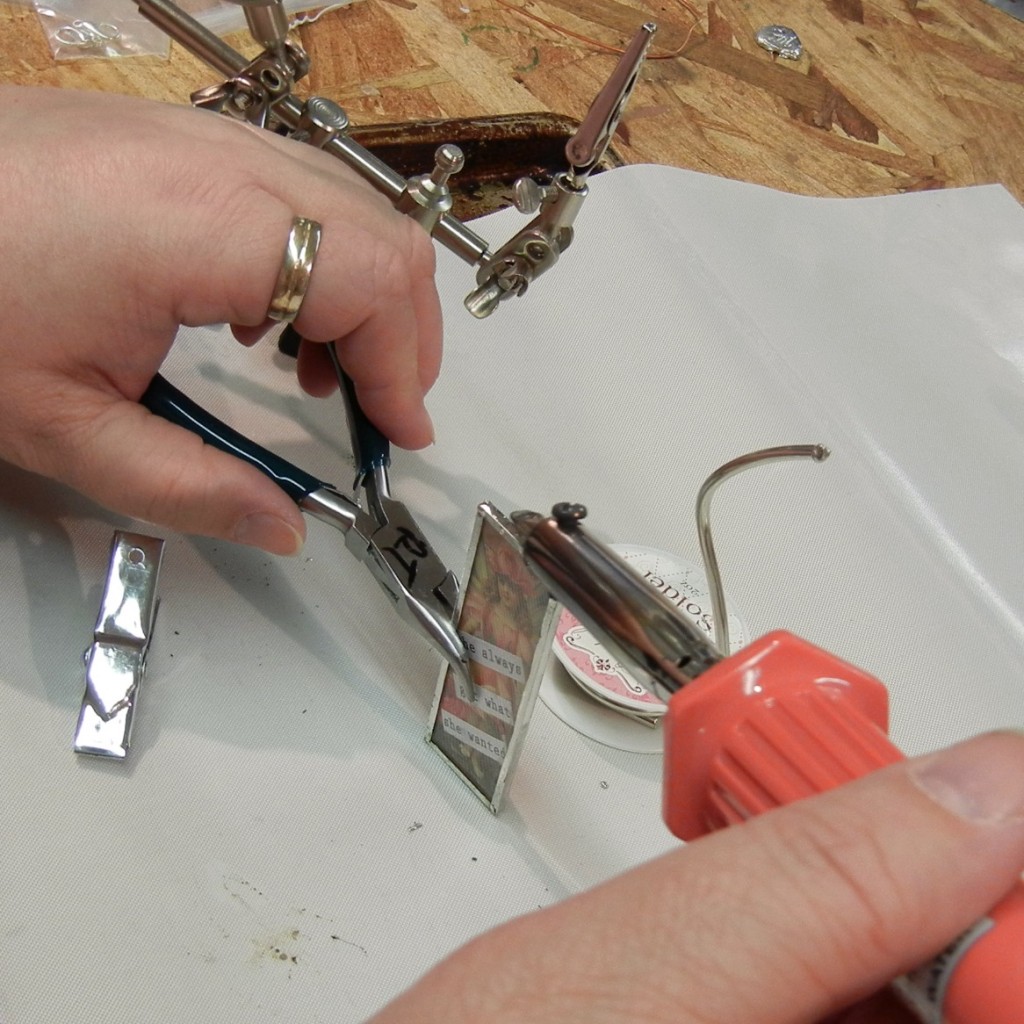
Apply flux to the copper tape. Touch your hot soldering iron to the solder to pick up a blob, and run the iron over the copper tape. Repeat. Repeat. Completely cover the copper tape with solder. If it looks lumpy, run the iron across the bumps to remelt the solder and smooth it out. Be sure to clean your soldering iron’s tip frequently. If the solder isn’t flowing, either the tip is dirty, your piece is dirty, you need more flux or you aren’t heating the piece sufficiently. Clips, clothespins or a third hand are all helpful tools for holding your piece while protecting your fingers.
Add a blob of solder to the point where you’d like to attach your jump ring. Use pliers to hold the jump ring on the blob, and reheat with the iron to secure it in place. File any rough edges, buff with a polishing cloth, and you’re done!
Making soldered pendants is totally addictive. Microscope slide glass is an affordable way to indulge your pendant-making habit. When I saw this ad for Sharktopus (an actual movie!) I had to preserve it within a frame.
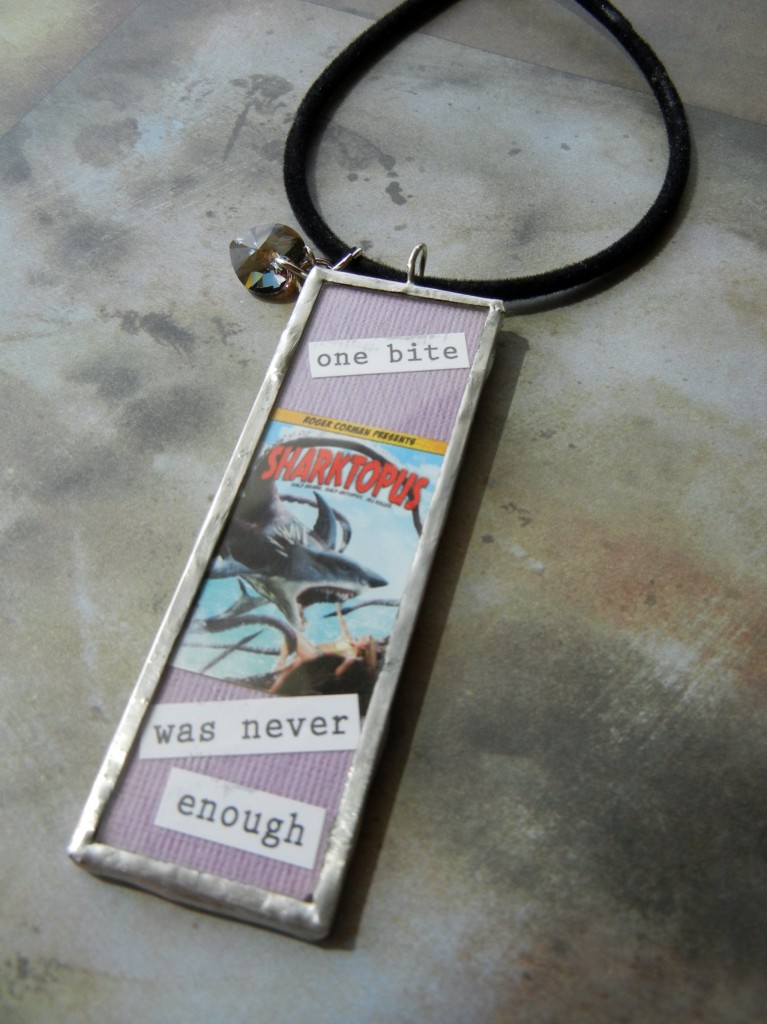
This quote belonged to the “Chocolate Pixie” (part of the Simply Swank Queens and Divas collage art set).
My solder isn’t completely smooth, but it isn’t too bad for a first attempt. Now that I know how to care for the soldering iron (thanks Simply Swank) I’m sure my next will be better! And don’t worry – there are no evil sea monsters lurking in Lake Soldering Iron. Come play! ~ Cindy
Editor’s note: This article (titled: “How to solder jewelry with Simply Swank tools”) is one of our most popular blog topics, and the techniques are tried and true, so when Simply Swank quit producing a line of soldering supplies, we updated the blog article to include our favorite replacements.
For a full line of soldering tools, soft solder and hard solder,
visit our web store:




59 Comments
Thank you ever so much for these tips! This is a bit of a steep learning curve… or so it seems. I have the Hakko Soldering Station FX-888, which I love. But with the wide assortment of solders out there, and not knowing the temp to use, it’s a bit difficult.
I’ve now ordered some Simply Swank solder & flux from your site, and hope that will take out a few of the unknowns for me. I’ve watched the videos on their site & they were very helpful, so thanks for pointing me that direction.
Right now, I’m using solder called “Studio Pro Lead Free (675D).” I picked it up at Hobby Lobby. Do you happen to know if the 675 is the melting point? I had trouble tinning the tip with it, so tinned the tip with some small sized lead free (acid core) solder from Lowe’s.
See what I mean? This is very challenging! 😉 But I’m not giving up!
Hi Lela! I don’t know about the Studio Pro solder. 675 degrees seems like too high of a melting temp for soft soldering, so perhaps that is the problem. 675 would flow with a torch, but probably not a soldering iron. I’m glad you are getting the Simply Swank solder – we’ve all really enjoyed using it here. My teacher told me to NOT use acid-core solders, but I don’t know the reason why. Good luck! Would love to see what you create when you get your Swank supplies 🙂
Thanks for the reply, Cindy. From reading a little on the Weller site, I think the acid core solder might be bad for the tips. Not sure. However, I couldn’t get the Studio Pro to tin the tip.
The thing is…after I get the tip tinned, the Studio Pro will flow….weird!!
I’ll try reducing the temp and see what happens. Can’t wait to get the Simply Swank solder! 🙂
Please don’t ever file the gunk off of your soldering iron !!!!! You WILL RUIN it !!!. wipe it on a wet spongue or a metal scrubie. If you have a reastate most 60/40 solder will melt at a 8 to 8 1/2 setting . let your iron warm up for a good 10 min .or more . I always plug my iron into a power strip along with a radio plugged into the same strip , leave the radio turned on. When you turn off the strip you know everything is off.
I wouldn’t waste the time to file anything off my soldering iron tip when using a Sal Amoniac block to clean it and re-tin it takes only seconds and is not harmful to your tip. This can be purchased at a stained glass supply store. This is much better for your tip!
Good tips! Thanks for sharing 🙂
I think the Simply Swank tip about filing was meant to be very gentle – as in file off the big globs and then use a scrubby or sponge when you get in contact with the iron itself, but you’re right, it pays to be careful!
Do you know if the simply swank soldering iron would work on gold vermeil or gold-filled jumprings? All I have to do is close jump rings and I am so confused as to the best way…
Thx so much! Love your blog!
Hi Eliza – no, I would not recommend using a soldering iron or soft solder with gold-filled components. Precious metals should be torch soldered. Silver solder would work, but it would look silver, not gold. I wish I could be more helpful, but we don’t carry the right solder for gold and I have not used it personally. I found this video though, maybe it will be helpful. http://bit.ly/y6t6UQ Best of luck!
Thank you for sharing these tips.
I would recommend a temperature controlled soldering iron for very fine and accurate soldering projects such as jewelry making. Electronic temperature control means you’ll always know if the tip of the soldering iron is hot enough for the material you are soldering. It makes your soldering task a whole lot easier.
Love your blog!
I would like to solder sliver charms onto silver bracelet. Can anyone tell me if this is feasible for a novice and what I would need exactly?
Hi Tia! Yes, that is totally feasible! These are the tools and supplies I’d recommend to get started:
Butane torch kit: http://www.rings-things.com/Products/Jewelry-Soldering-Tools/
A good book: http://www.rings-things.com/Products/Reference-Books/Book-The-Complete-Metalsmith-An-Illustrated-Handbook.html
Plus your sterling wire, chain, charms etc.; silver solder and flux: http://www.rings-things.com/Products/Hard-Jewelry-Solder-Flux-and-Pickle/
I’m enjoying all the tips and am still learning as I fine tune this art. My problem is the soldering tips……..they keep disintegrate on me… I’ve gone through 3 models, 25w and 40w, and about 6 tips. I have a variety of lead free solder that all melt fine and continually clean and use sal ammoniac to tin the tip. Is it the flux? My fluxes don’t specify, but the Weller manual says not use acid fluxes, but use rosin flux (?) HELP!
Hi Susan! Apparently not all tips are created equal – Mollie, who has years of soldering experience (both jewelry and stained glass) tells me iron-clad tips are durable and will last a lifetime, but that other tips easily get corroded and damaged. Some Weller tips are iron-clad, others aren’t. The sal ammoniac is corrosive, so without that factory-applied iron-clad tip, it can cause damage. I hope this info helps – it is no fun to struggle with tools when you have art to make! 🙂
Well that’s a wealth of information to me…….I’m positive then that the tips were NOT iron-clad. Thank you for that info. My next question is, does the Simply Swank Soldering Iron come with an iron-clad tip? Thank you!
It was news to me too, so thanks for asking the question! And yes, the Simply Swank soldering iron does have an iron-clad tip. http://bit.ly/KtH4Sw I also really like the Simply Swank flux, mostly because the cute little fingernail polish bottle it comes in is really convenient to use.
SOLD! Thank you so much.
Can you use the soldering iron in the house?? I know the hotter ones put off lots of fumes.
Hi Kathi! Yes, you can use the soldering iron in the house. The solder we use is lead free, and while some fumes are created, it isn’t enough to bother most people as long as you are in a well-ventilated room.
Does anyone know any tricks to make the bubble effect on soldered pendants? Instead of leaving the pendant with a smooth soldered look, they go back and add “bubbles” or “balls” of solder around the pendant to make a framed look.
Hi Jen! It is exactly as you are describing, I think – just adding blobs of solder instead of smoothing them flat. They might also be soldering ball chain around the edge, and covering it with a layer of solder (kind of hard to know without seeing exactly what you’re seeing!).
Hope this helps! Cindy 🙂
Hello everyone! I am very new at this so I decided to start with something easy like the glass pendants…I cannot, for the life of me, get the soldering to stick evenly. It beads up and runs everywhere. I am using Handy Flux (Lucas Milhaupt) recommended by my bead store. I was scared I put on too much, then too little, then it was oxidizing quickly even though I was covering a small area at a time. I have watched multiple videos online and read many how-to pages and FAQs. You guys were the best, that’s why I came to you:) I have been making jewelry for a while, but with resin. I want to step up my skill level:) Please help! Thank you.
Hi Elizabeth,
A few questions, and I’ll see if I can figure out what you need to do differently: 1) What type of solder are you using? 2) What type/brand/model of soldering iron and tips are you using? And 3) what type of foil are you using? Good chance it’s not your technique, but one of your supplies that’s causing the problems.
Although I haven’t used it, Handy Flux (as long as it is one of their low-temp options) looks ok: http://www.lucasmilhaupt.com/en-US/products/fluxes/handyfluxes/13/
We’ve been using Staybrite Flux and Solder:
http://www.rings-things.com/Products/Soft-Jewelry-Solder-and-Flux/Solder-Soft-Staybrite-reg.html
and I’ve also used SilverGleem with the La-Co Brite Flux:
http://www.rings-things.com/Products/Soft-Jewelry-Solder-and-Flux/
Thank you so much for helping me out Polly! I actually just got a soldering kit from my local Michael’s. Not sure if those are nationwide…it’s just a craftstore. They have many of the Bead Landing products. It came with all the stuff: The iron/2 tips (but one does not fit!)/soldering/clamps/glass and copper tape to get started. The whole thing was 40$. Not too bad…but maybe it was a bad decision. I am using the soldering that came with it, and also the kind Michael’s carries…which is…Bead Landing…tah dah (I picked it up bc I wasn’t sure how everything worked and wanted to make sure I had some)! The tip on the iron that fits is the pointed one, so that is the one I have been trying with. The “flathead” tip is too wide to insert. grrr. Thank you again:)!!
I wonder if your soldering iron is simply too hot for your solder.
Does it have a temperature/wattage control or it simply “off” and “on”? If it’s just “off” and “on” — or “plugged” and “unplugged”, then try using it before you think it’s fully ready/warmed up.
And turn it off for a few seconds every now and then to let it cool off.
Also, you really DO want the wider tip, not the pointy tip. Those pointy tips don’t work well for this type of project.
I think you should take it back and see if you get a tip that fits your iron, or else an iron that fits your tip.
I’m shocked to know Simply Swank is no longer is business. I see I can purchase most of their products (my favorites) on your site. However, I don’t see their polish. Do you know who made if for them or where I can get any? It was the best I’ve found.
Hi Janee,
We haven’t found a replacement yet, but we’re checking.
Hello. I bought 500 rhinestone connectors from China. They are beautiful but not strong enough to hold up a bikini. I am wanting to add more solder. i am not a jewelry maker. So I don’t need anything sophisticated. What would your suggestion be?
Hi Carrie,
Connectors come in an infinite variety of shapes, size and materials, so without seeing the connectors (or a picture of them), I don’t know if it is possible to strengthen your connectors with solder.
~Polly
Hello, I have a torch that I want to solder with. I’m wondering what kind of solder or technique I use to solder non precious metal like house keys, light weight metal trinkets….I sure hope you can answer my question. Thank you!
What type of torch do you have?
You can — very carefully — use a torch with soft solder.
You just need to be careful not to melt your non-precious-metal objects and trinkets into sad little puddles.
It’s actually a lot of fun to use a butane micro torch and soft solder, because it is gratifyingly FAST.
Here are links to a few projects using soft solder and a torch:
Aqua Love: http://www.rings-things.com/Products/Aqua-Love-Necklace-Tutorial/
Pleasant Dream barrette:
http://www.rings-things.com/Products/Pleasant-Dream-Etched-Barrette-Tutorial/
And my favorite, Puppy Love pin:
http://www.rings-things.com/Products/Puppy-Love-Pin-Tutorial/
Hi…lots of information. I have only been thinking about this for the past couple of days. I appreciate all the comments. My question is….will this type of torch work if I want to connect different items together to make a pendent & also to solder this to a piece of metal…making one large pendent.
This is to be my next level. Never have soldered …. know nothing about how to do it. So all info is greatly appreciated.
Thank you.
Carol
Hi Carol,
What types of metal(s) do you want to solder?
Generally, you use a torch for sterling silver, gold and other precious metals, and you use a soldering iron for the metals that have a lower melting temperature — like costume jewelry — and would be destroyed if using a torch.
Soft solder (used with soldering irons) and hard solder (used with torches) have different properties, so require different construction methods. Hard solder is more durable, but requires temperatures that are unsafe for the types of jewelry pictured in this blog article (paper, thin glass, etc.).
Check out the links in the reply to Rain (above), for some project ideas that were created with a butane micro torch and soft solder.
Hi, Polly,
Thanks for all the valuable info. I have a question. How do you make a shadowbox pendant? I have been making memory glass pendants, but I wanted something three dimensional. Thanks for your help.
Stephanie
Hi Stephanie,
There are a few ways. Of course, the simplest is to buy an already-made hinged shadowbox, but I realize you’re looking to make your own.
You could use a strip of copper, brass or nickel silver sheet or bezel wire as the sides, and wrap it to the memory glass, just like above. 2 potential issues to deal with would be: bending the corners to perfectly match the size and shape of the memory glass — for this you could place the metal in a bench vice, and bend sharply against the jaws. It would take a little practice to get nice sharp bends at exactly the right measurements, but once you had a good template, you’d be set. I also think these would need a little bit of reinforcement on the inside … unless you only use glass on the front, and you cut the back and sides from a single sheet of copper (or other metal). It would be all straight cuts, so not too tough. A jeweler’s saw would be ideal, but you might be able to get away with sheet metal shears.
You’d still need to bend the sides sharply in a vise, but I don’t think you’d need any reinforcement.
~Polly
As a matter of fact … this sounds like a great project for a blog article. When I go on vacation this summer, I’m going to try to bring back some small mementos with a shadowbox in mind and see what I can do with them.
~Polly
The reason not to use resin core solder is that it leaves a very sticky and difficult to remove residue. It makes clean-up a nightmare!
Hello :0) I was wondering if you could give me a tip on how to get the copper tape to stay stuck to the glass. I’ve just had a go and found that it raised when I applied the solder. Many thanks, Claire
Hi Claire, it sounds like there is a bit of grease or dust on your glass. Clean it with a little rubbing alcohol (and then let it dry) before applying the tape.
You might also want to — gently but firmly — burnish (press it down) with a burnishing tool or the back of a pen (Sharpies have a smooth end that works great as a burnisher).
I have a sterling silver pendant that the bail broke off from. It is a standard Bali styled handmade pendant from Jaipur, India. Is it possible to repair it with a soldering iron? When I tried the solder seemed to want to stick to only one side of the join eventhough both sides had flux.
Hi Michelle,
It may just need to be cleaned. Try thoroughly cleaning the areas to be joined, with rubbing alcohol and a cotton swab. Let it dry, and then try again.
~Polly
Where could I buy a Startter kit like the one Simply Swank used to sell (Simply Soldering Creative Art Kit)?
Hi Sean,
How about this glass soldering kit? http://www.rings-things.com/Products/Soldering-Irons-and-Tools-for-Soft-Solder-Jewelry/Rings-Things-Exclusive-Glass-Soldering-Jewelry-Making-Kit_2.html
It includes:
One Hakko® 60w Soldering Iron
One Soldering Iron Stand
8oz Choice™ Solder
4oz LA-CO® Brite Liquid Flux
1 roll of 5/16″ Copper Foil Tape
1 pack of 1″ Square Memory Glass™
1 sheet Piddix 7/8″ Square Collage Sampler
1 individual Craft Brush
~Polly
I want to make the “Shadow Box” charms/jewelry
I’m struggling to find a tutorial.
They don’t seem to have pieces of glass as sides. I want to use flat backed charms/buttons, etc.
Can you help me with this? Maybe send me in the right direction? Thanks Much!
Hi Jenna,
I’m not quite sure what you’re asking, so I’ll give you a few links that I hope point you in the right direction. If these don’t do the trick, maybe give us a call at 1 (800) 366-2156, 8-4 weekdays Pacific time.
Here is our updated blog post, with the newer soldering supplies (the Simply Swank brand no longer exists):
http://www.rings-things.com/blog/2013/04/18/how-to-solder-glass-pendants
And here are a few shadow box design ideas, but they use already-made shadow box pendants that you just fill:
Focus Necklace Tutorial
Compass Pendant Tutorial
And a few other blog articles that might help:
Create a Healing Shrine
How to Make a Metal Box
How to Create a Reliquary Pendant
Glass Bezels – How to show off your treasures
~Polly
Jenna, to make the “shadow box” charms you need to use black backed copper tape that is 1/2″ wide. But two pieces of glass together with whatever you want to fill the box with balanced between them. The 1/2″ foil should be big enough to allow for a bulky object and still go over the sides. Flux and solder. Hope this helps!
Thanks Jamie!
~Polly
I was wondering why my solder jewelry pieces seem to tarnish? They often turn black and dingy and even green on some pieces.
Hi Michelle, what type/brand of solder and/or flux are you using? The green sounds like some type of acid corrosion. ~ Polly
I have just purchased the whole set of soldering torch items, all of the videos made it look so simple, and when I started my solder ran everywhere but where it was supposed to go, when I finally got some on it would crackle and fall off.. Would love any tips on what I’m doing wrong…
Thanks so much
Hi Marsha,
Did you clean your items before you started, and if so, what did you clean them with?
Plain isopropyl alcohol works fine, but if it has additives (for example, scents or other additives common in the cosmetics industry), you could actually be making your metal oily or adding chemicals that cause problems, rather than cleaning it like you tried to do. Or if you have lotion on your hands, and you touch it again after cleaning it, you’re coating it with something that will prevent the solder from sticking.
–Polly
Hey, thank you for all the useful information! Could I use the soft solder process to attached two pieces of aluminum wire together?
thanks!
meredith
Hi Meredith,
First check to see what aluminum’s melting point is. If it’s higher than copper, you’re probably fine. You’ll still need to wrap your items with copper foil, since that’s what this type of solder sticks to.
We do also sell aluminum paste solder, but we haven’t had much success with it. So I won’t recommend it until I find out what we’re doing wrong! It is used with a torch rather than a soldering iron, so I think you’re safe to use the soldering iron method, as long as you understand that soft solder is not designed for aluminum, and so you’ll need to hold them together with the copper foil, and then run solder to hide the copper foil.
That’s probably not what you were intending – you were probably hoping I would say you can simply solder the wires together, but I am pretty sure that soft (tin-based) solder will not work directly on aluminum.
I don’t know if you’re still checking comments after all these years, but I can’t find the answer to my question anywhere. I make something similar to photo pendants, but double sided and coated with UV or regular epoxy resin. They are 1″ round, and about 1/4″ thick at the thickest point. To seal the edges, I was hoping to add copper foil and then solder with my soldering iron. I burnish silver foil tape around the edges now, and I’m not crazy about the look. Is soldering possible? I know it won’t work with hard solder, but I can’t see why it wouldn’t work this way. But, then again, I can’t find any information. I would love some advice! Thanks so much.
Hi Kris,
It may be that no instructors have yet used your particular UV or epoxy resins to do this, so there simply isn’t a tutorial. So I think the best way to find out is to just give it a try. The worst thing that can happen is that your pendants will burn or melt, giving off potentially toxic fumes. So try this near ventilation! (Actually, all soldering should be done with ventilation due the gasses produced from either the flux or the solder itself, not to mention the resin that you’ll have.)
I’ve scorched the paper in a glass pendant with paper glued to it, when adding foil and soft solder. But that was just my first try – my teacher hadn’t scorched any in years. So if your first one fails, that doesn’t mean it isn’t do-able; it may just mean that you need a lighter touch, and a soldering iron with a rheostat rather than the simple “unplug it when it gets too hot and plug it back in once it cools off a bit” temperature control that my soldering iron has.
Sorry I couldn’t answer your question definitely. I think it will work, but I’m not positive as I haven’t tried it with your materials. If they melt/smoke too easily, that would be the only reason it wouldn’t work.
–Polly
Thanks for A LOT of useful information. I need help choosing a soldering iron for soft soldering of charms and jewelry. I’ve gone through 3 models and seven tips now….the soldering tips are disintegrating on me! I don’t understand why. Is it because I’m useing cheap models? 25w, 45w and 60? I thought maybe it was the chemical flux vs. rosin flux. Or is it the corrosive sal ammoniac? Then I read maybe it’s the tips…they must be of ironclad.
I’m lost. Can you help?
Hi Willie,
You will go through tips eventually (this is part of why they are replaceable), and you’ll go through them even faster if they are core tools and you’re using them daily. They are considered consumables rather like drill bits. But you shouldn’t be going through them as fast as sandpaper!
I haven’t destroyed any yet, but I don’t use mine daily. Since I haven’t used any others than the ones we sell (and the ancient one in my dad’s basement 40 years ago), I really can’t advise you on the quality of yours, or the various types of flux. We just sell a handful of soldering irons, tips and flux that we carefully selected for creating jewelry, and we haven’t had any problems with them. Here is Rings & Things selection: http://www.rings-things.com/Products/Jewelry-Soldering-Tools-and-Supplies/ – I hope this helps! Maybe give our flux, solder and soldering irons a try and see if it makes a difference.
Hi, I have a broken cufflink that the shank broke away from the cabochon. On the top side of the cabochon is a stone that looks like blue cat eye. Is it possible to solder the shank back onto the cabochon? If it is possible, what kind of soldering do I use; torch or iron? Is it worth my time or should I just trash it all?