Monthly Archives

March 2011

How to use heat to patina brass charms and filigrees

March 31, 2011
bee charms, raw and with heat patina

One before and two after applying heat patina. Check out the rainbows on the middle bee!

Ah, brass. Beautiful brass. I love everything about using brass in my handmade jewelry … except its raw brassiness. Brass is affordable, easy to work with, and available in all kinds of fun charms and filigrees. And while giving raw brass an antique patina with an oxidizing solution such as Win-Ox really is not difficult, my favorite method of coloring brass is the torch! It tones down that brash brassiness to a beautiful warm glow that is infinitely more appealing to my eye.

bee charm torch

Torching the bee charm only took a few seconds.

Applying heat to give the metal a patina is so easy – and clean! No chemicals, no rinsing, no waiting! Sometimes you can even get shimmery rainbows to appear by holding the heat on for a few extra seconds. (The same process works to heat patina raw copper.)

Heat patina raw brass filigree

Raw brass filigree, before and after meeting the torch flame.

You all know to set up a heat-proof work area before firing up your torch. This can be as simple as a cookie sheet. Tie back your hair, wear safety glasses and just plain BE SAFE. Do your homework before you start. A great book that explains all the necessities for working with a torch is Soldering Made Simple by Joe Silvera.

Butane is widely available at hardware stores.

Don’t feel fired up to experiment? You can buy Vintaj natural brass jewelry components, most of which have already undergone a chemical-free process to give them their rich color.
Plated brass filigrees are also available. But I encourage you to try heat patina. It is the safest way to let your inner pyromaniac out to play!

Velvet ribbon adds a luxurious feel to this brass bracelet.

Here is a gorgeous brass jewelry example by Mollie to inspire you! She soldered a raw brass bee to a Vintaj connector to make this bracelet and used both heat and Win-Ox to patina the pieces. ~ Cindy

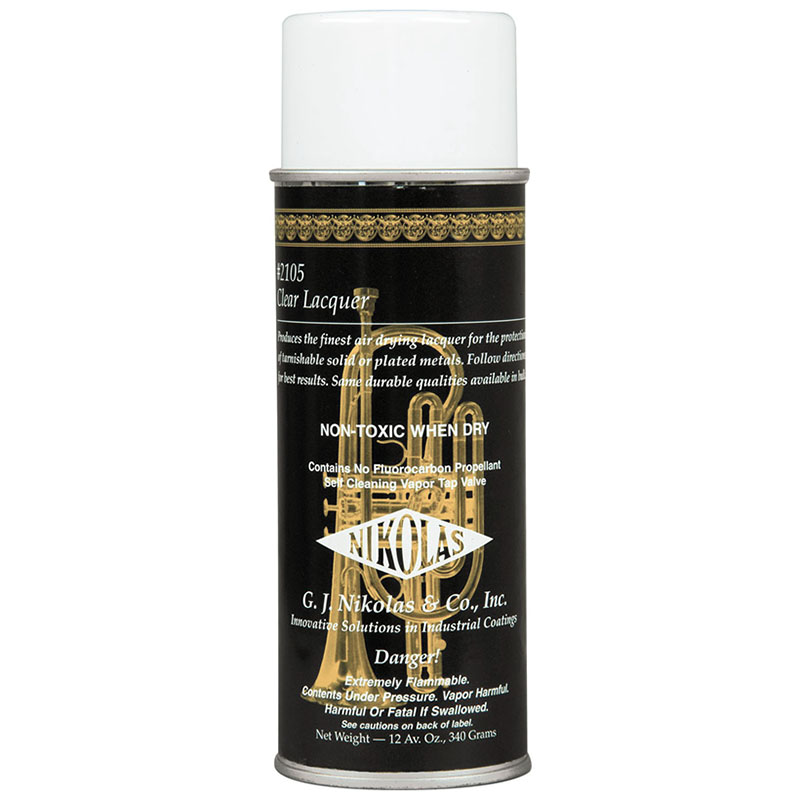
Want to keep that perfect heat/torch patina that you’ve achieved? Nikolas #2105 Clear Silver Lacquer is the product we’ve most often heard recommended by teachers and jewelers, to protect heat patinas and other colors on silver, copper, brass, and bronze. Follow the manufacturer’s instructions on the packaging, to seal and protect your jewelry. When properly applied to metal surfaces, it forms a coating that protects from oxidation, perspiration, sulfur, and abrasion.

Please note, that this item does require special hazardous shipping, so be sure to select UPS GROUND as your shipping choice during order checkout.

How to make interchangeable magnetic jewelry with 1" buttons

March 24, 2011

bottle cap magnet button pendantHandmade magnetic bottle cap necklace with assorted buttons
Mollie has been borderline obsessed with one particular item lately. It’s not a pretty gemstone bead or sparkly crystal pendant. It isn’t even new. No, Mollie is obsessed with plain old sticky dots. Almost daily, she’d ask me, “Oooh, have you tried the sticky dot?” and I’d just roll my eyes. But now I’m a convert too.
Sticky dots are just that – self-stick little glue pads. Easy to use, strong, zero mess, no fuss, no cure time, no smell. This is true instant gratification!


Round sticky dots fit perfectly under our magnets!

Two of Mollie’s recent designs use the sticky dot: the interchangeable magnet ring and the interchangeable magnet bottle cap pendant. Like many of you crafty people, Mollie has a button making machine. The little 1″ buttons are particularly adorable, and since they are made of steel, naturally they are magnetic. I don’t have a button machine myself, but I buy lots of buttons – and now I can wear them instead of leaving them on my bulletin board!

Here’s the magnet

Here’s the pendant – so cute!

Rings & Things’ wholesale price breaks makes it really affordable to make a whole bunch of these necklaces. For about $50 (before shipping and tax, if applicable) you can get everything (except the buttons) to make 70 necklaces – with supplies leftover! If you don’t already have one, add a pair of EuroPunch pliers to make holes in the caps.

1 spool of ball chain (makes 70 17″ necklaces) $18-25 ~ 100 ball chain clasps $2 ~ 1 oz. jump rings $5-6 ~ 100 bottle caps $7-10 ~ 144 adhesive dots $6 ~ two packs of 35 magnets $12-14

The adhesive dot is completely hidden by the ring and magnet.

1″ buttons make perfect rings!

The same value applies to the magnetic ring design – and absolutely no tools are required to make these!

72 adjustable flat-pad ring blanks $42-62, depending on color (we do sell a less expensive ring blank if you prefer, but the style and comfort of this style is worth the added cost) ~ 144 adhesive dots $6 ~ two packs of 35 magnets $12-14

At these quantities, the necklaces cost less than a dollar and the rings about $1.20 to 1.50 each to make. Buy more and the cost per is even lower. Ah, the genius of good design! ~ Cindy

“Make everything as simple as possible, but not simpler.”
~ Albert Einstein


PS: here are some handy links to some other how-to’s in the Rings & Things blog!

The secret discount code

March 23, 2011

.

Update:
See current Sales and Clearance items
— no codes required!

.

.

.

.


I admit it: there is a secret discount code at Rings & Things.

Through Sunday, anyway.

Here it is — SALE1C4-10.

How do you use it??

Order these before March 27th passes you by:

5-Day Sale!

Thru Sunday, March 27, 2011: Roll into springtime with great deals: sparkling SWAROVSKI ELEMENTS round crystal beads, striking gemstone donuts and easy-to-use donut bails! Save 10-20% on these quality components.Your savings will be visible in your final Order Review (after entering payment info), just below the “Place Order” button. (No coupon needed, yay!)
Swarovski Elements rounds 10% Off: SWAROVSKI ELEMENTS Rounds
Use versatile #5000 round crystal beads from SWAROVSKI ELEMENTS, and add sparkle to an endless array of designs in an endless array of colors! 2mm through 10mm rounds are on sale now for this limited time. (SALE1C4-10)
Gemstone donuts 20% Off: Gemstone Donuts
Add natural beauty to designs with gemstone donuts in a huge variety of semi-precious stones. Find round donuts in 7 sizes (from 15mm to 60mm), plus rectangle, oval, trillion, and new octagon & square styles! (SALE1C4-20)
Donut bails 15% Off: Donut Bails
Make connections with ease using donut bails in white, silver plate, antiqued silver, gold plate, bright brass, antiqued brass, bright copper, antiqued copper, gunmetal and sterling silver. Perfect for hanging focals & more! (SALE1C4-15)
Click here for free projects that feature sale items!

Now, does that get a comment out of you?
Let me know what you think 🙂


Picks of the Showroom!

March 18, 2011

The time for our fabulous showroom picks has come nigh!

This time some of these items are “Cash and Carry” items. For those of you who haven’t had a chance to visit our showroom or go to one of our Road Shows, Cash and Carry items aren’t available through our online store or catalog. Most of the time, they’re one-time special buys that our purchasers get for either the showroom or the road shows…so come & visit us in our warehouse or in your town!

Tiffany:

Birdseye rhyolite beads

Cash and Carry “Birdseye Rhyolite

These new items will soon be live on our online store! Here are the stock numbers for each new item:

21-005-227-10, Birdseye Rhyolite, 30×40 Puffed Oval

21-005-227-11, Birdseye Rhyolite, 20mm Puffed Coin

21-005-227-16, Birdseye Rhyolite, 20mm Puffed Square

21-005-227-22, Birdseye Rhyolite, 18×25 Puffed Rectangle

21-005-227-29, Birdseye Rhyolite, 30mm Puffed Coin


Sondra:

Mixed rainbow gemstone strands

Cash and Carry Mixed Rainbow Gemstone Strands


Toni:

Turquoise magnesite butterfly beads

Turquoise Magnesite Butterfly Beads


Lindsey:

Bottle cap beads

Cash and Carry Bottle Cap Beads

Some of these styles will soon be part of our stock as well!


Kameron:

Tim Holtz

New Tim Holtz!

These new items will soon be live on our online store as well! Here are the stock numbers for each new item:

55-000-20, Ideaology, 90 Red Game Pieces

55-000-21, Ideaology, 10 Tin Light Bulbs

55-000-23, Ideaology, 9 Distressed Plaquettes

55-000-24, Ideaology, Regal Adornments

55-000-25, Ideaology, 24 mini Hanger Clips


Mandi:

Stretchy finger rings

Stretchy Rings


How to make polymer clay pie earrings using mini bottle caps as pans!

March 18, 2011

polymer clay cherry pie earrings

If they weren’t so disgustingly cute, they’d be good enough to eat!

Hello, bloglandia! We just added a whole bunch of bottle caps to our mixed-media jewelry product line. The best of the bunch, in my opinion, is the cute little mini cap.

mini bottle caps

Wee bottle caps make regular size (1″) ones look huge in comparison!

As soon as I saw them I became obsessed with making tiny pies. It was basically an illness that I had to treat before I could move on with my life. So today I went ahead and baked my little cherry pie earrings. Disclaimer: I am by no means a polymer clay expert. My skill level is clumsy at best. But really, I think anyone can have fun making these! Here’s how:

punch pliers

These pliers make it so easy to punch holes!

  1. Punch holes in the caps. I used our EuroPunch pliers, which handle the job easily. However, since bottle caps are steel they will wear out the punch tips eventually (just replace the tips, not the pliers!).
  2. Add jump rings.
  3. Condition your clay and load up the tins with pie filling. I used magenta Kato polyclay. I also added a little red liquid polyclay. I like how the liquid added a realistic pie filling gooeyness, but if you are more of a perfectionist, omit the liquid clay. A note about Kato – it is fairly stiff and crumbly straight from the package. Since I was just making one pair, I kneaded it by hand, but it would have been way easier to condition a bigger lump of clay using a pasta machine.
  4. Roll out your pie crust – mine is yellow mixed with a little “beige flesh” color. Cut the crust into thin strips.
  5. Criss-cross the strips over the pies. Press down gently and trim off the ends.

    forming the clay pie crust

    Criss cross to make a traditional lattice top.

  6. ready to bake polymer pies

    Ready for the oven!

    Following the instructions for your type of clay, bake the pies in a toaster oven to cure.

  7. Use 2 more jump rings to attach the pies to ear wires (I used steel blue niobium).

easy cherry pie earrings

Pie is the new cupcake, I’ve been told. What do you think? Can a pie really be as cute as a cupcake?

Well, I thought baking these earrings would cure me of my pie obsession, but then a friend suggested making blackbird pie (from the nursery rhyme) and now I really want to make that too! And what about Pi Day earring? What kind of clay creations can you imagine making with these bottle caps? ~ Cindy


PS: here are some handy links to some other how-to’s in the Rings & Things blog!

Take our design challenge!

March 17, 2011

[last update, May 2nd:
designer entries added at the bottom–scroll down!
Grand Prize winner to be picked this week]

Take our design challenge!

(PS: while you’re all waiting for the entries to be posted at the bottom of this post,
enjoy our last design challenge featuring glass bezels!)

The theme is brushed copper beads, look at ’em:

Brushed copper beads

Design challenge! Satin-finish copper beads

We think you’ll love these: They’re gorgeously shiny… fun to touch…

and we like how people’s faces light up when they see ’em at our bead shows!

Here’s how to enter:

  1. Leave a comment below.
  2. Get an extra entry in the drawing: Link from your blog to this post. Share this post in Facebook or Twitter.

Then, wait for an email from me: One week from today, on Thursday, March 24th, I’ll do a drawing & pick 15 lucky participants. I’ll send those 15 people a packet of these satin-finish copper beads.


They’ll have 1 month to provide photos of the jewelry they make with these beads. Out of all those entries, Rings & Things will pick a Design Challenge winner to receive a surprise pack of our jewelry supplies! So enter now, tell your online friends, and get thinking–what will you do with a bunch of brushed copper beads? Doming? Sawing in half? Image-transfer solution? Patina’ing? Hole punching? –Dave at Rings & Things–


Update, March 29th: Yay! Winners! Here’s the list of the lucky 13 people whose names were drawn:

1. Penny Neville,
http://copperpennydesigns.blogspot.com/2011/03/take-our-design-challenge.html
2. Marie-Noel Voyer-Cramp,
http://skyejewels.blogspot.com/
3. Erin Prais-Hintz,
http://treasures-found.blogspot.com
4. Erin Strother,
http://www.studioEgraphics.com
5. Francine Vorbeck,
http://www.exclusivelyoursdesigns.blogspot.com/
6. Jenny Mac,
http://jennymacoriginals.goods.officelive.com/default.aspx
7. Amy,
http://spritecreations.dnsdojo.com/
8. Kristi Bowman,
http://dreamsomedesigns.blogspot.com/
9. Melissa M,
http://melissameman.blogspot.com
10. Kym Hunter,
http://kymhunterdesigns.blogspot.com
11. Tina Lawrence,
http://www.etsy.com/shop/statementsinsterling
12. Jenny Vidberg, http://shymessmycken.blogspot.com
13. Laura Staley,
http://www.etsy.com/shop/laurastaley

The design entries keep coming in…


Celebrate spring abundance: eggs 'n' bunnies!

March 16, 2011

Celebrate spring abundance with Easter bunnies + eggs
From the fertile imaginations of our designers, a springtime pairing: SWAROVSKI ELEMENTS pear-shaped crystal pearls with
TierraCast® rabbits make perfect eggs ‘n’ bunnies for Easter jewelry. (See the design ideas below!) Plus, we have a basketful of other Easter jewelry parts!

Use pear-shaped crystal pearls with TierraCast rabbits for Easter jewelry that's sophisticated and adorable!Swarovski “pear” pearls (Easter eggs!)
& TierraCast® bunny rabbits

Easter jewelry ideas:

Wear this chain and crystal necklace as one long strand or doubled up.
“Bunny Foo Foo” necklace
Combine pear-shaped crystal pearls and teardrop crystal beads in this timeless earrings project.
“Easter Egg” earrings
Feature Swarovski crystal pearls, crystal butterflies and TierraCast bunnies in this spring bracelet design.
“Easter Egg” charm bracelet

Happy hopping…er…shopping! 🙂