Gemstone & Leather Cuff Bracelet, simple & fun!
How many times do you open up a magazine and see photographs of adventurer type models wearing simple, but chic leather jewelry? I see it quite often when I’m thumbing through the usual magazines at check out while I’m shopping. It’s easy to see why these types of bracelets are oh, so trendy. They’re simple, stackable and easy to customize! Plus leather is pretty durable if you’re like me – a little too hard on your jewelry.
I’m going to show you just how easy it is to make this bracelet in a few photographs!
Here’s what you will need:
- 1/2″ Leather Cuff Bracelet
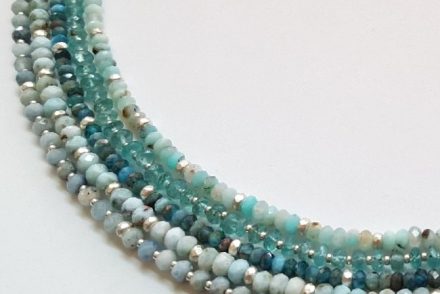
- Mixed Stone Beads
- Beadalon Wire, 49 Strand
- 3mm Cornerless Cube Beads
- Beaded Spacer Beads
- 2mm Crimp Bead
- 3.2mm Crimp Covers
- Two Hole Metal Punch
- Crimping Pliers
- Scissors

Just a visual on the supplies that you will need.

Pick the color of cuff you desire, and then cut out the middle of the cuff. Try to make your cut as straight as possible to avoid your beads laying in an unattractive manner. I cut about 2″ off of my cuff, but again, this is definitely something you can customize. What’s great is that the cuff has two snaps, so if you cut too much off, you still have some wiggle room.

Now you’re going to make your holes. I lined mine up by laying one of the two holed beads that you’re stringing directly on the leather where you’re going to make your holes. I made a little mark with a pen, lined up the punch and voila!

After punching my holes, I cut a piece of stringing wire about 2′ long – folded it in half and cut it again (making two pieces.) I then ran each piece of wire through each hole, put my crimp bead on, folded over the wire to run the other end through the crimp bead and then crimped. Once I crimped it, I slid the crimp cover to make the crimp look like a plain round bead.

Start beading! I put a flower spacer on each strand, my two hole watch bead on, and then a cornerless cube on each strand. Repeat without the flower spacer until you have reached the desired amount of two hole beads & string on a flower spacer on each strand.

Now you’re ready to repeat the crimping process.

One..

Two..

Three! Just snip off the extra stringing wire as close to the crimp cover you can, and you’ve got yourself a pretty new bracelet! There are endless combinations of beads, findings and leather that will work with this project. Find out what colors work for you and get going! – Jaci
2021 UPDATE: Sadly, Rings & Things no longer carries the double-drilled “watchband” gemstone beads (does anyone still wear an actual wristwatch?). But that doesn’t mean that we don’t still love the idea of combining a modified leather cuff with gemstone beads. You can make this bracelet by combining multiple strands of smaller gemstone beads and still be just as trendy as the original was in 2012!
Mollie

2 Comments
really like !!!!! can’t wait to make one.
Wow! That is so cool! Thank you so much for the tut’! 🙂
Best regards from Eva Mari in Norway