Browsing Category

Beads

DIY Swarovski Applique

December 9, 2014

Did anyone else notice that winter hit overnight? The below-freezing temps are here and it’s time to snuggle up in our warm winter-wear! While I hate being cold, I love wearing coats and all of the fun accessories that go along with them – so I obviously need to be cute while doing it! I’ve also found a passion for the ‘DIY’ trend that seems to be everywhere these days, and I have created a basic tutorial for applique work using Swarovski crystals and an old headband I found in my closet!

20141119_152753

Supplies

1 – John James Beading Needle, Size 10

1 – The Beadsmith Braided Bead Thread, .006in, 28yd spool (I used White)

288pcs (2 gr) – Swarovski Crystal Jams, 4mm (I used Bohemian Rhapsody) OR any color Swarovski Crystal Bicones, 4mm

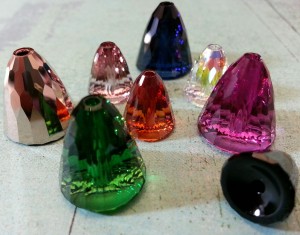
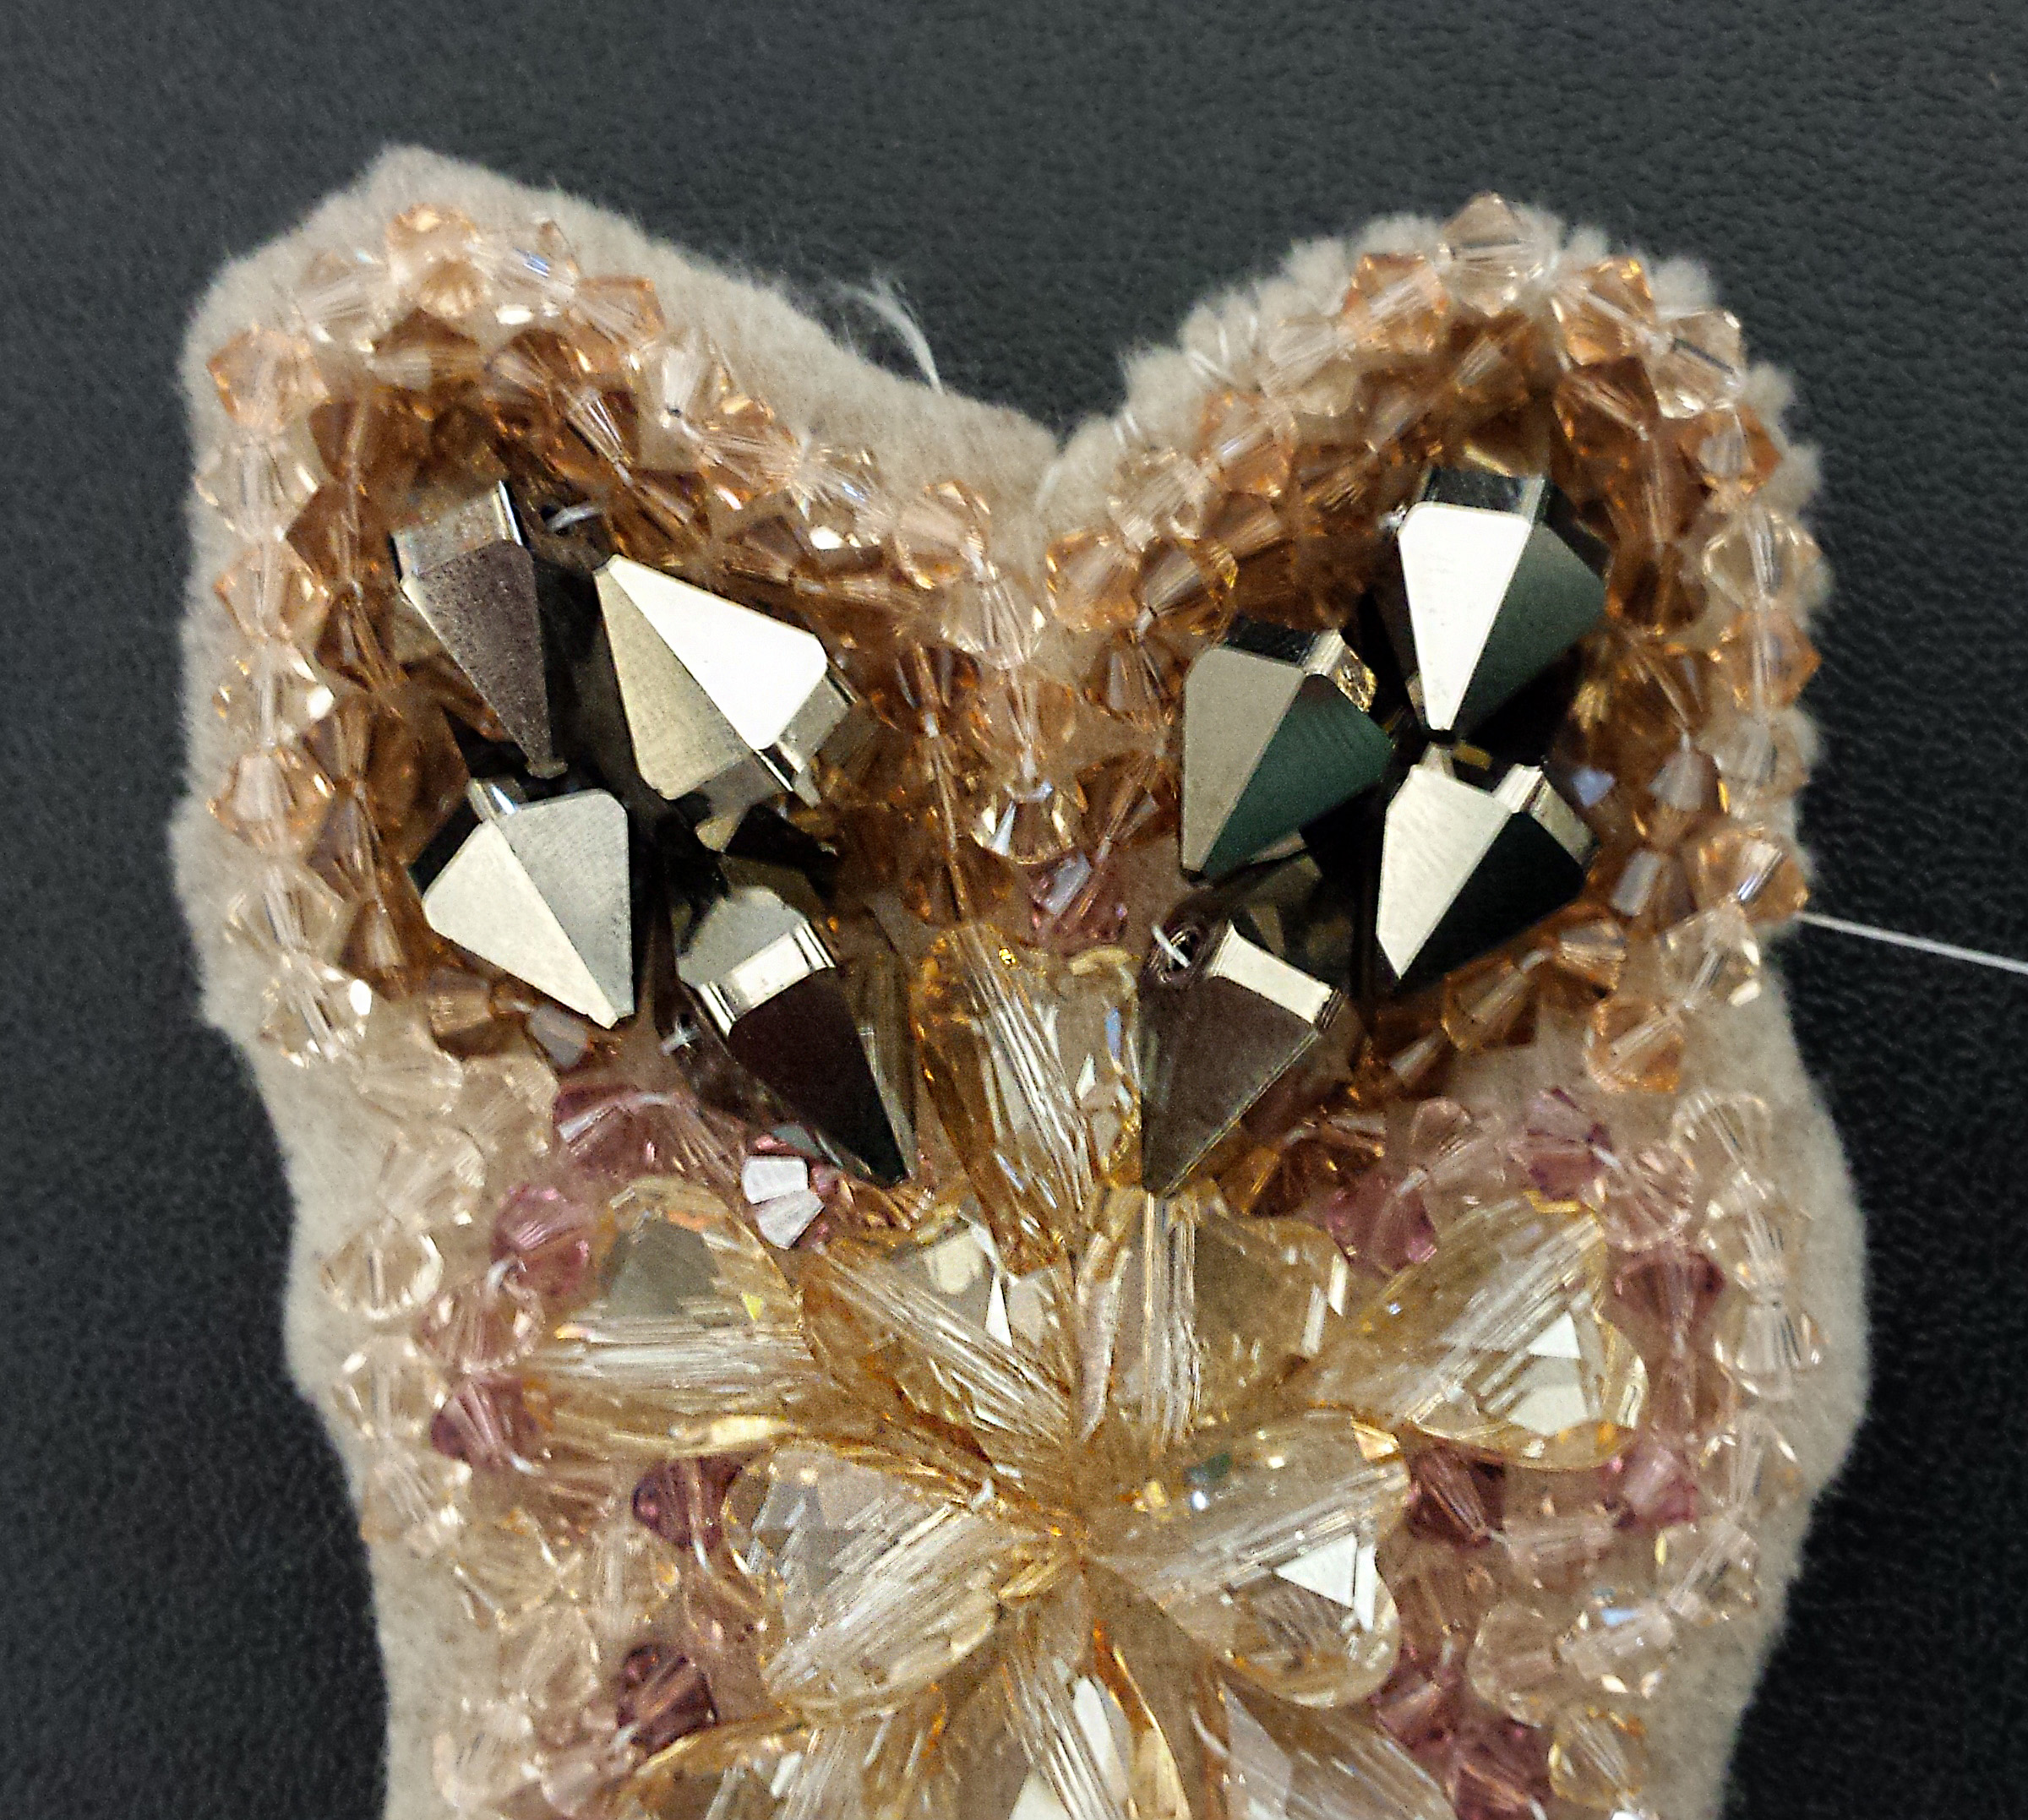
9 – Swarovski Double Spike Beads (I use 12mm Metallic Light Gold 2x)

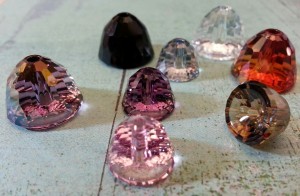
10 – Swarovski Wild Heart Crystal Beads (I used 12mm Golden Shadow)

2 – felt squares, about the size of your hand

Pair of scissors

20141117_175149

Now the Fun Part!

20141117_175441_

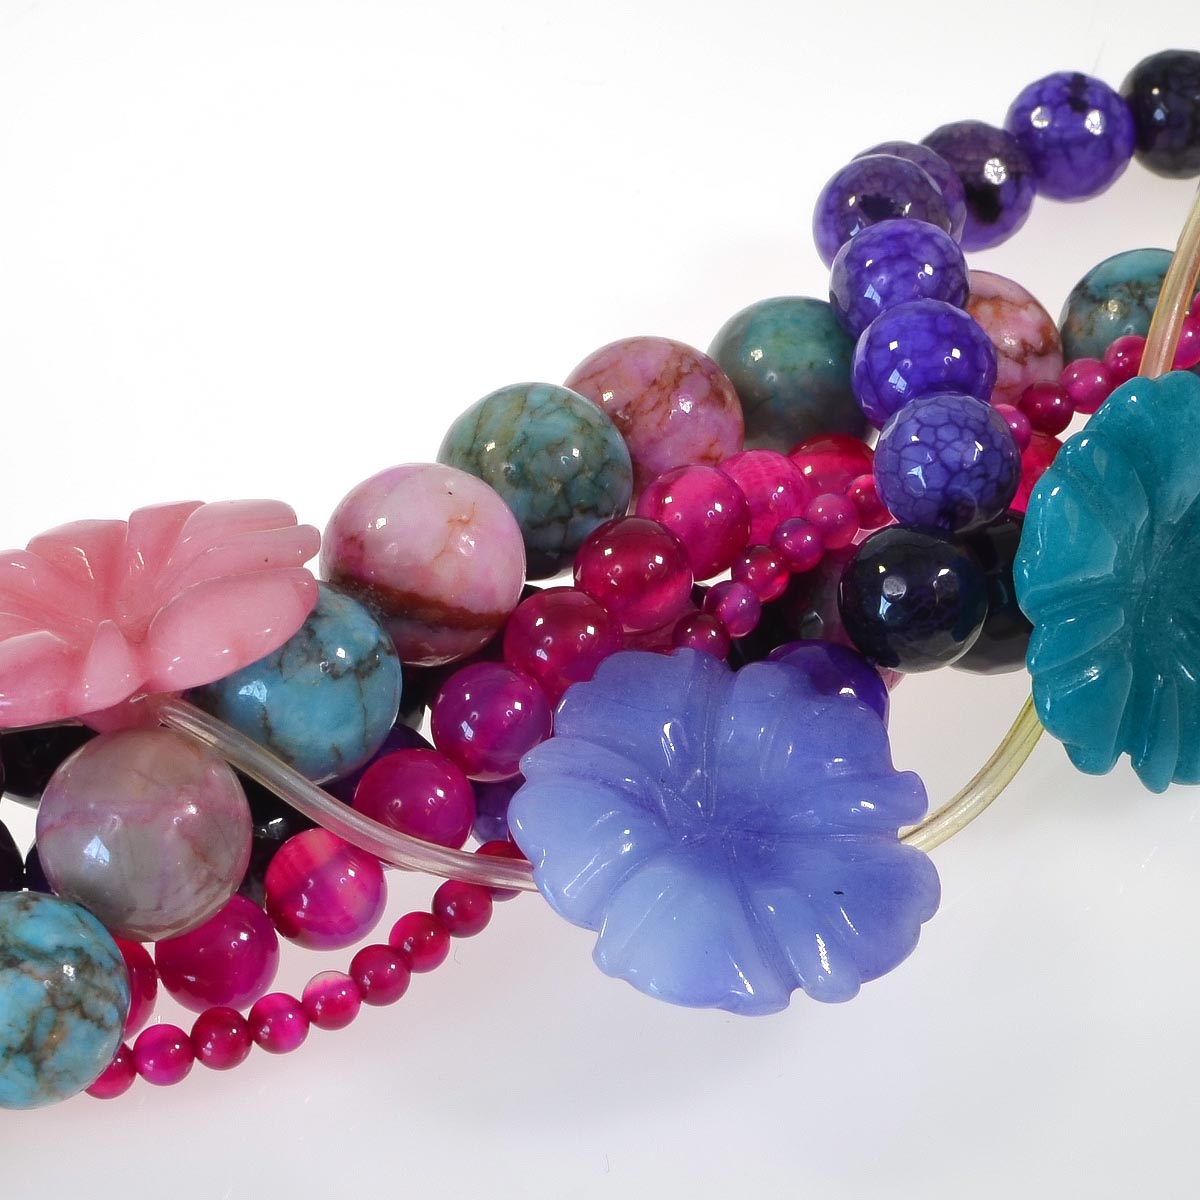
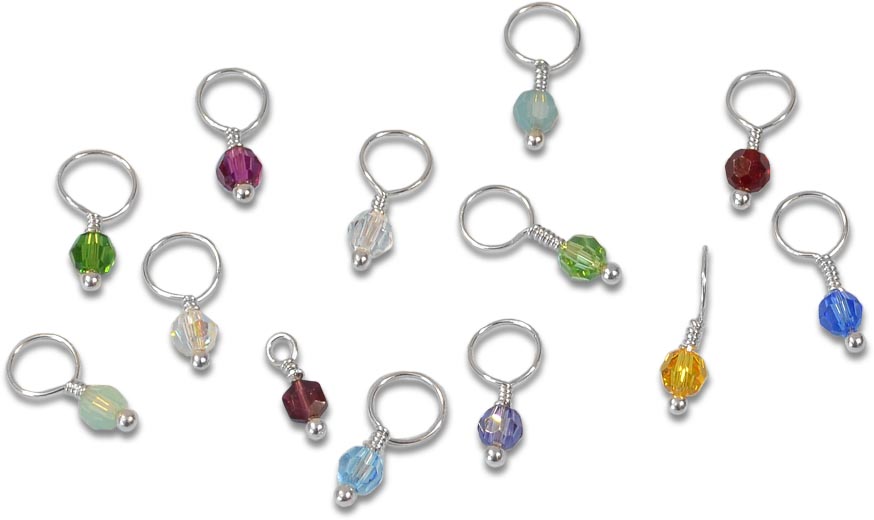
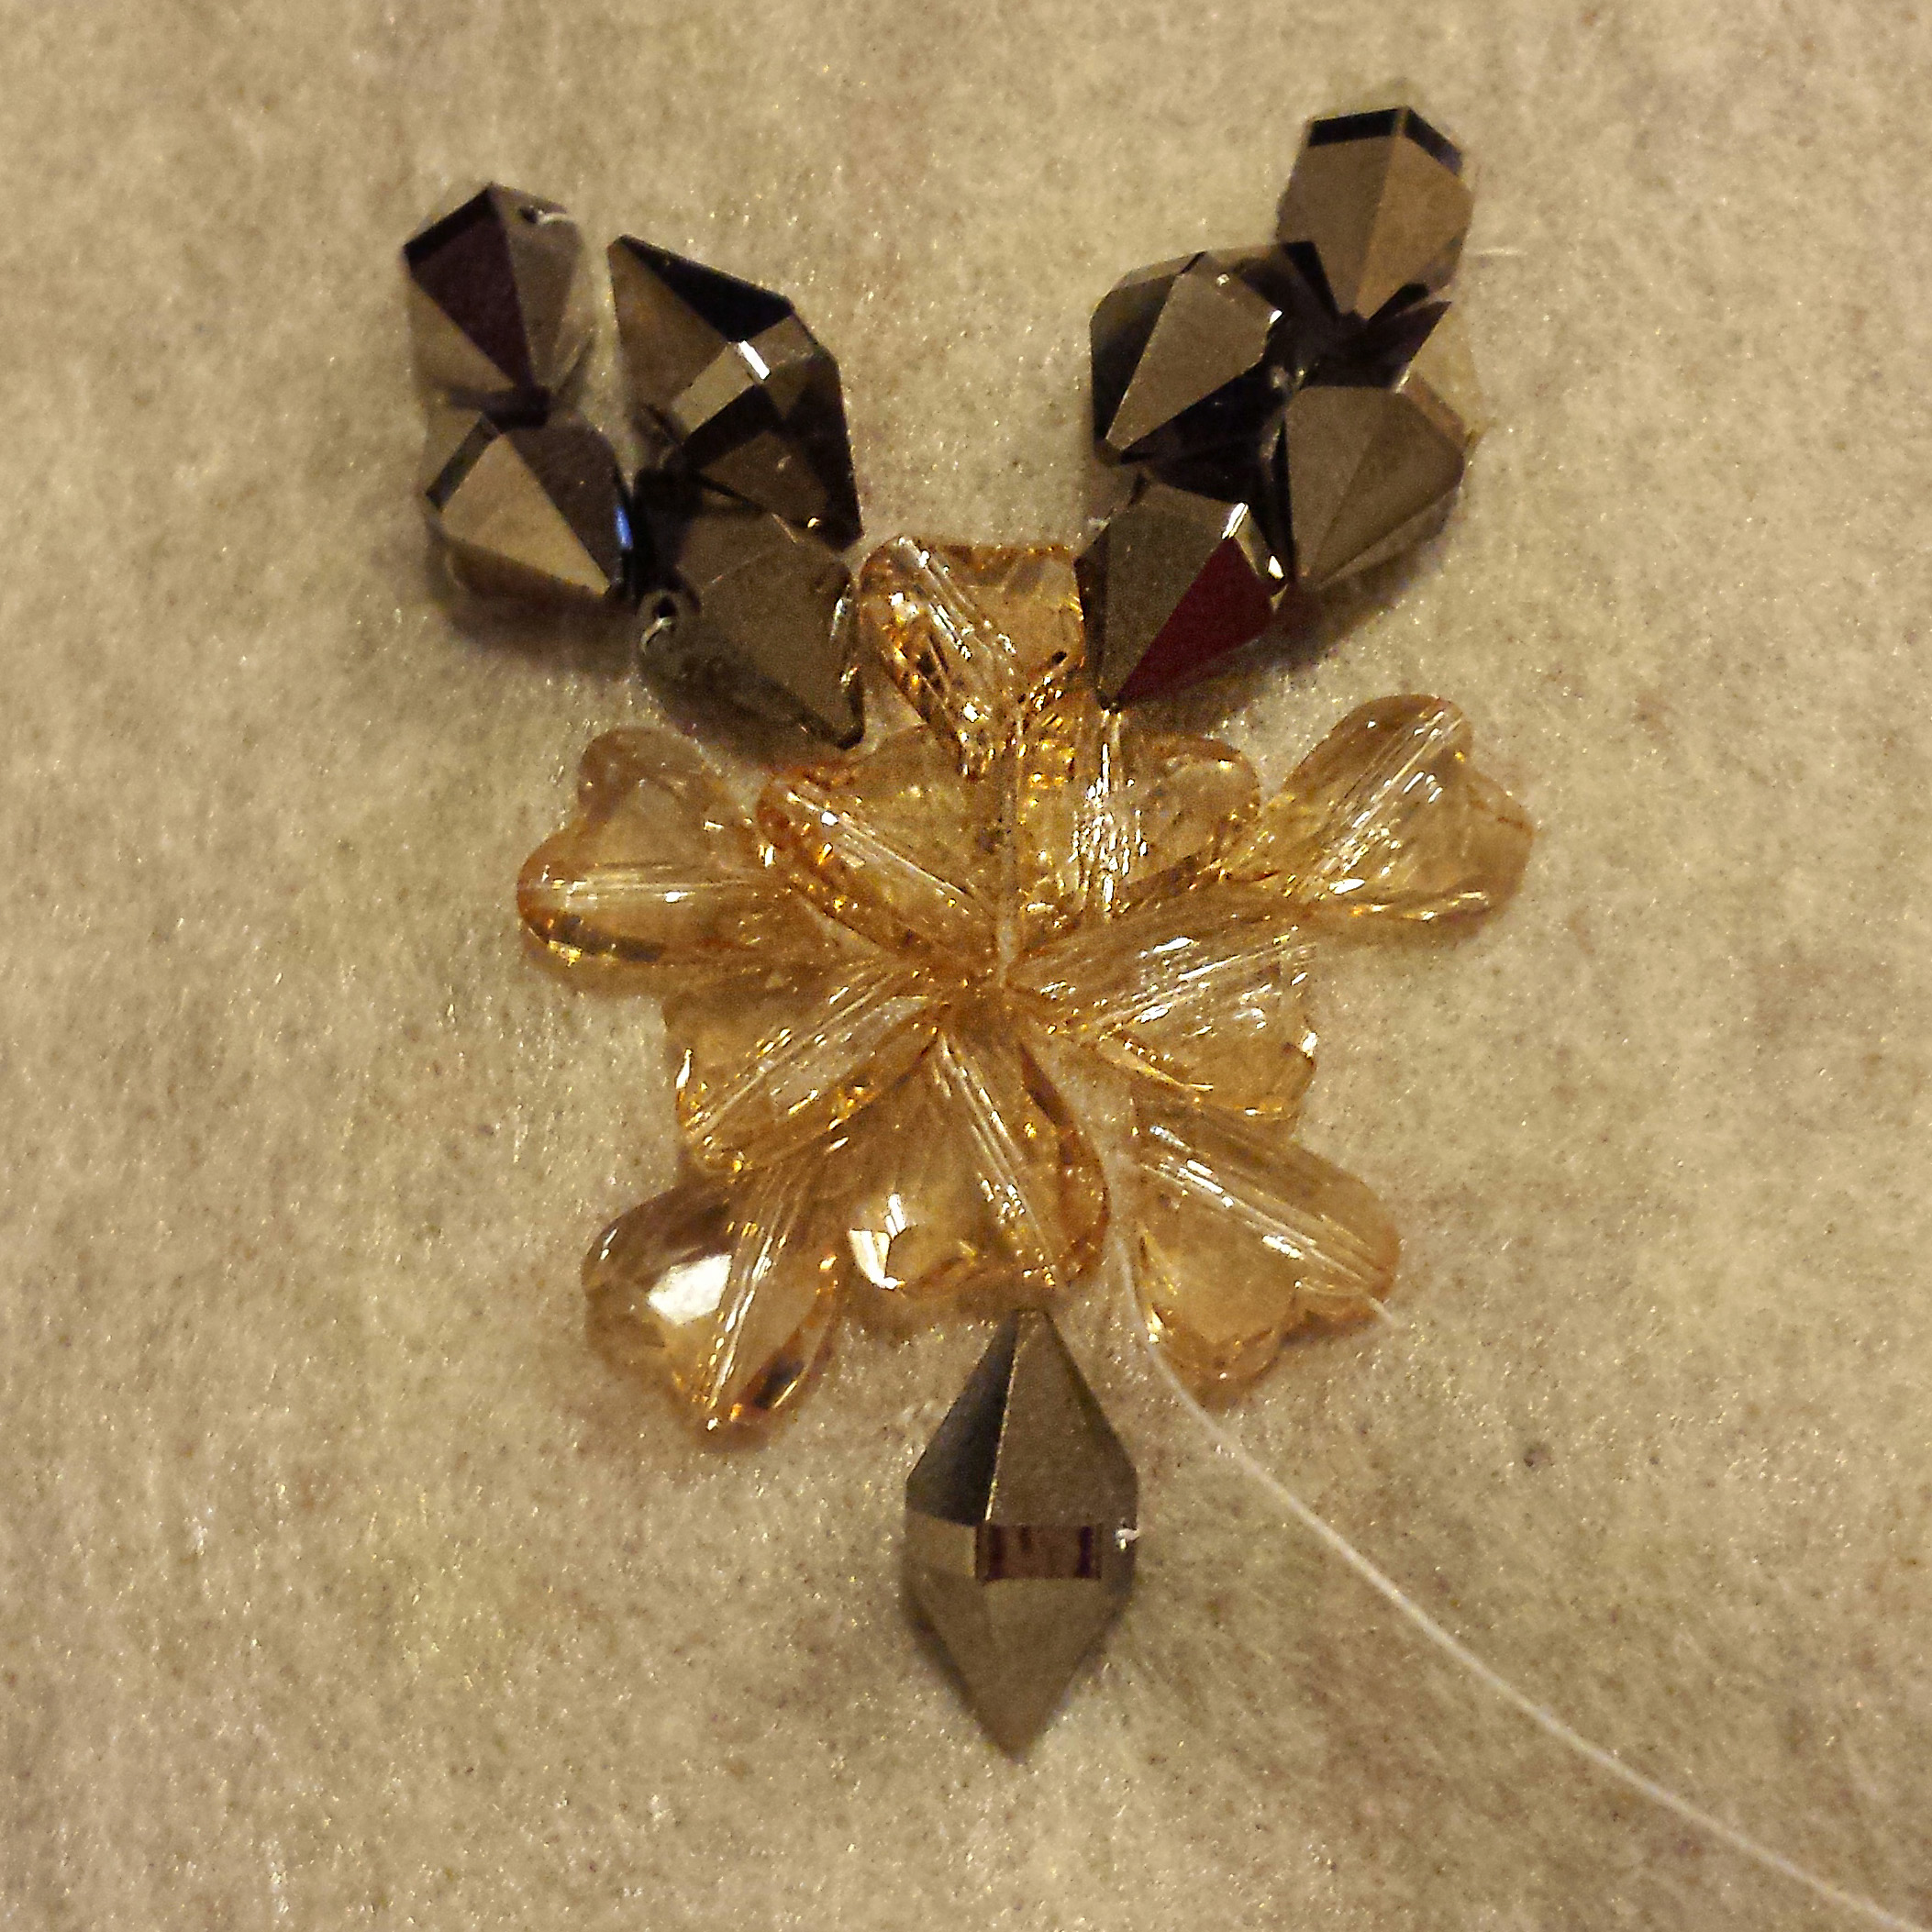
The beauty of this project is that you can use an assortment of crystals! I try and keep a good balance of large and small crystals, with the larger ones being the focal point. My image above shows my color and size assortment. I went for more of a neutral color palette, really playing off of the golds and light pinks. The Rings & Things Exclusive Swarovski Crystal Jams bead mixes are great for something like this, as they can help you develop a strong color story from the beginning.

20141117_180739 20141117_180928

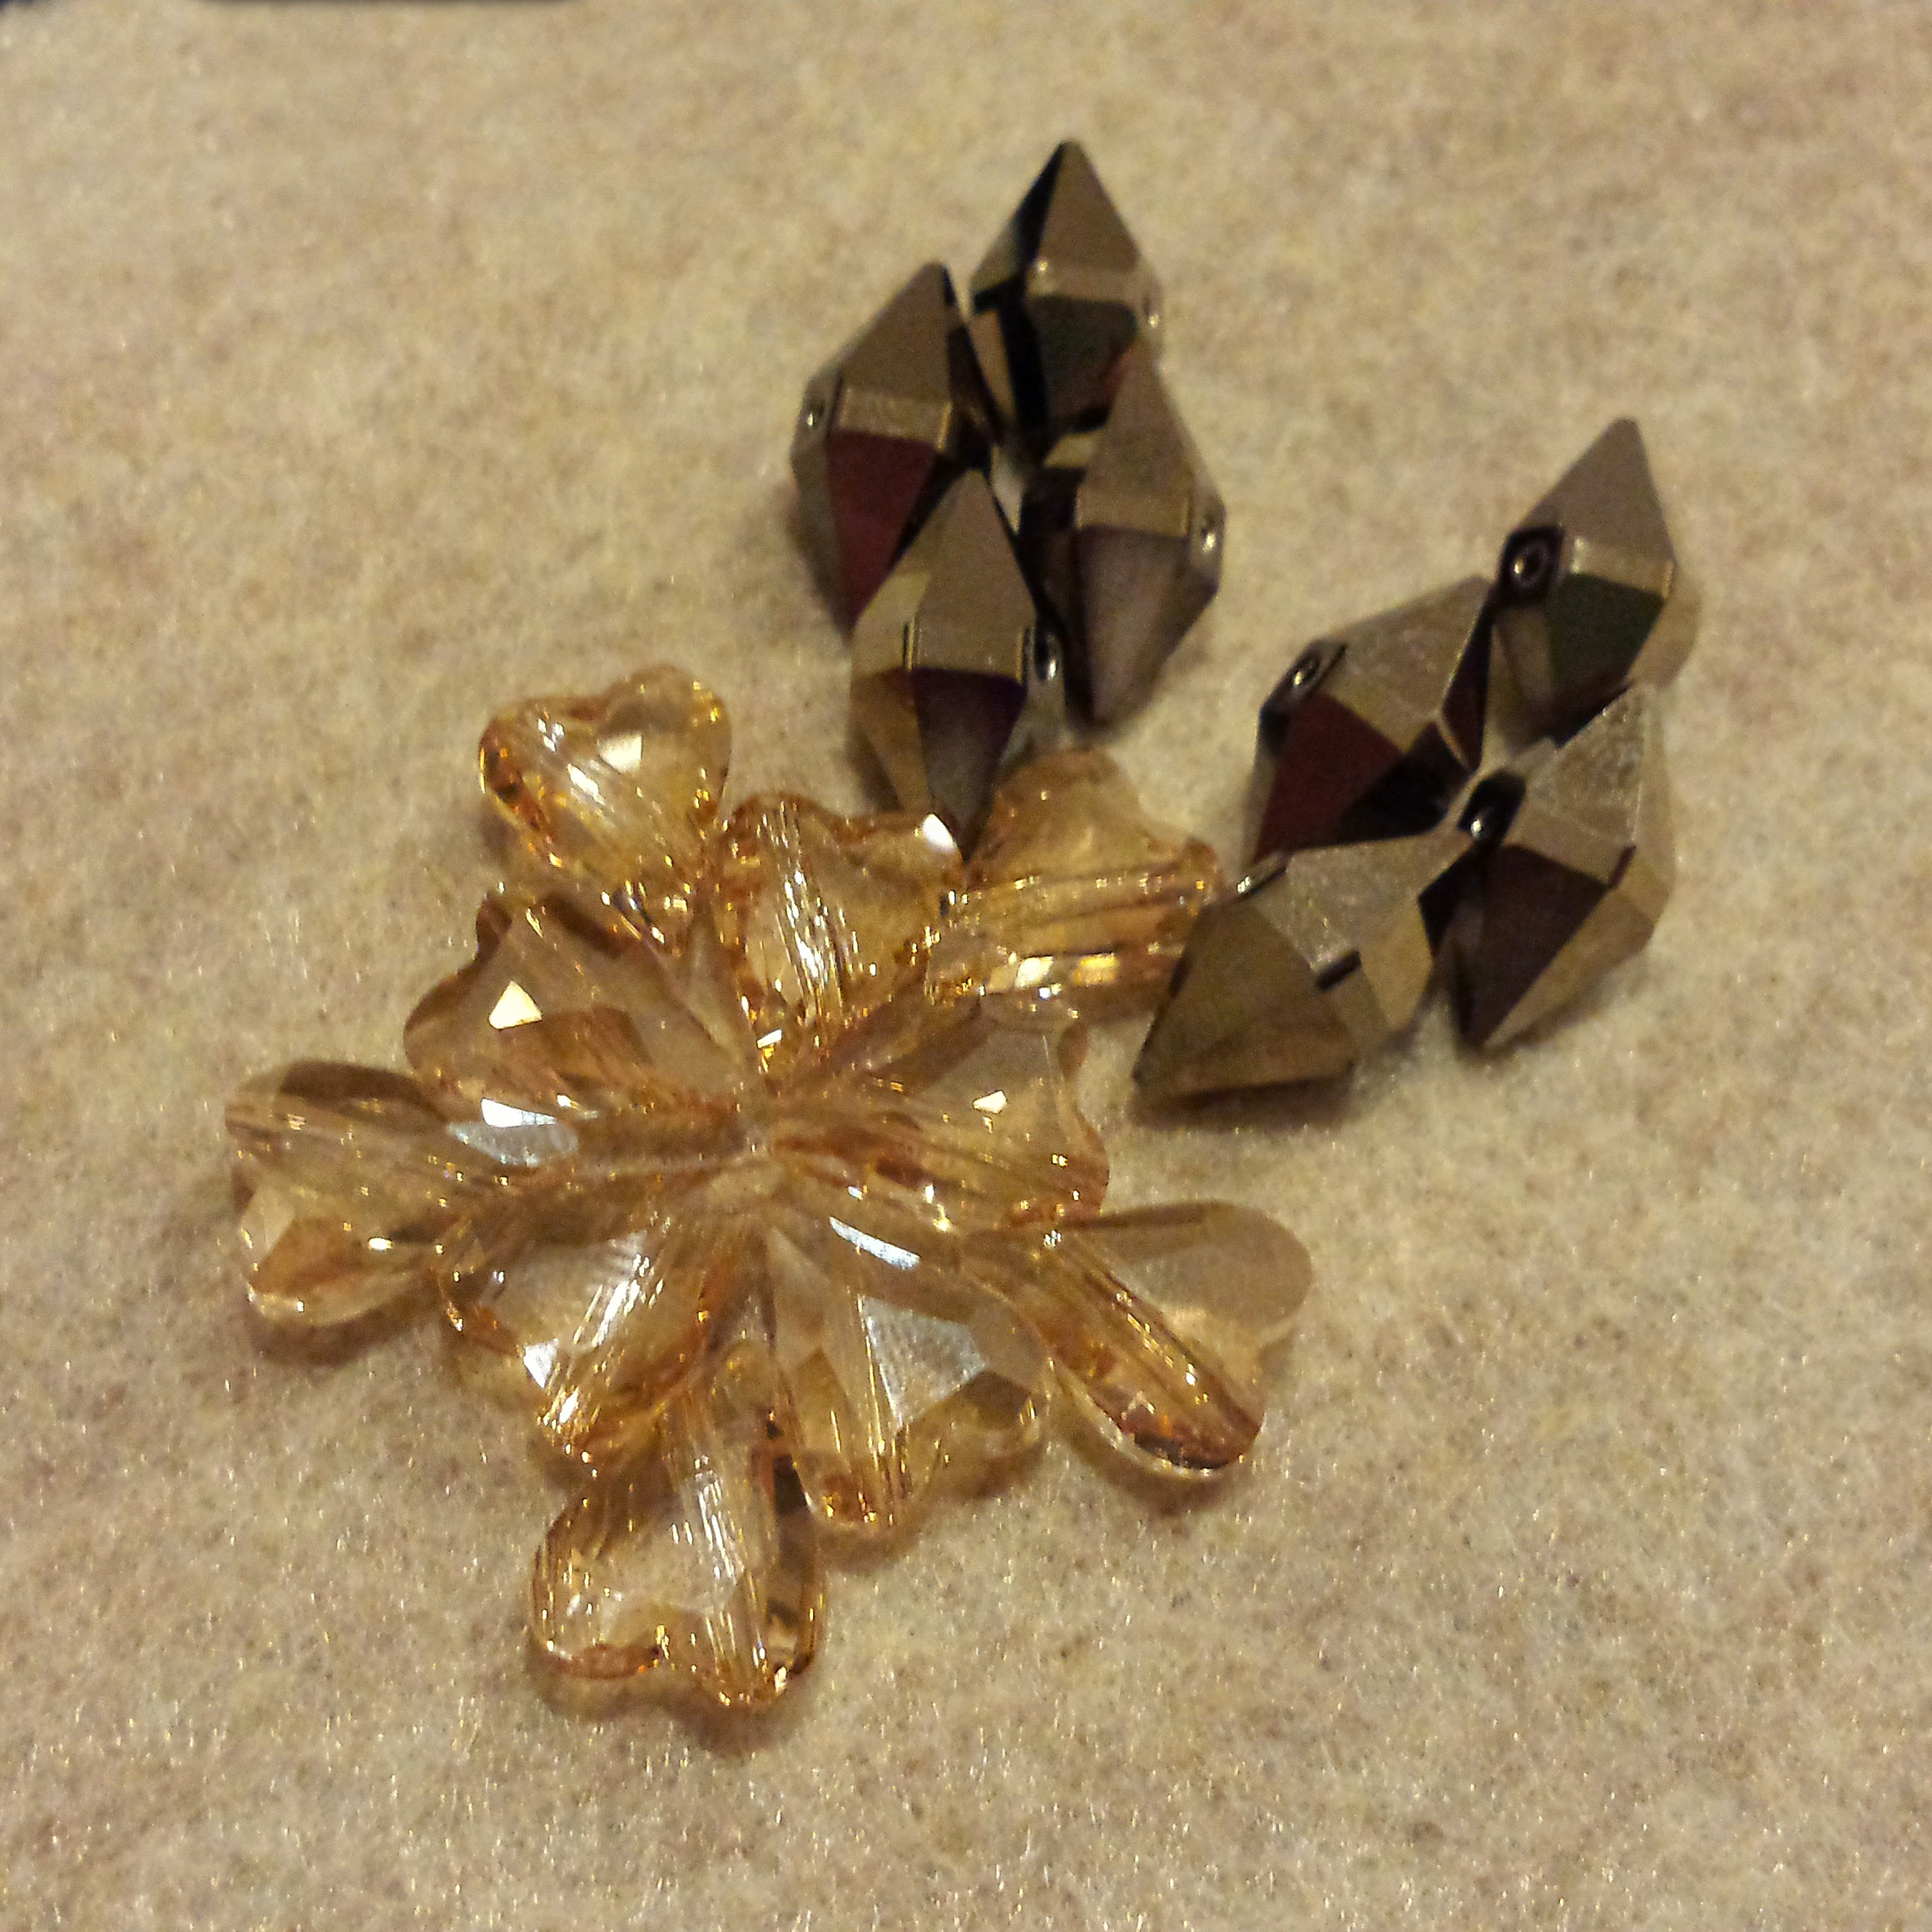
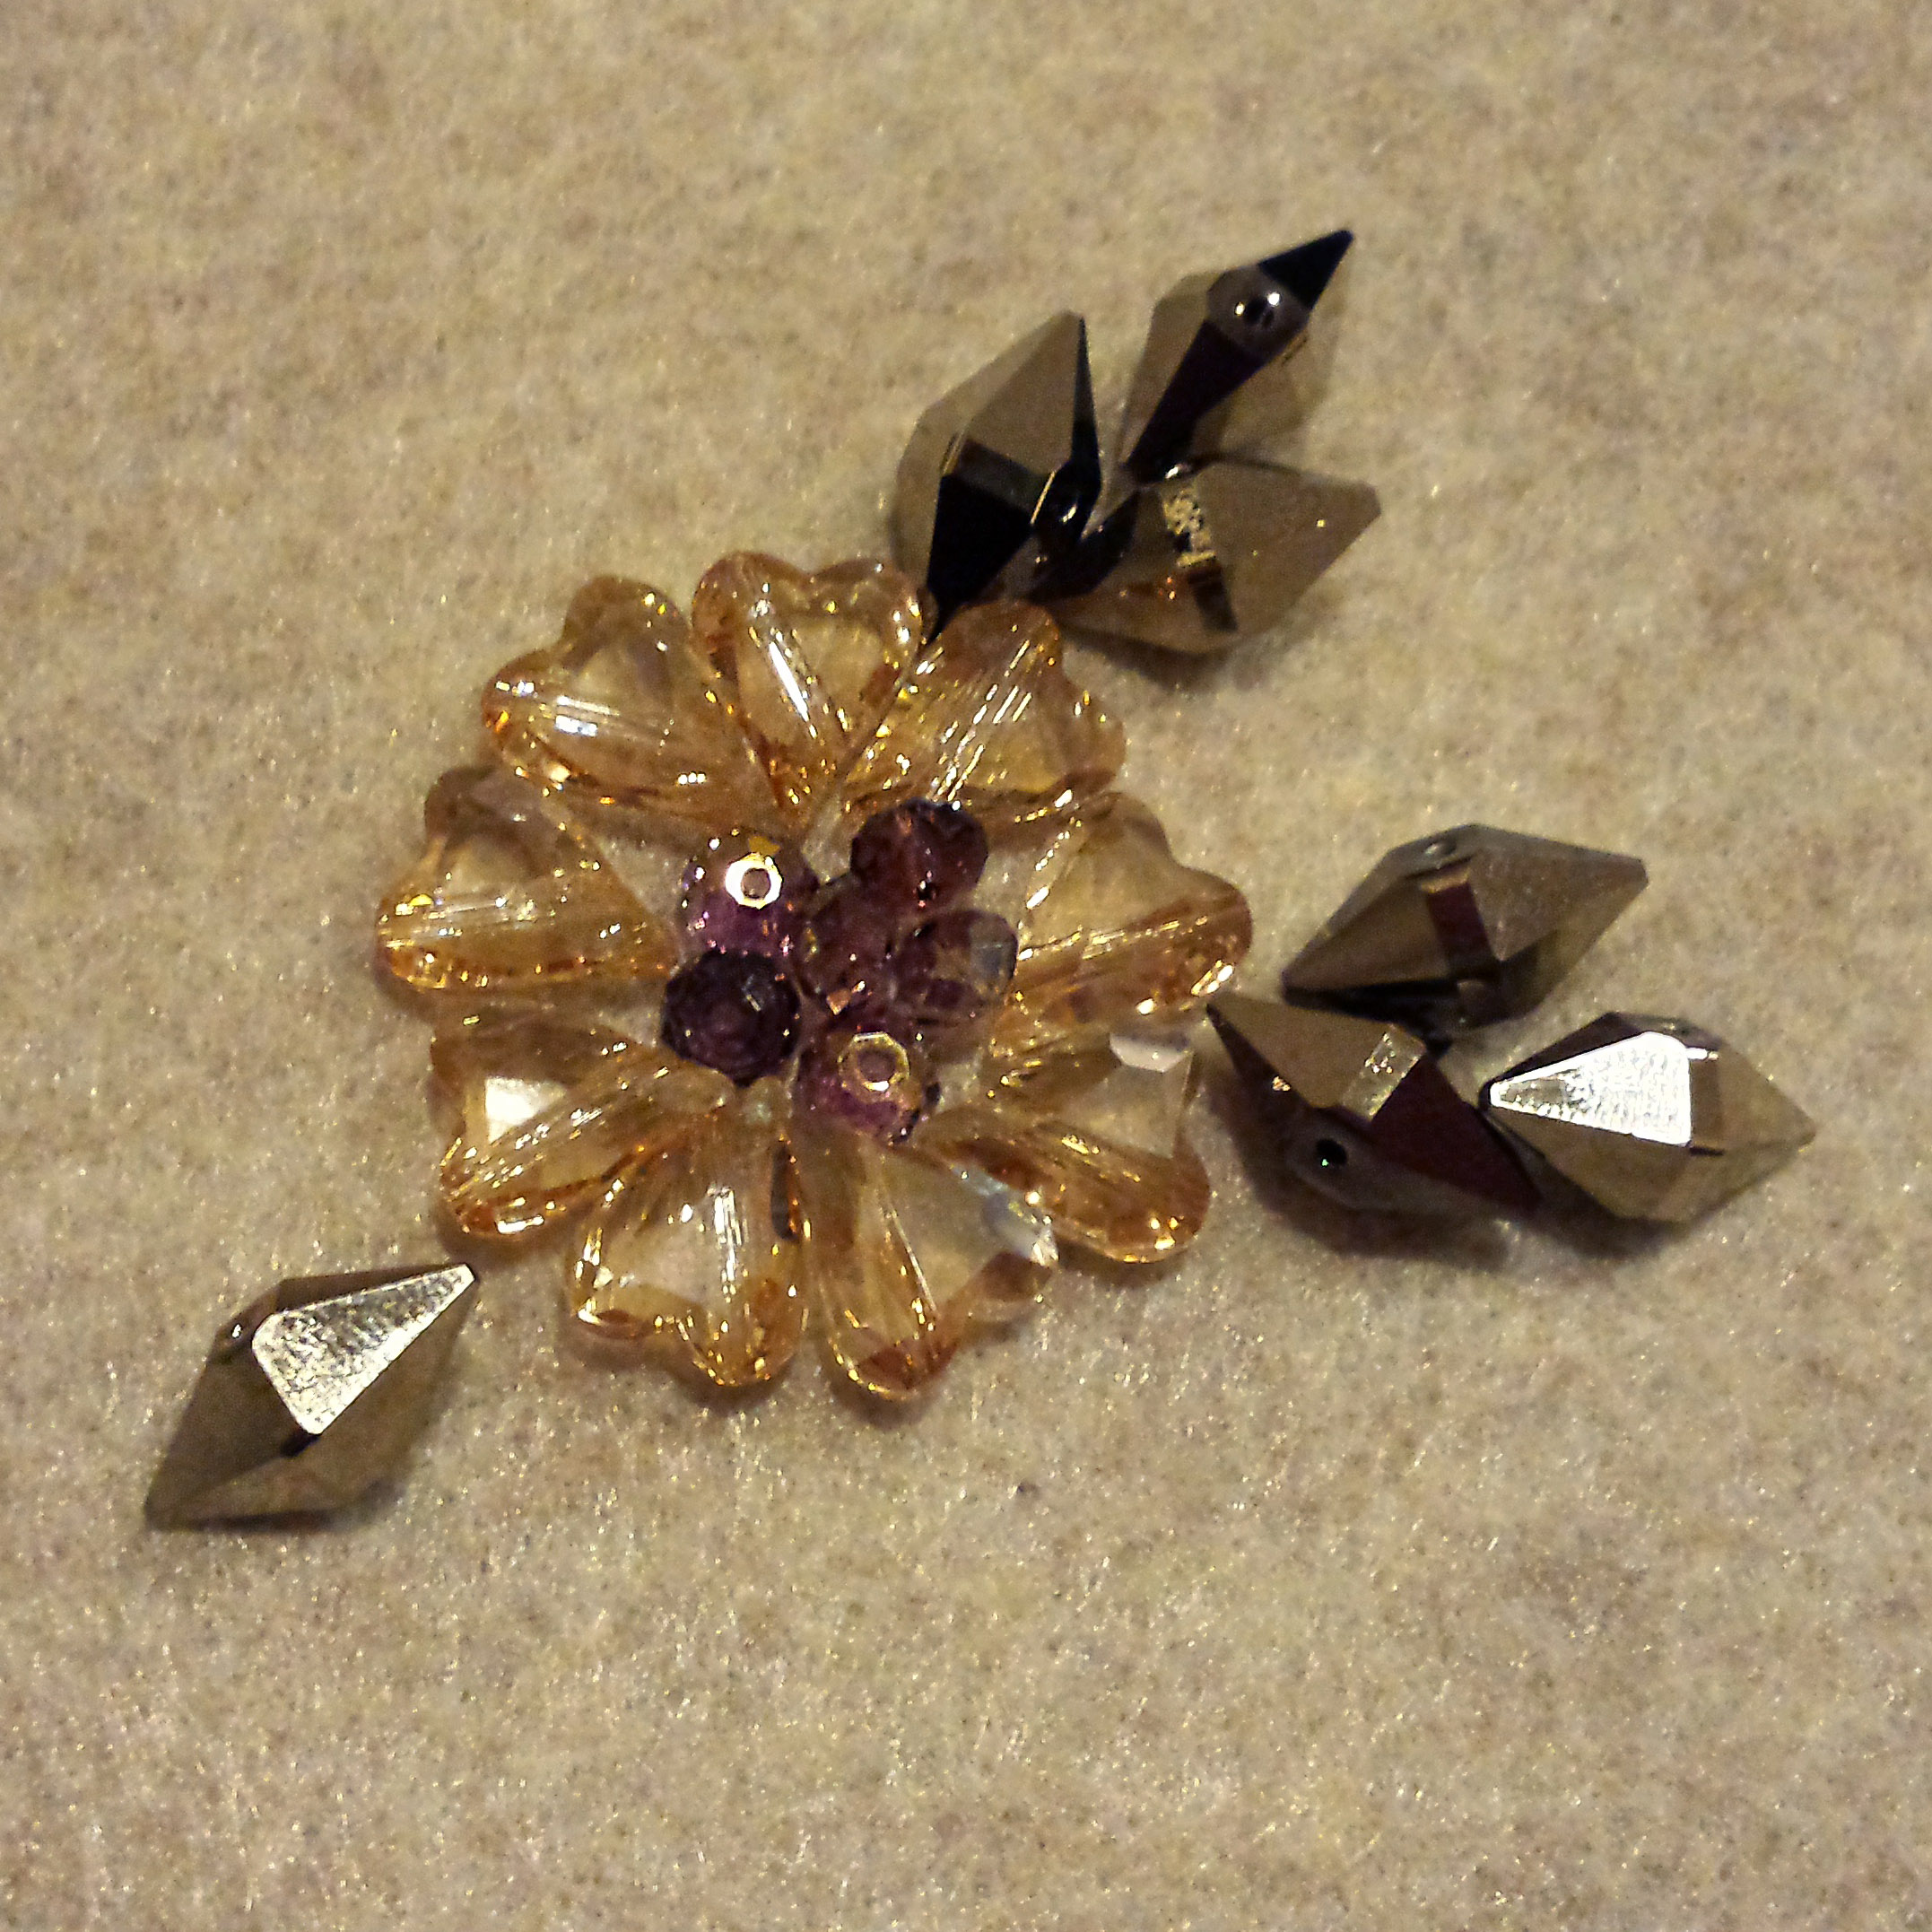
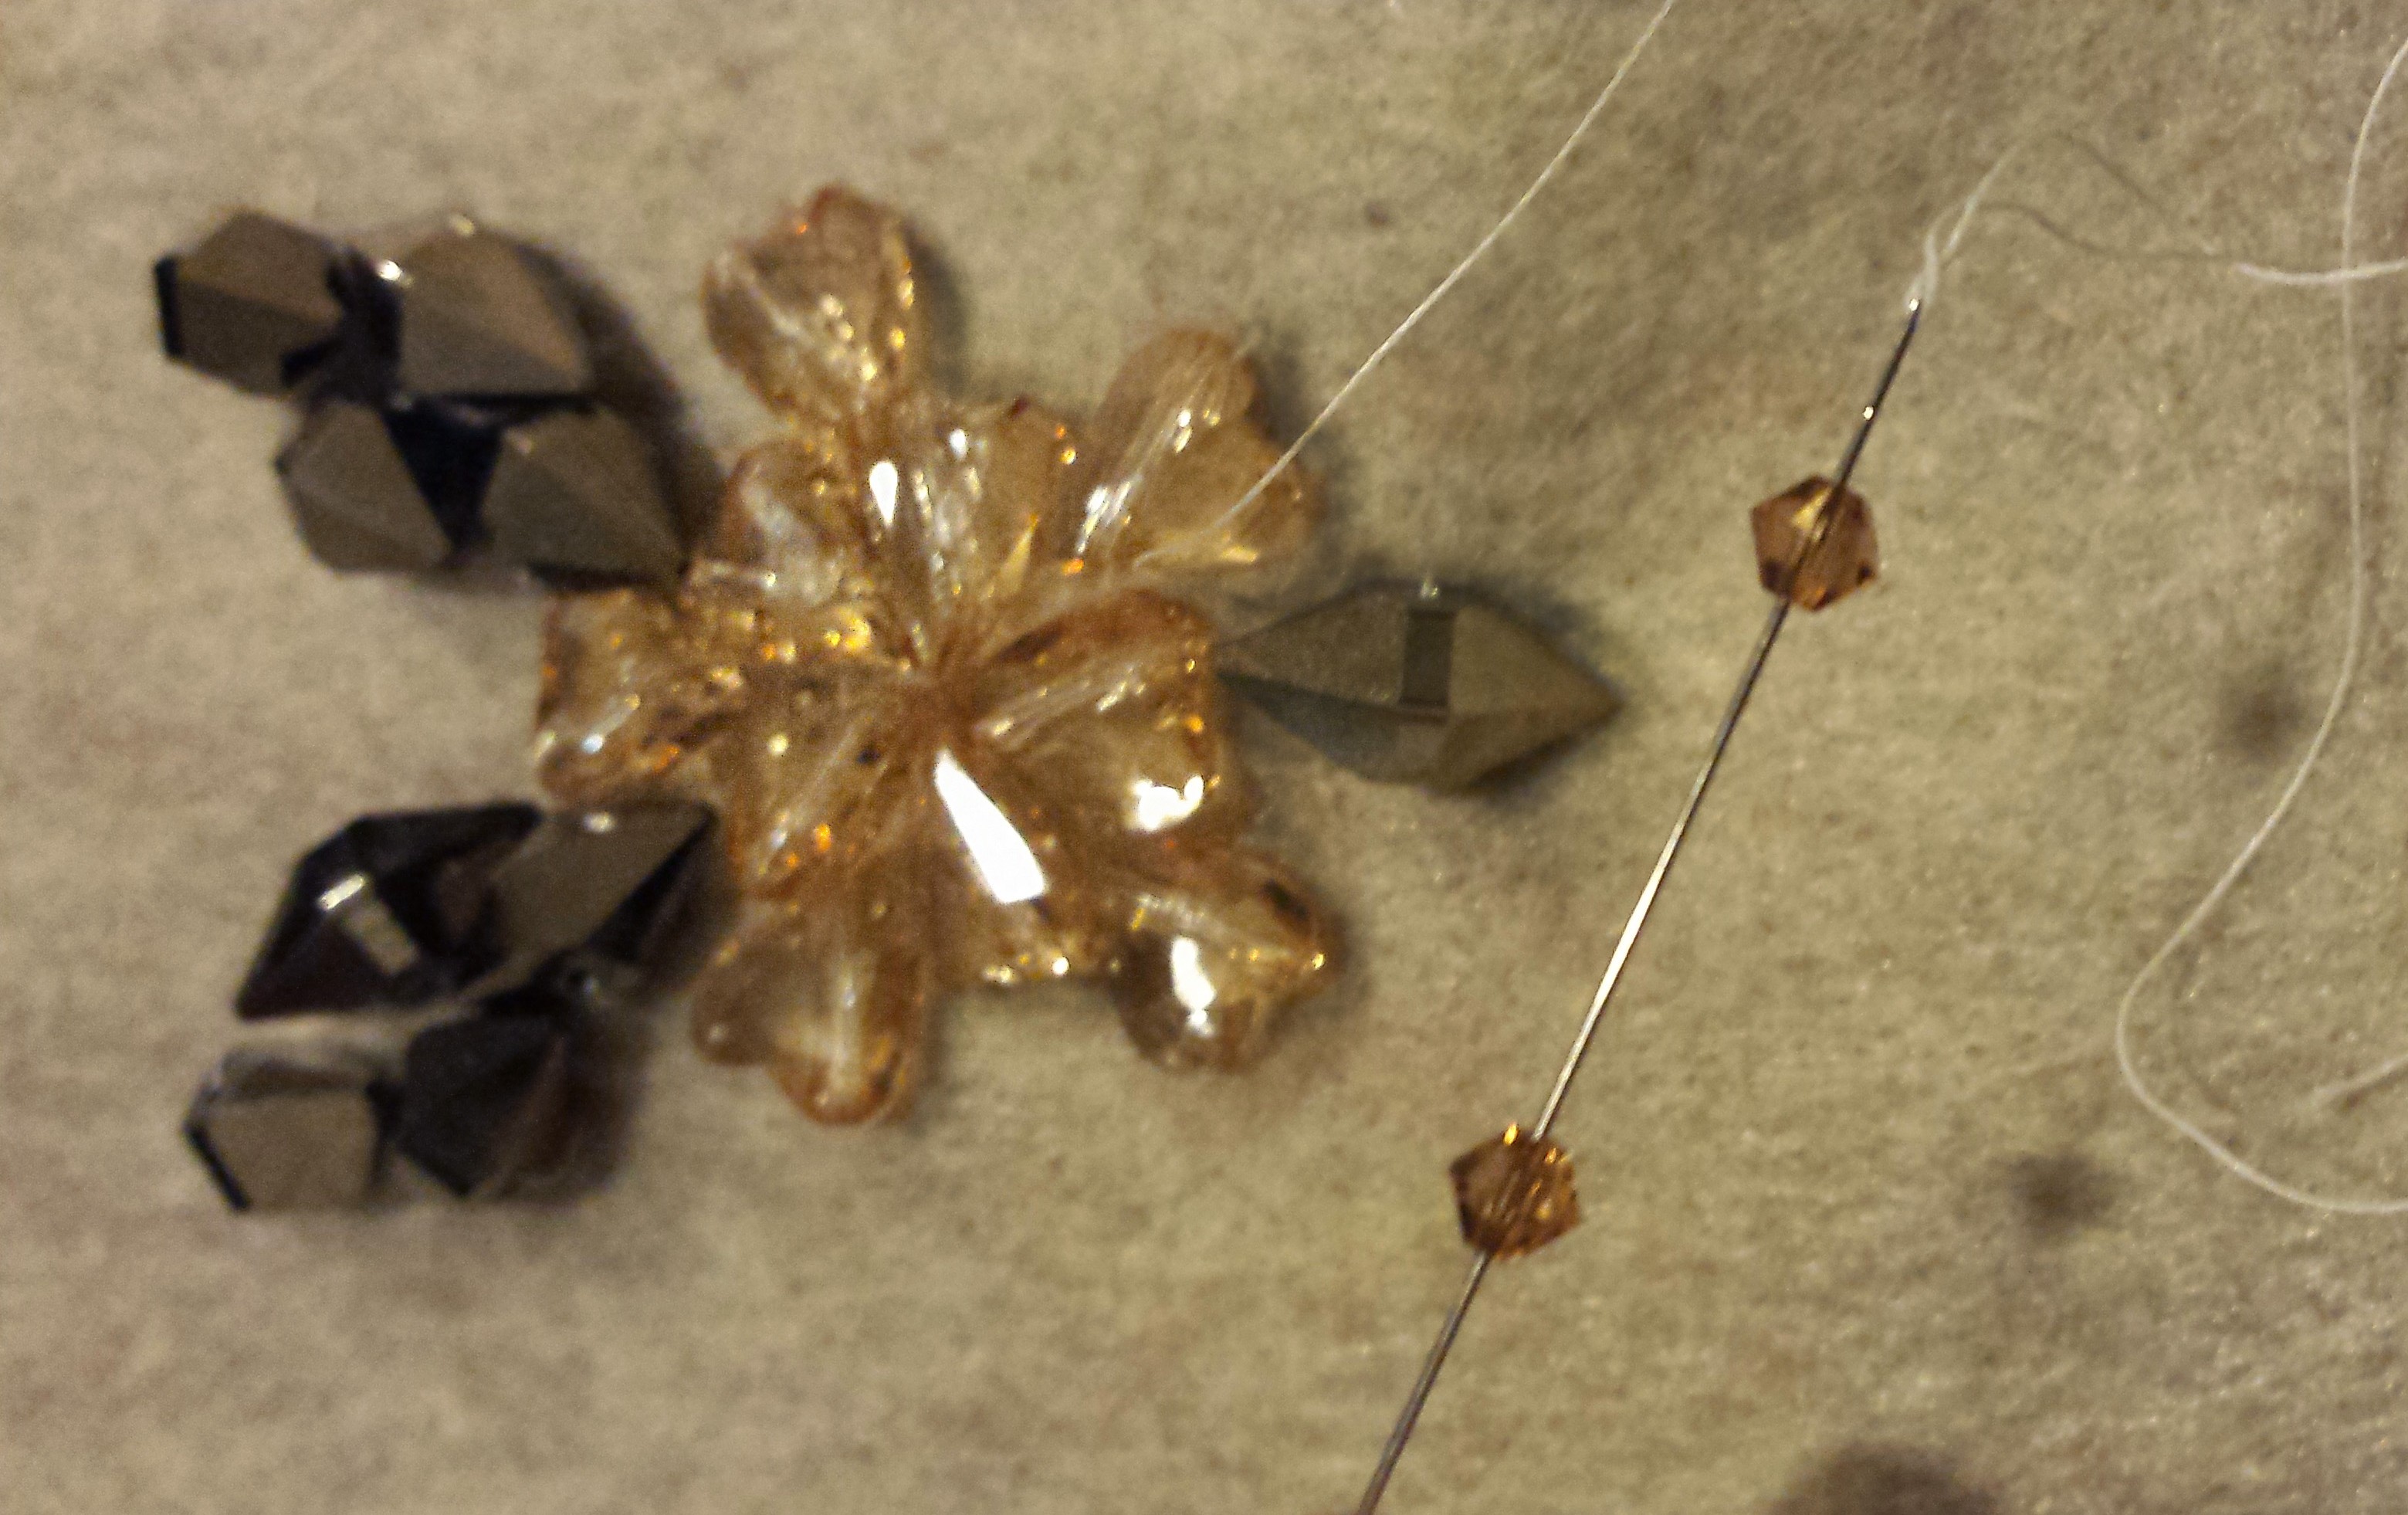
First, I started by arranging my larger beads in various patterns (2 options I came up with are above). I knew I wanted to do some kind of floral-inspired design. For some people, it may be easier to roughly draw something as well.

Needle & Thread Basics

20141117_182404

I began by cutting a strand of Power Pro bead thread that was about the span of my arms; you can start with a smaller strand than this as this may be easier to manage at first. This thread is pretty amazing – I would not recommend using other threads that you may find at the fabric store because the crystals can actually cut through that type of thread! Power Pro by The BeadSmith is much more sturdy, and you would hate to lose your Swarovski crystals because of the wrong thread!

 20141117_182123  20141117_182205

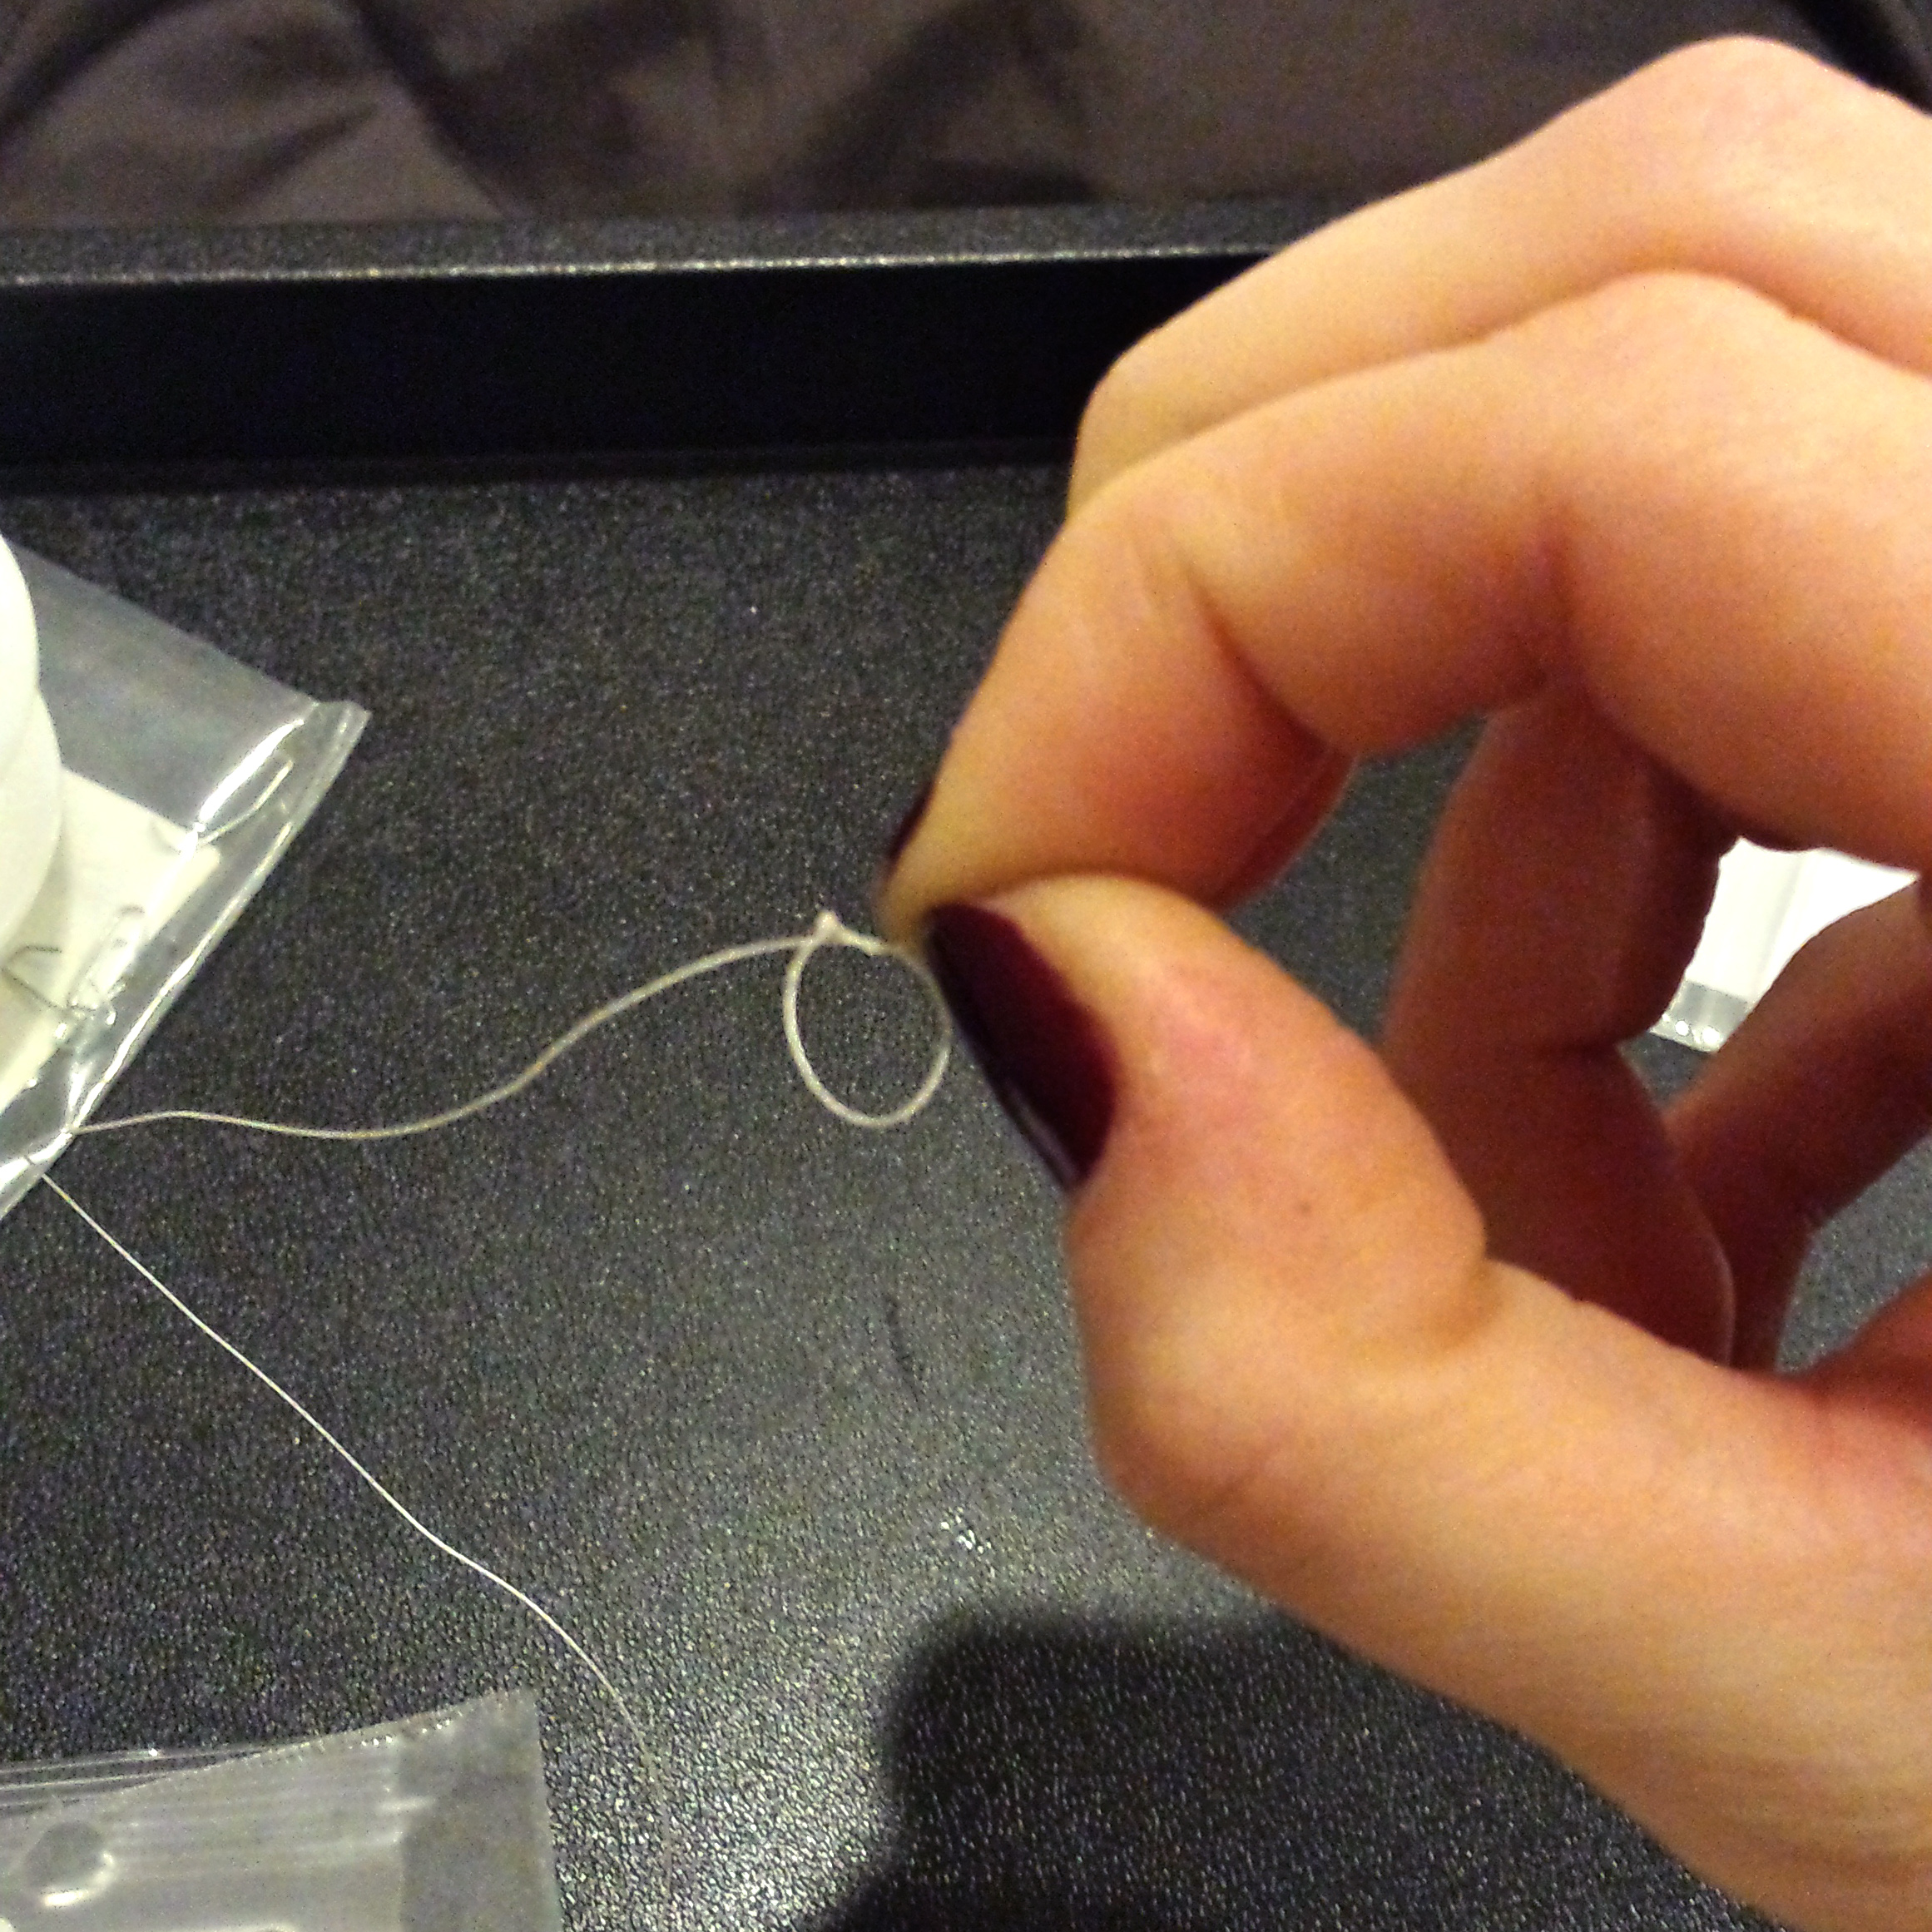
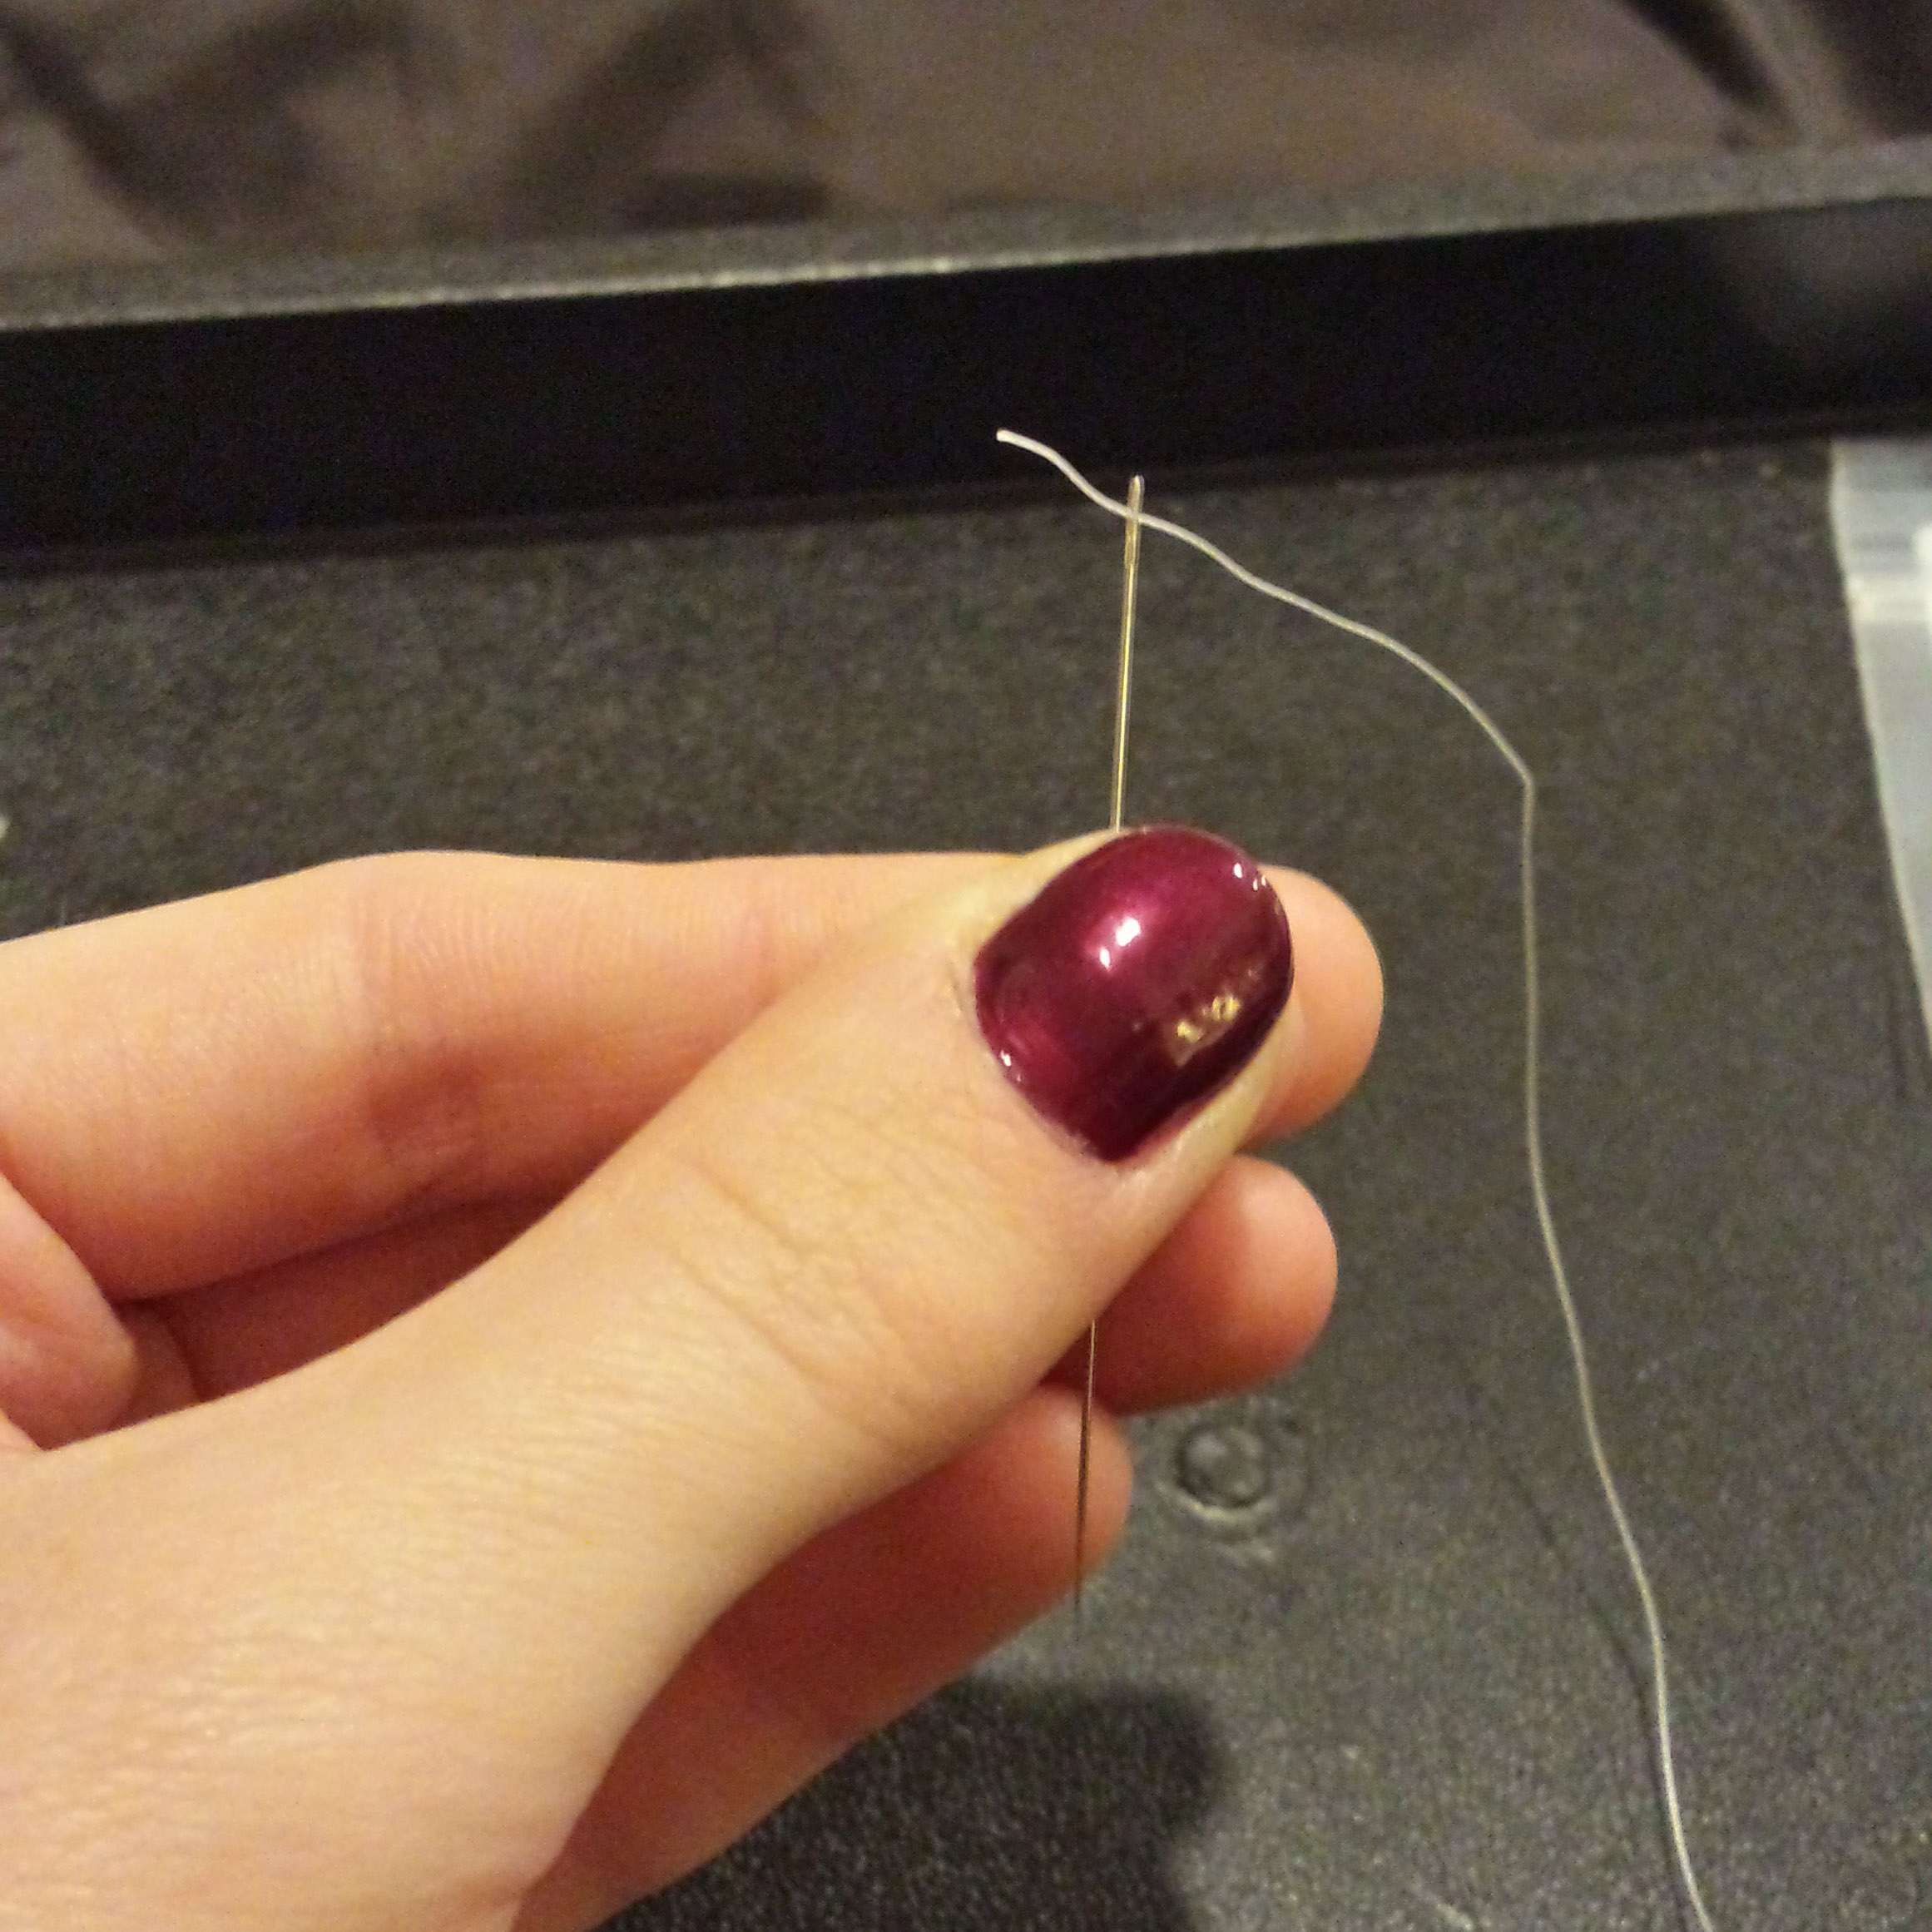
Once the needle is threaded, tie a basic knot; I did three loops to create a thicker knot.

Step by Step

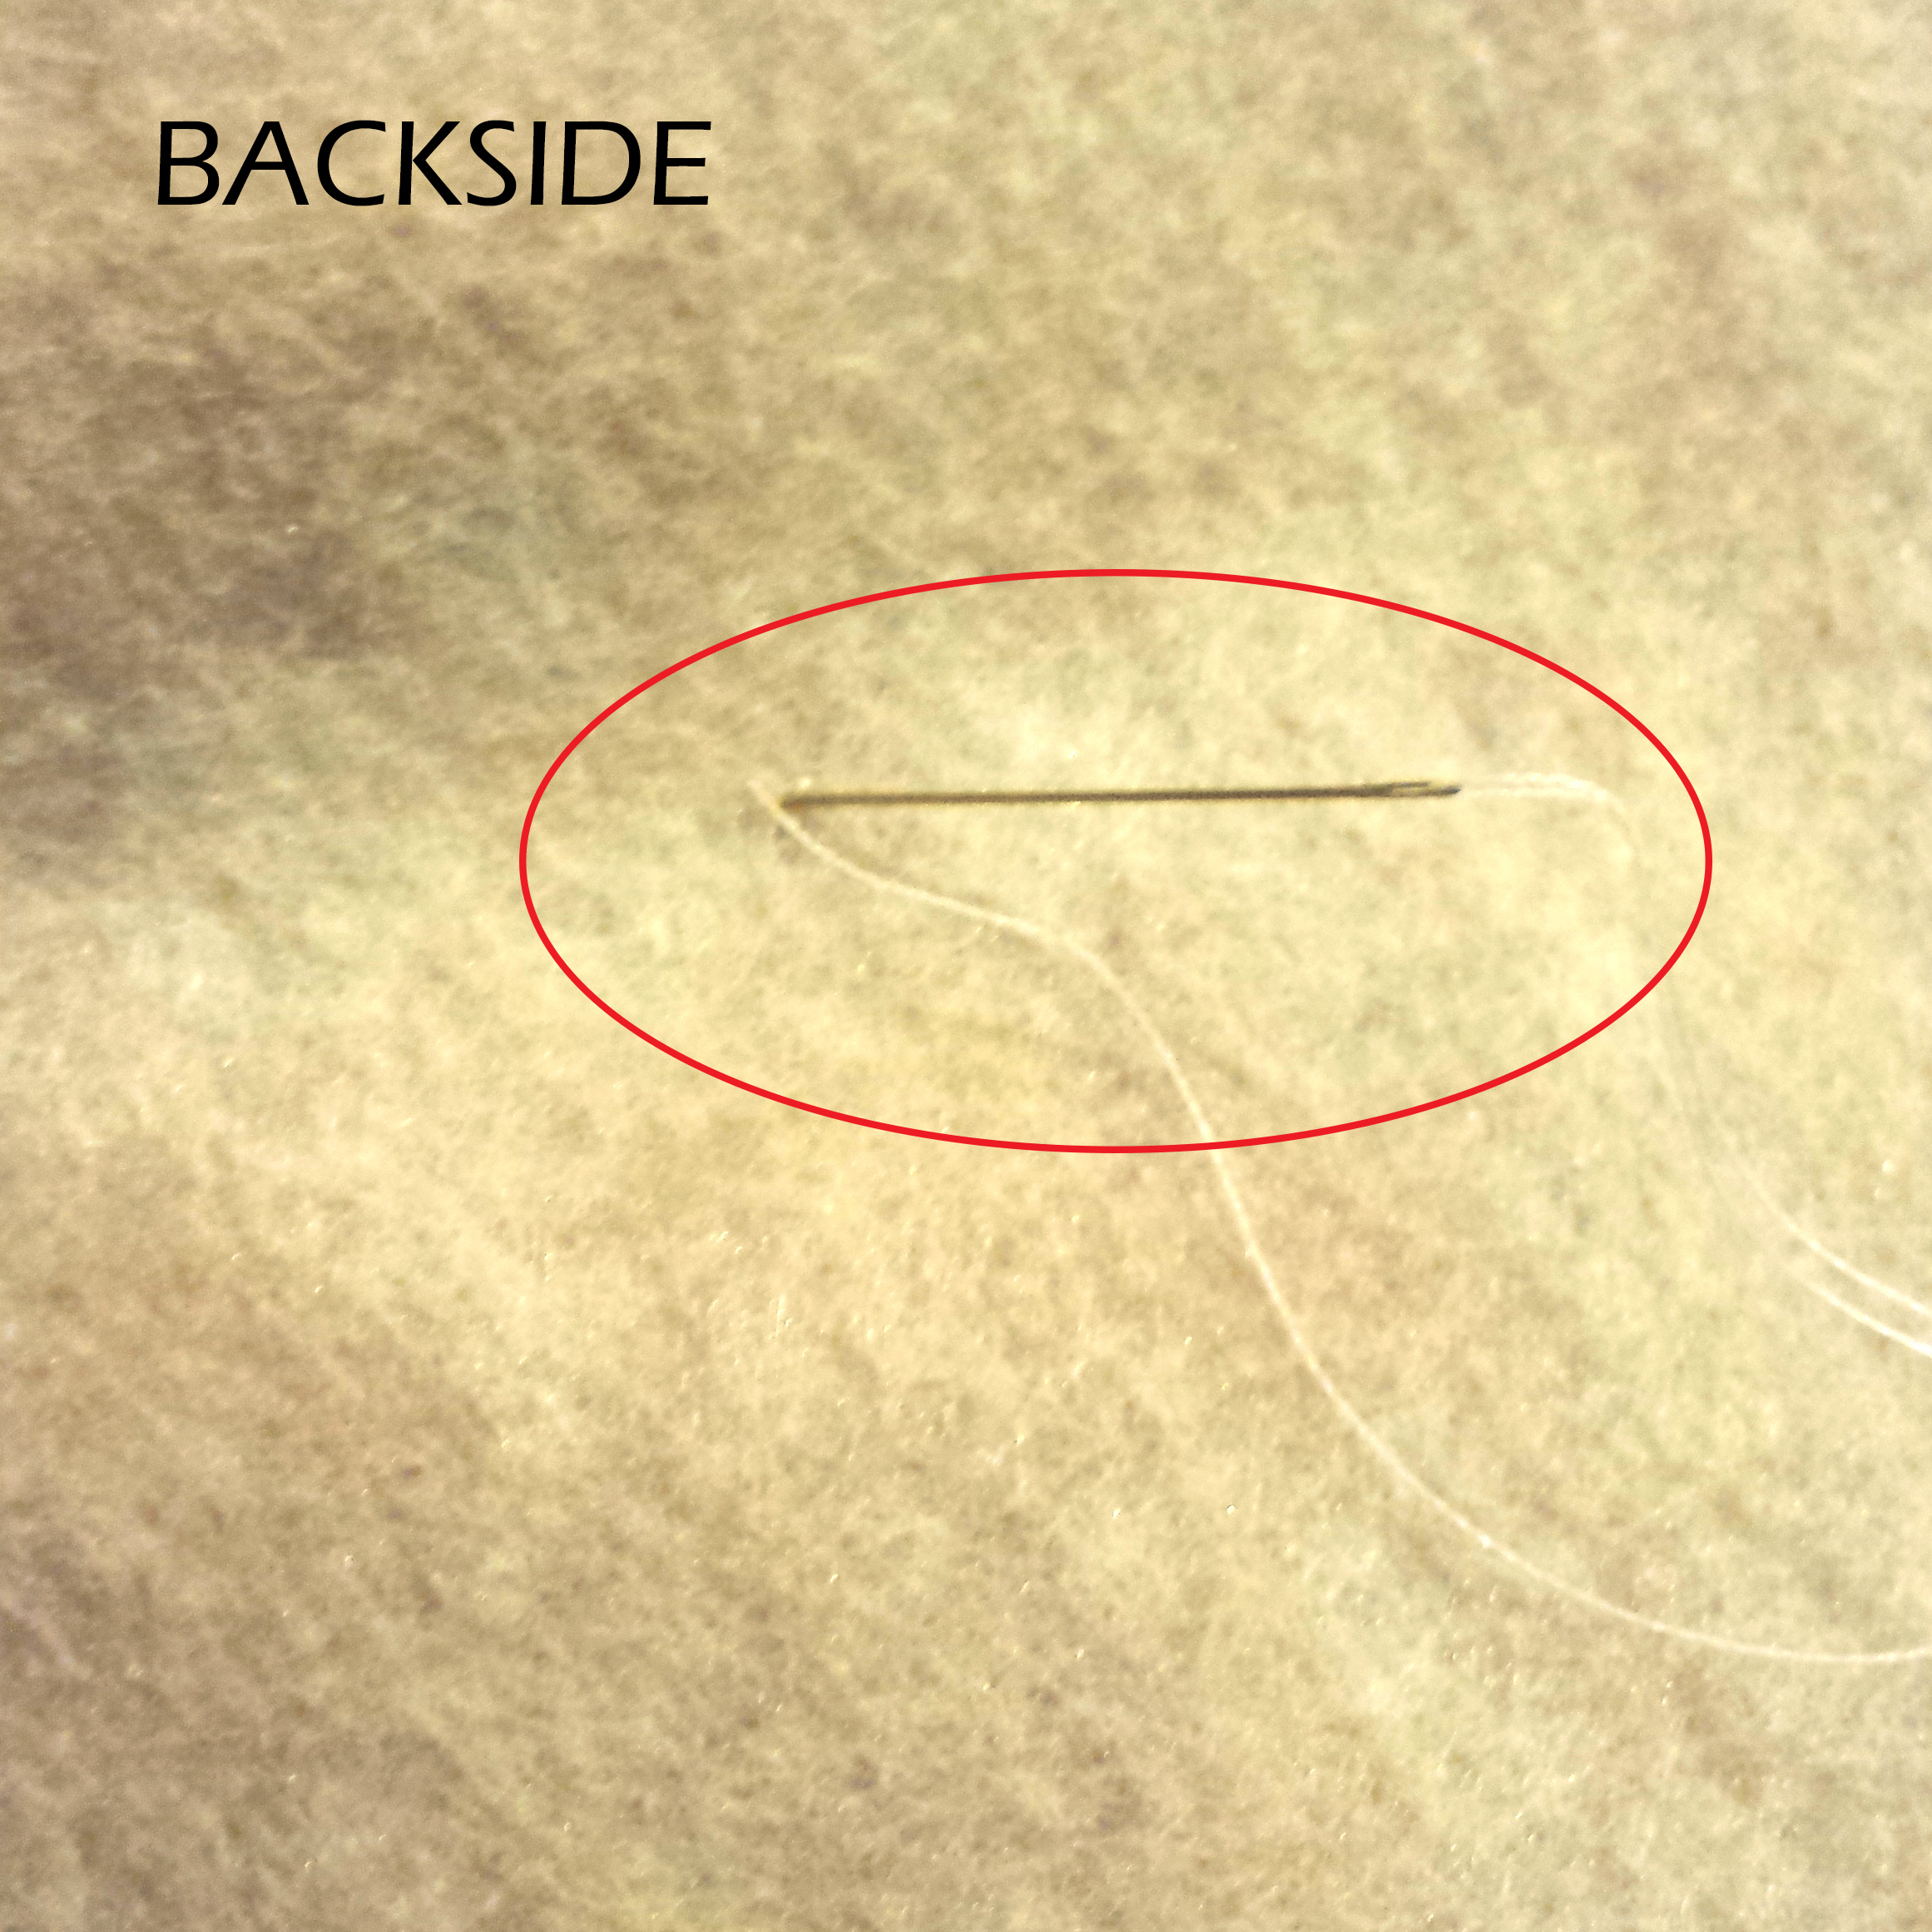
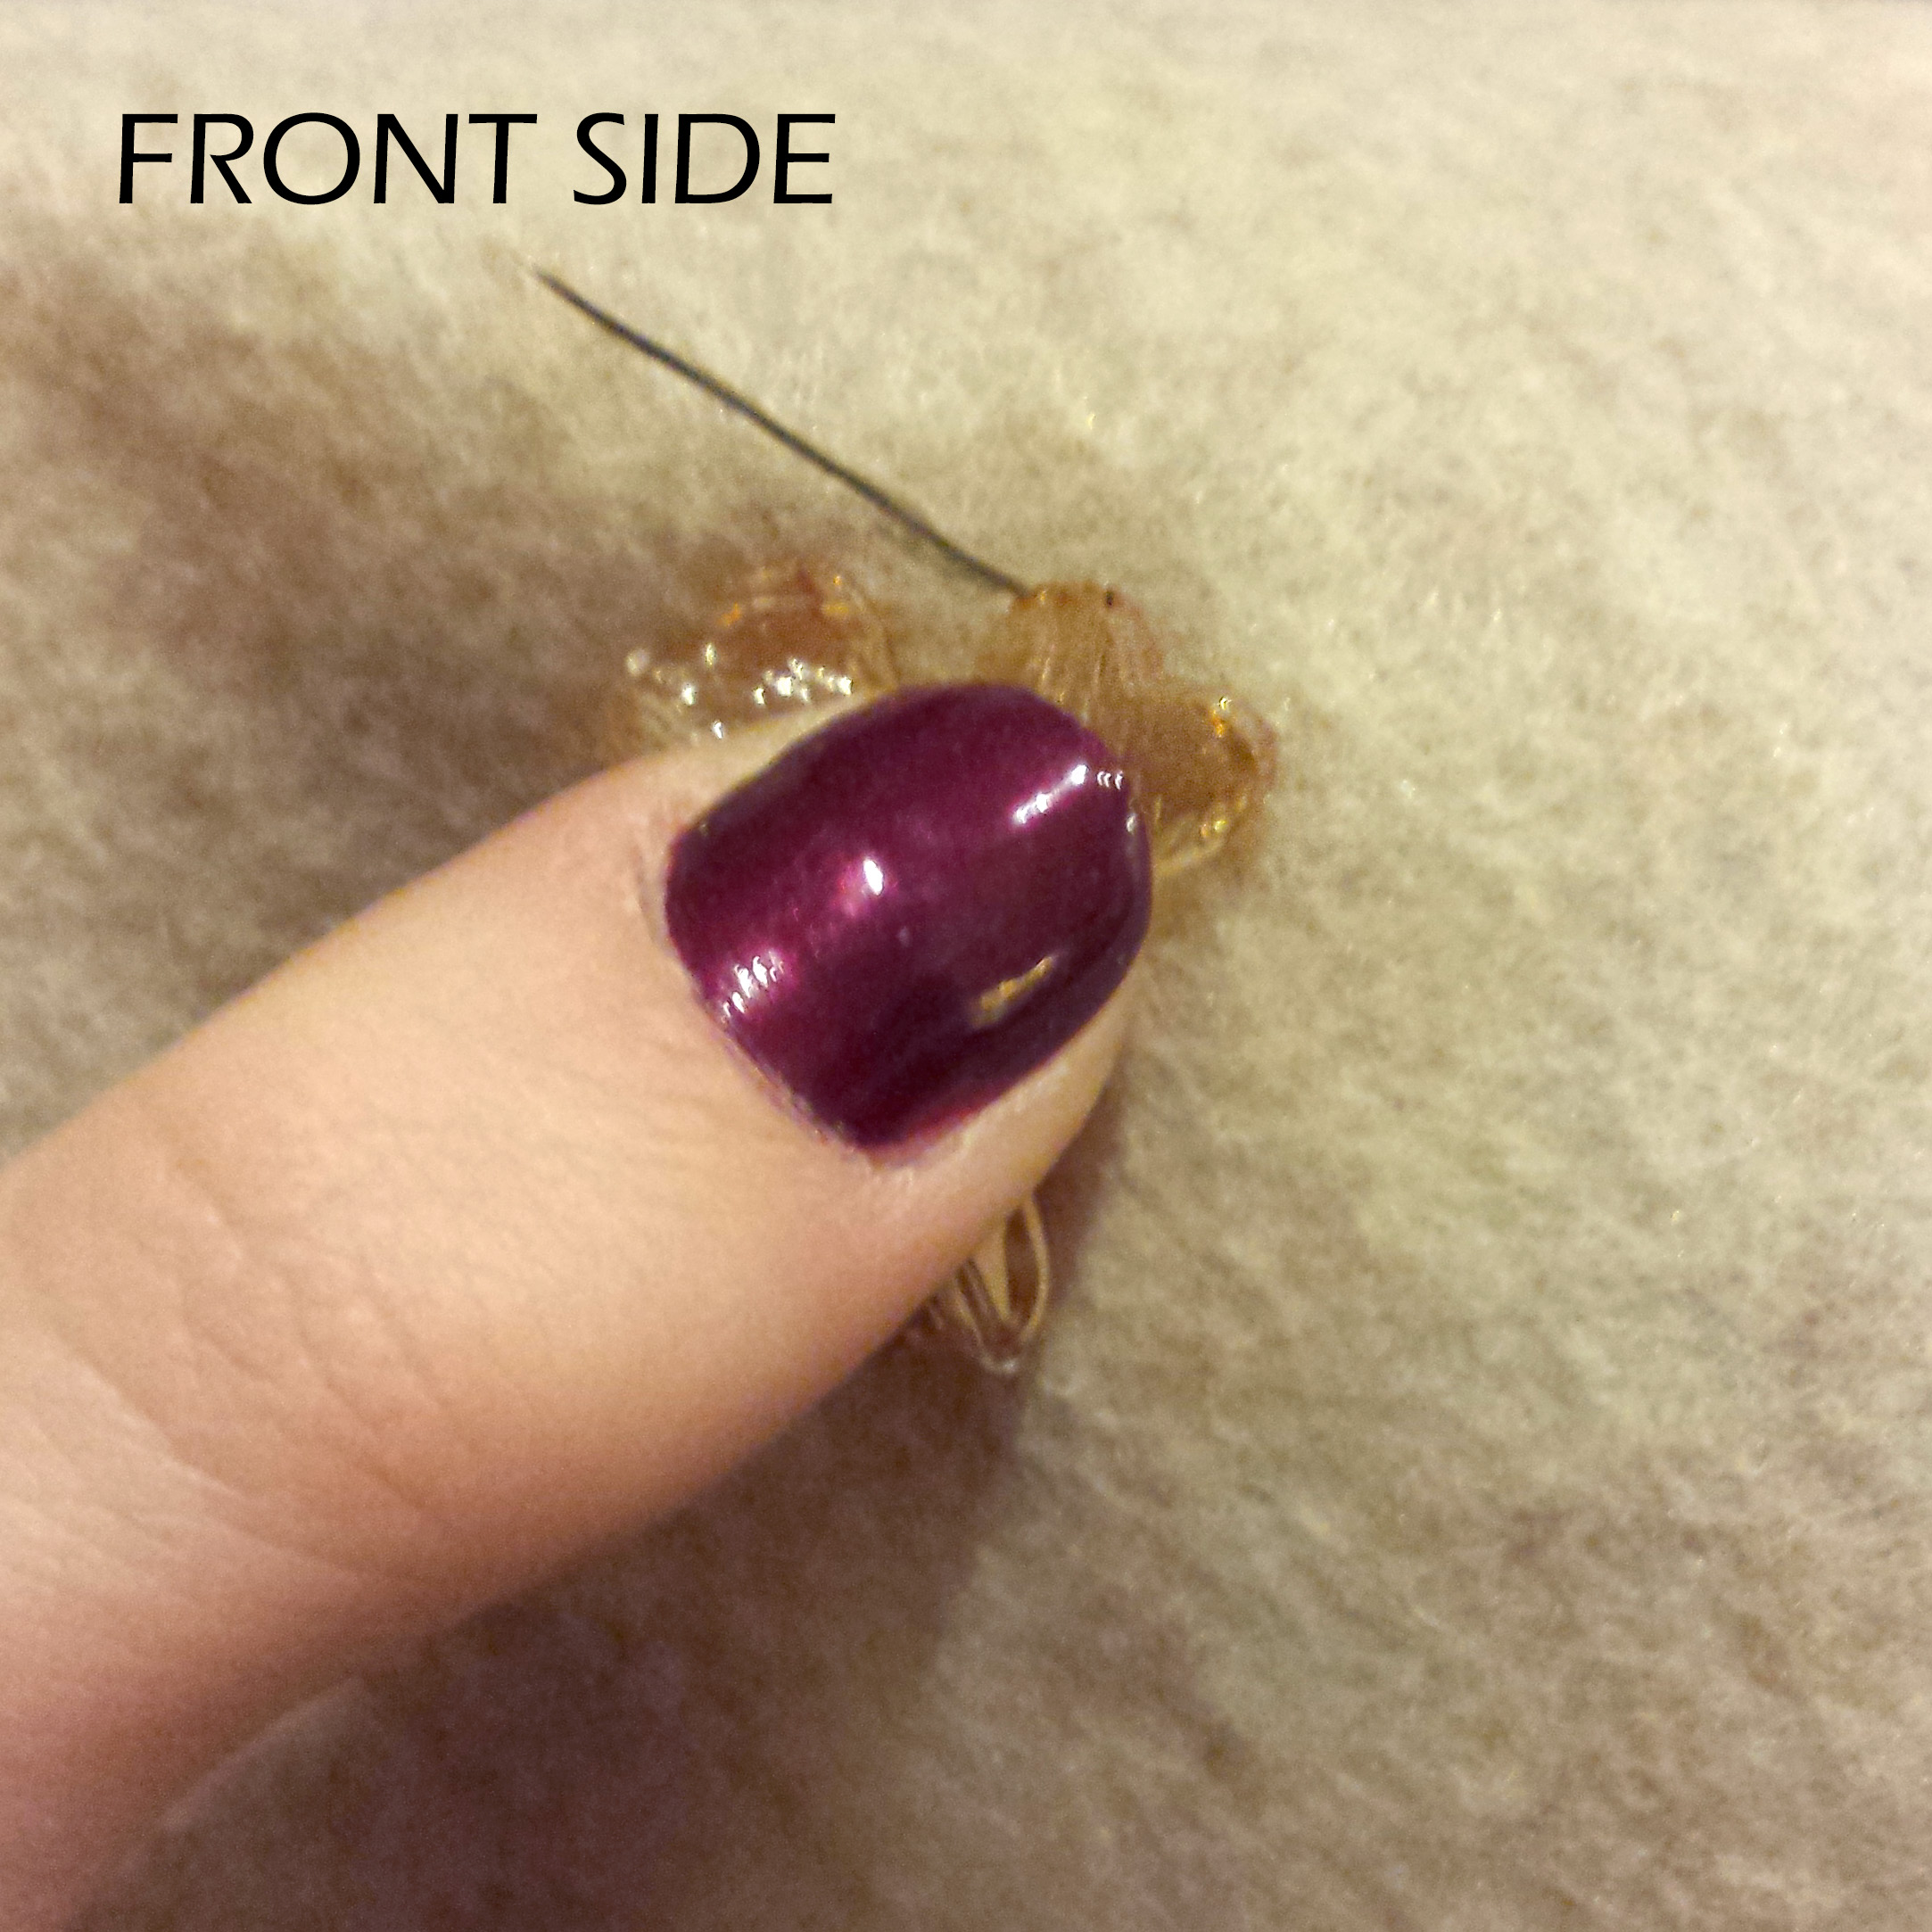
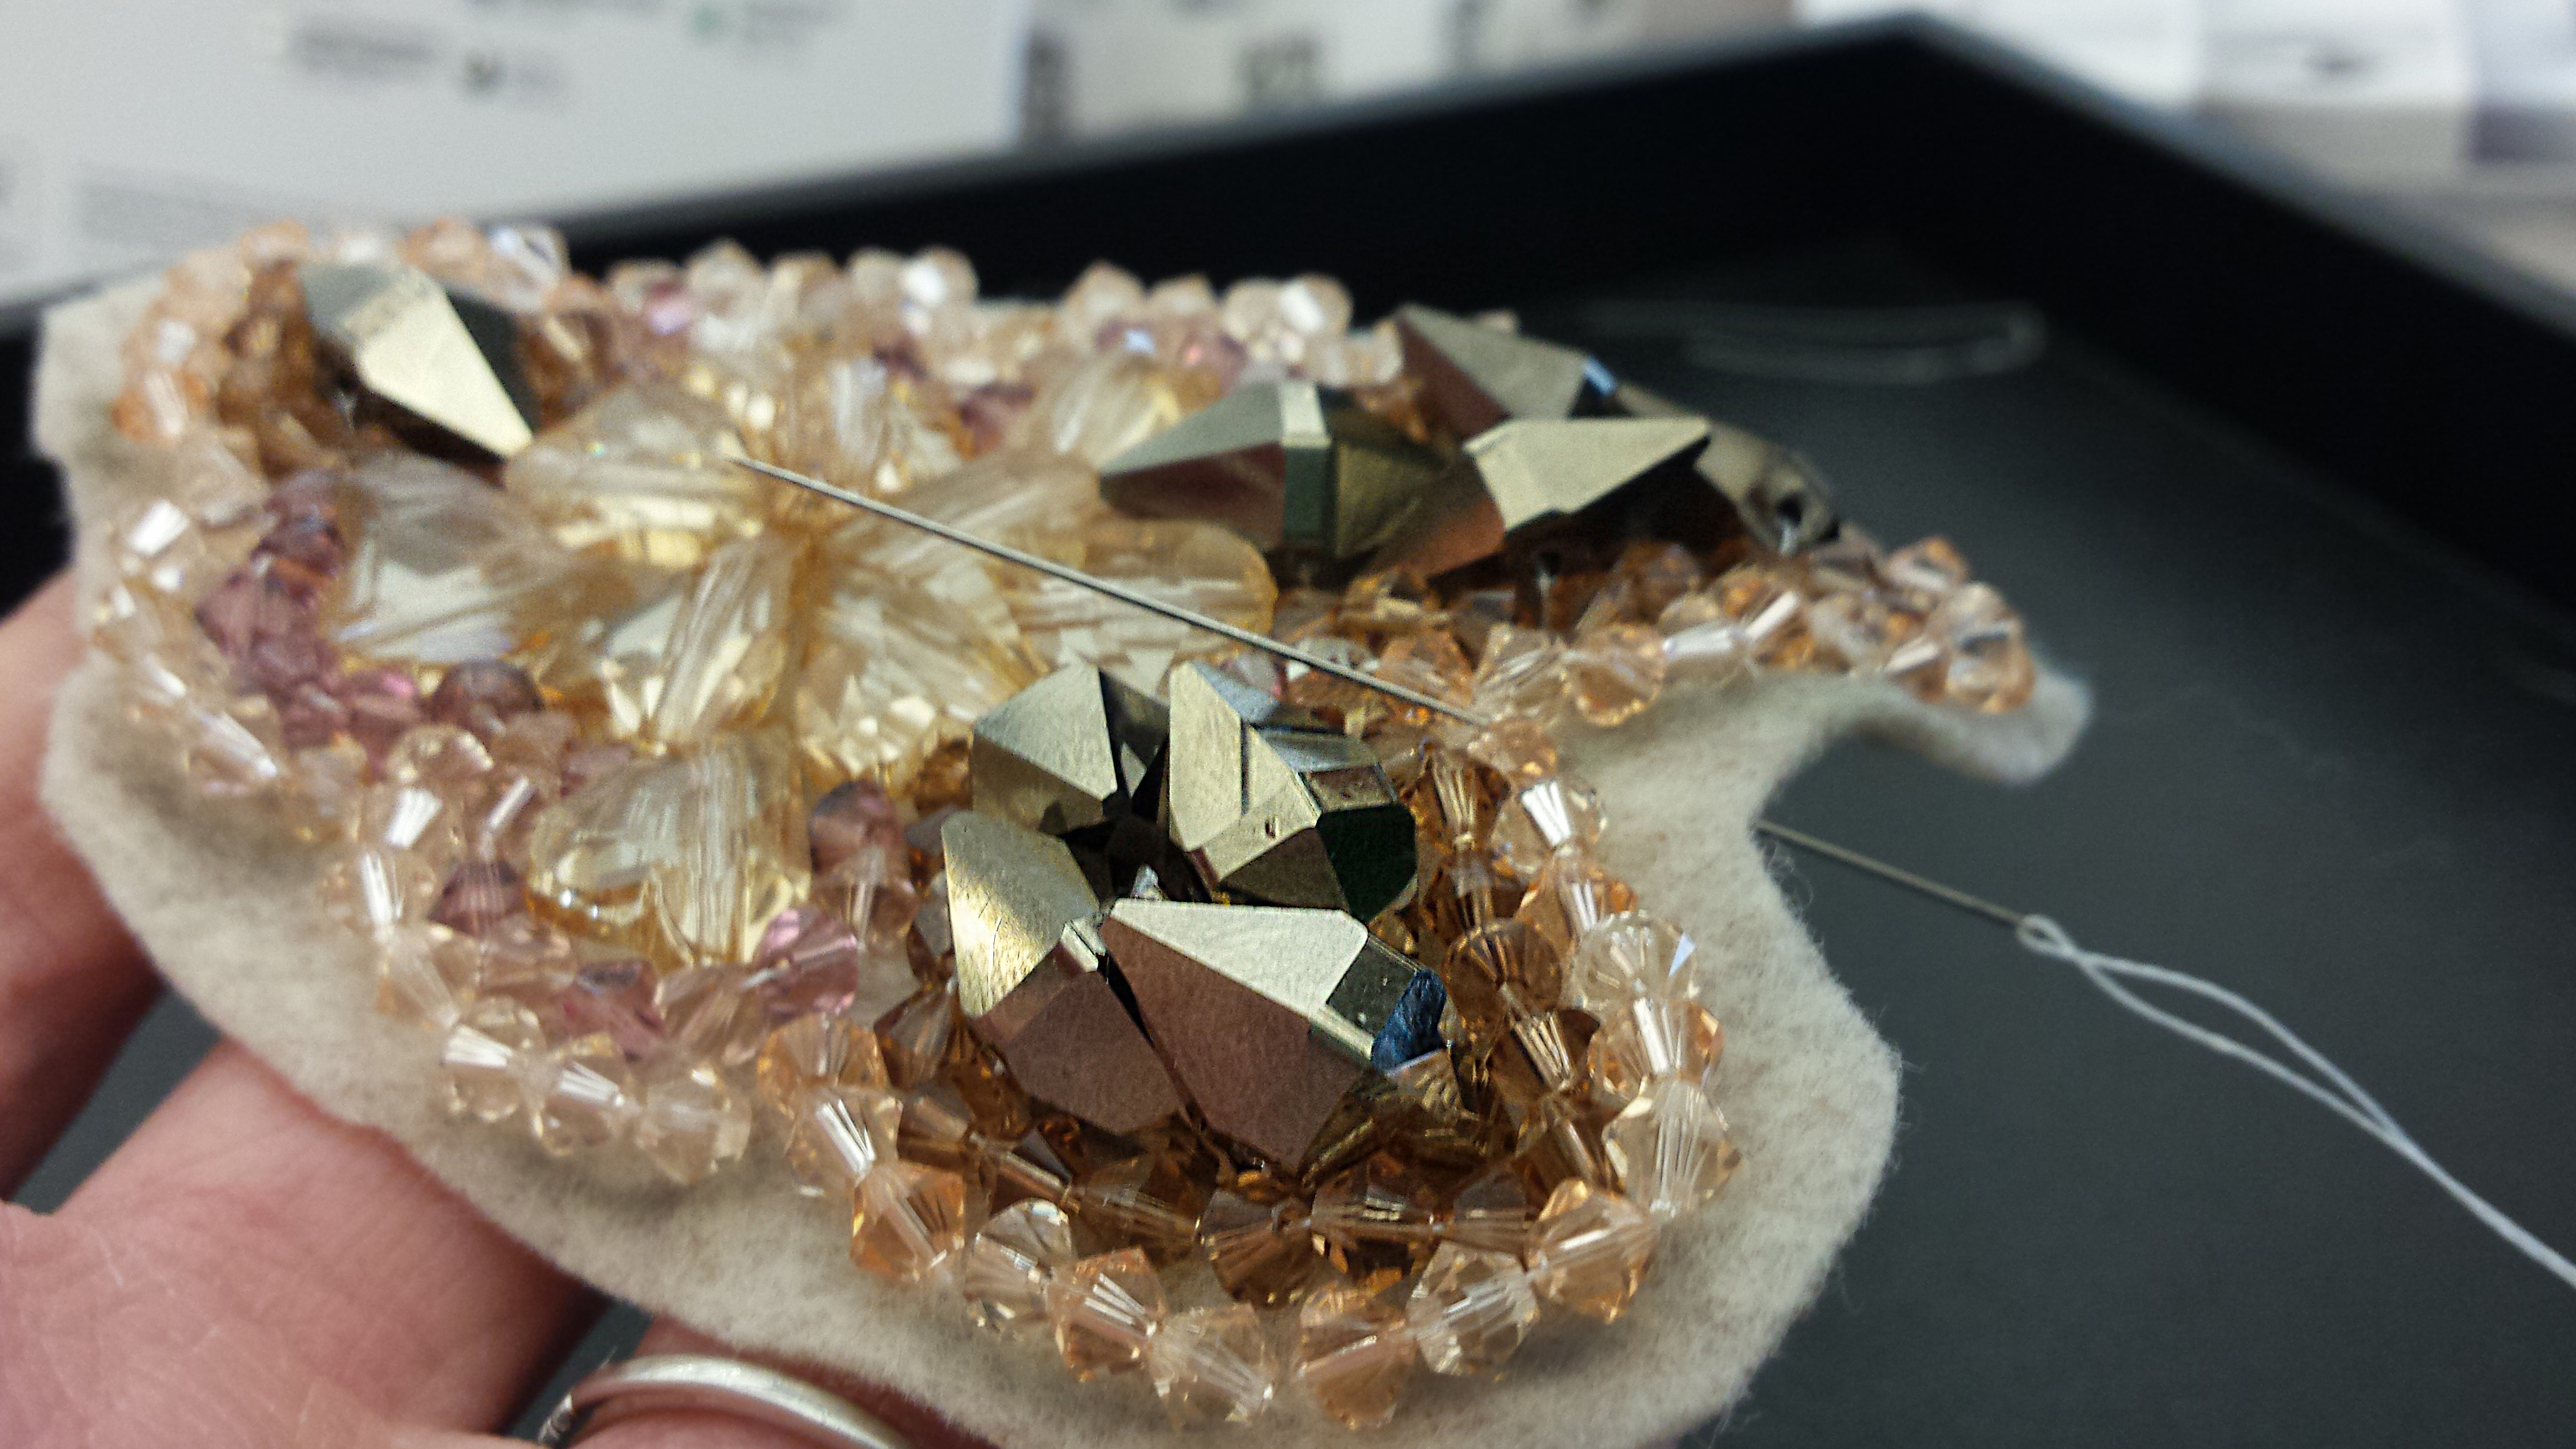
1.  Now it’s time to sew the final design onto the felt. I like to start at the center of my design when I’m sewing on the crystals. Since you have the basic design laid out and your needle threaded, start by holding one crystal in place with your thumb and index finger; insert the needle from the BACK SIDE of the felt so that the needle appears near the edge of the crystal where the hole is located (see FRONT SIDE image below). The knot that you made should be on the back side of the fabric.

   backside  front side

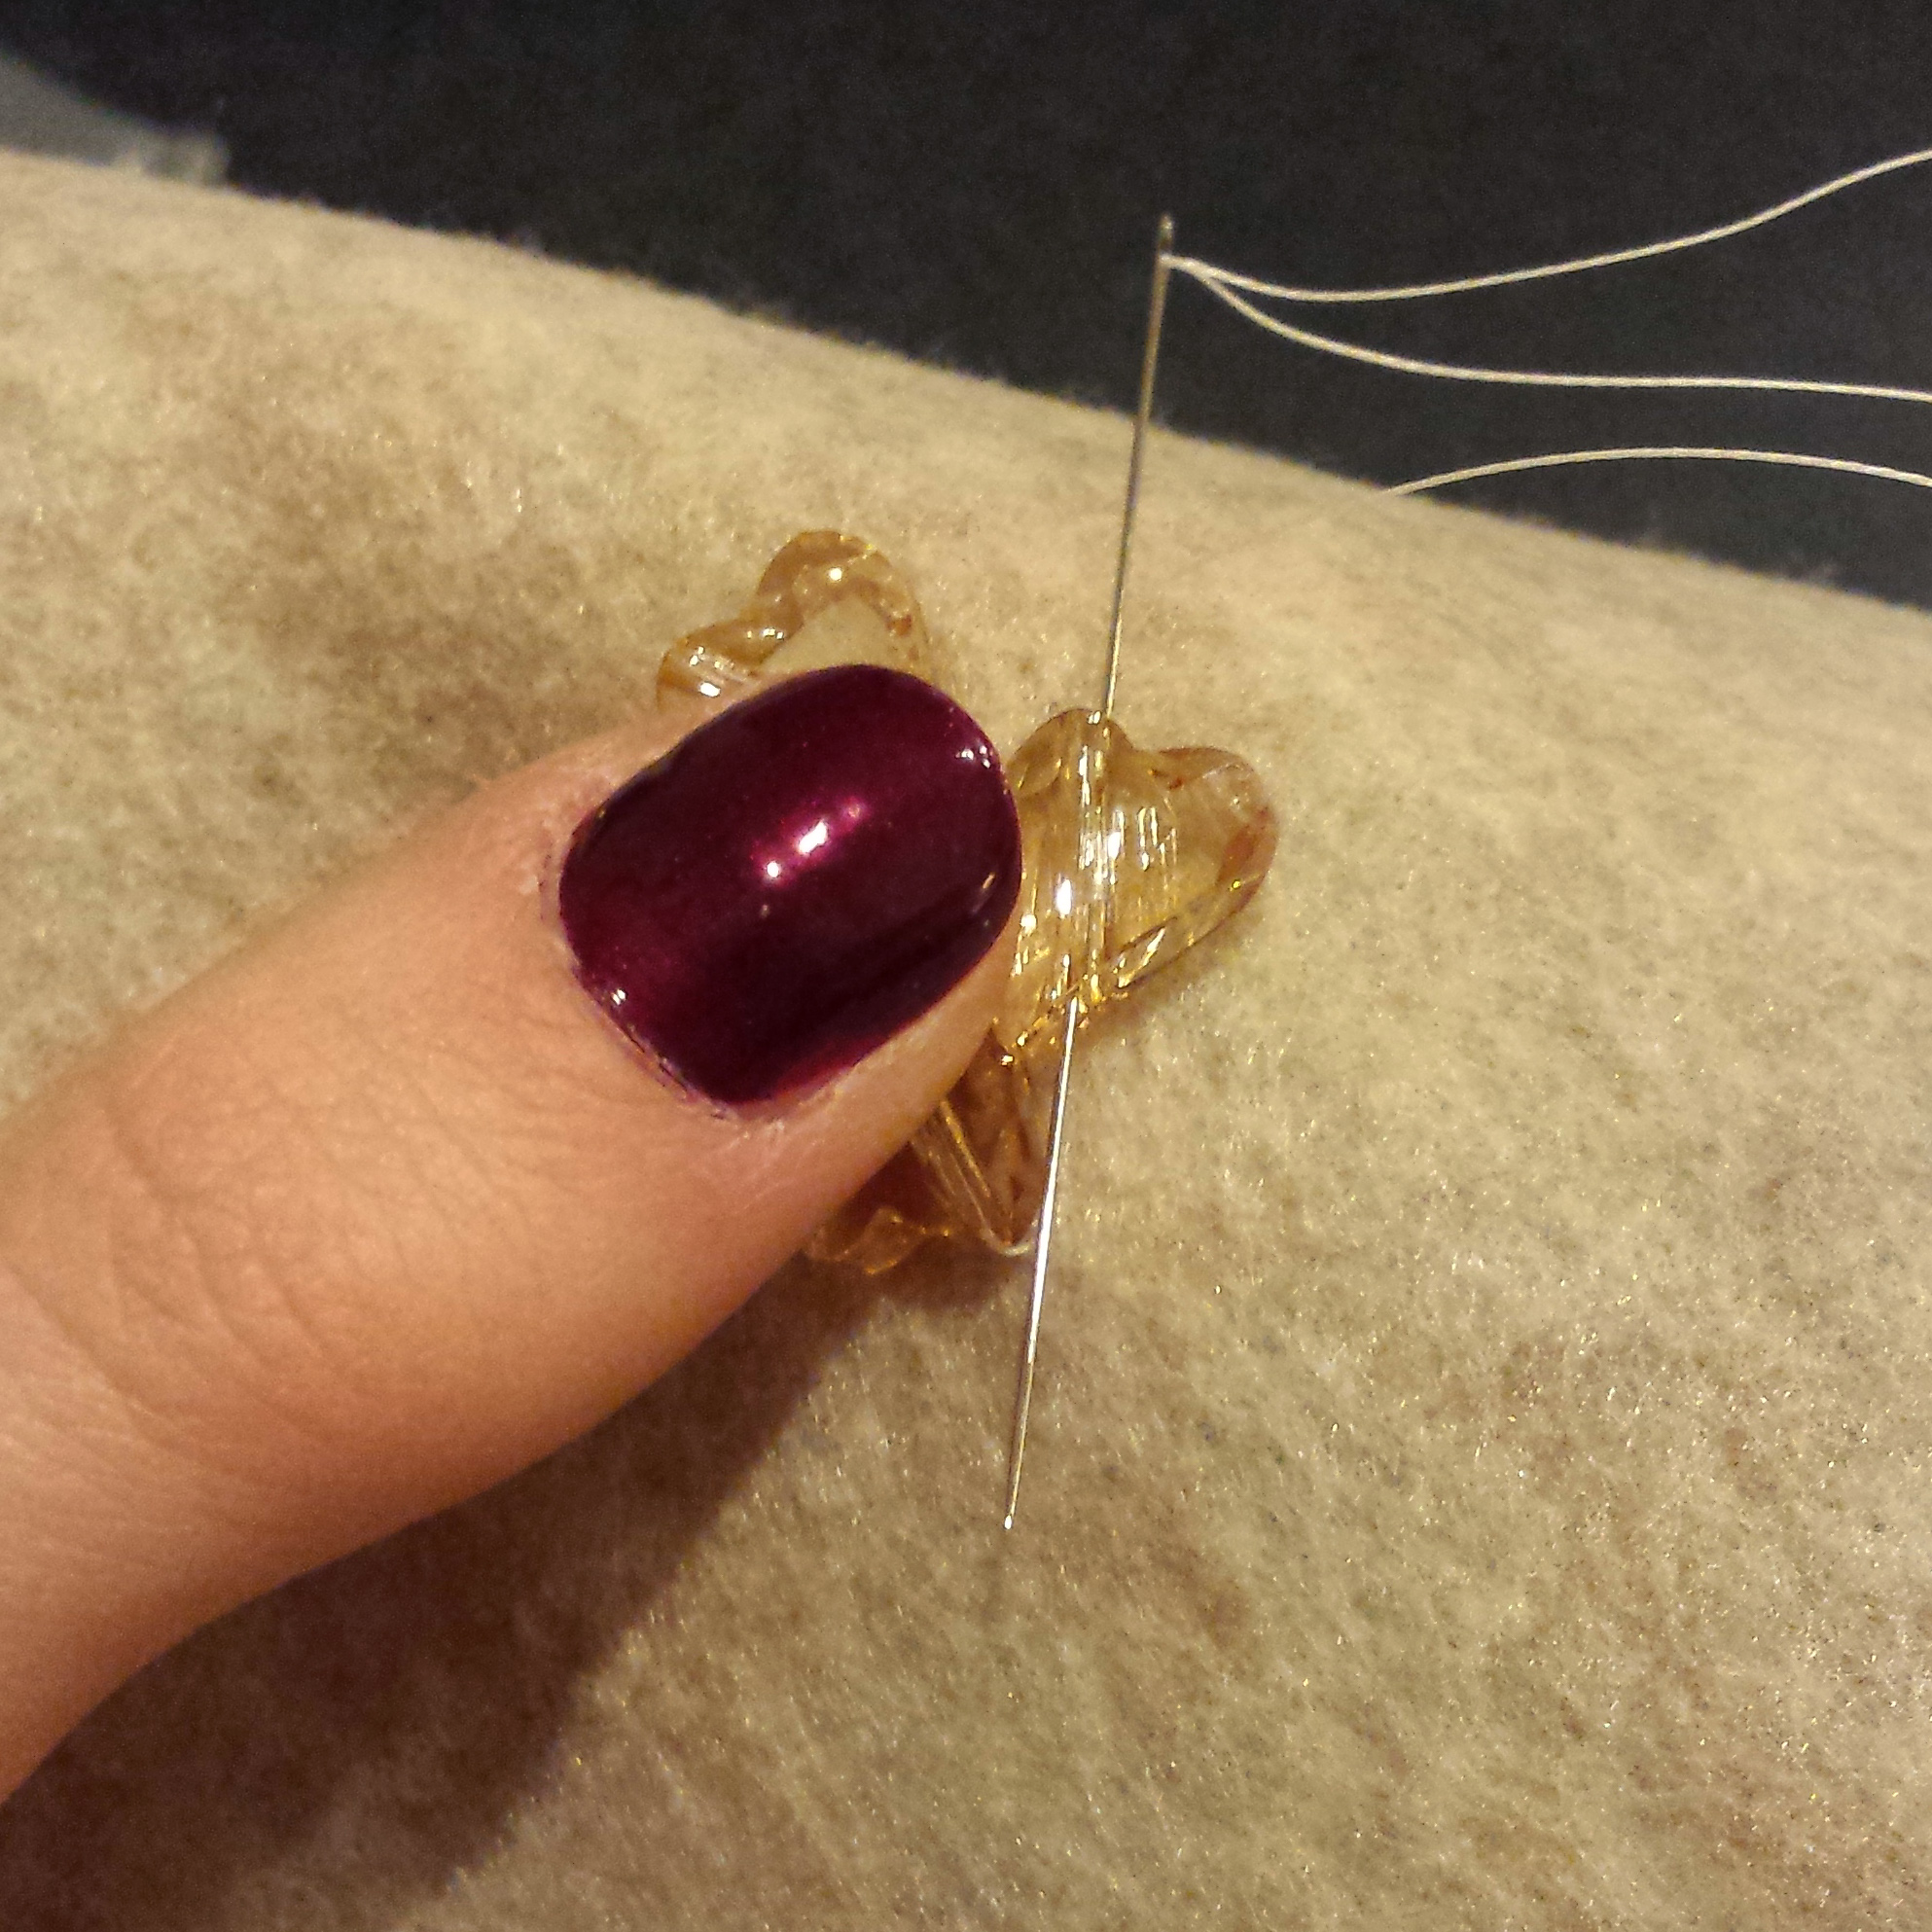
2.   Thread the needle through the hole in the crystal, and insert the needle back into the felt. Make sure to stay near the crystal’s edge where the needle just exited the hole.

20141117_184017  20141117_184115

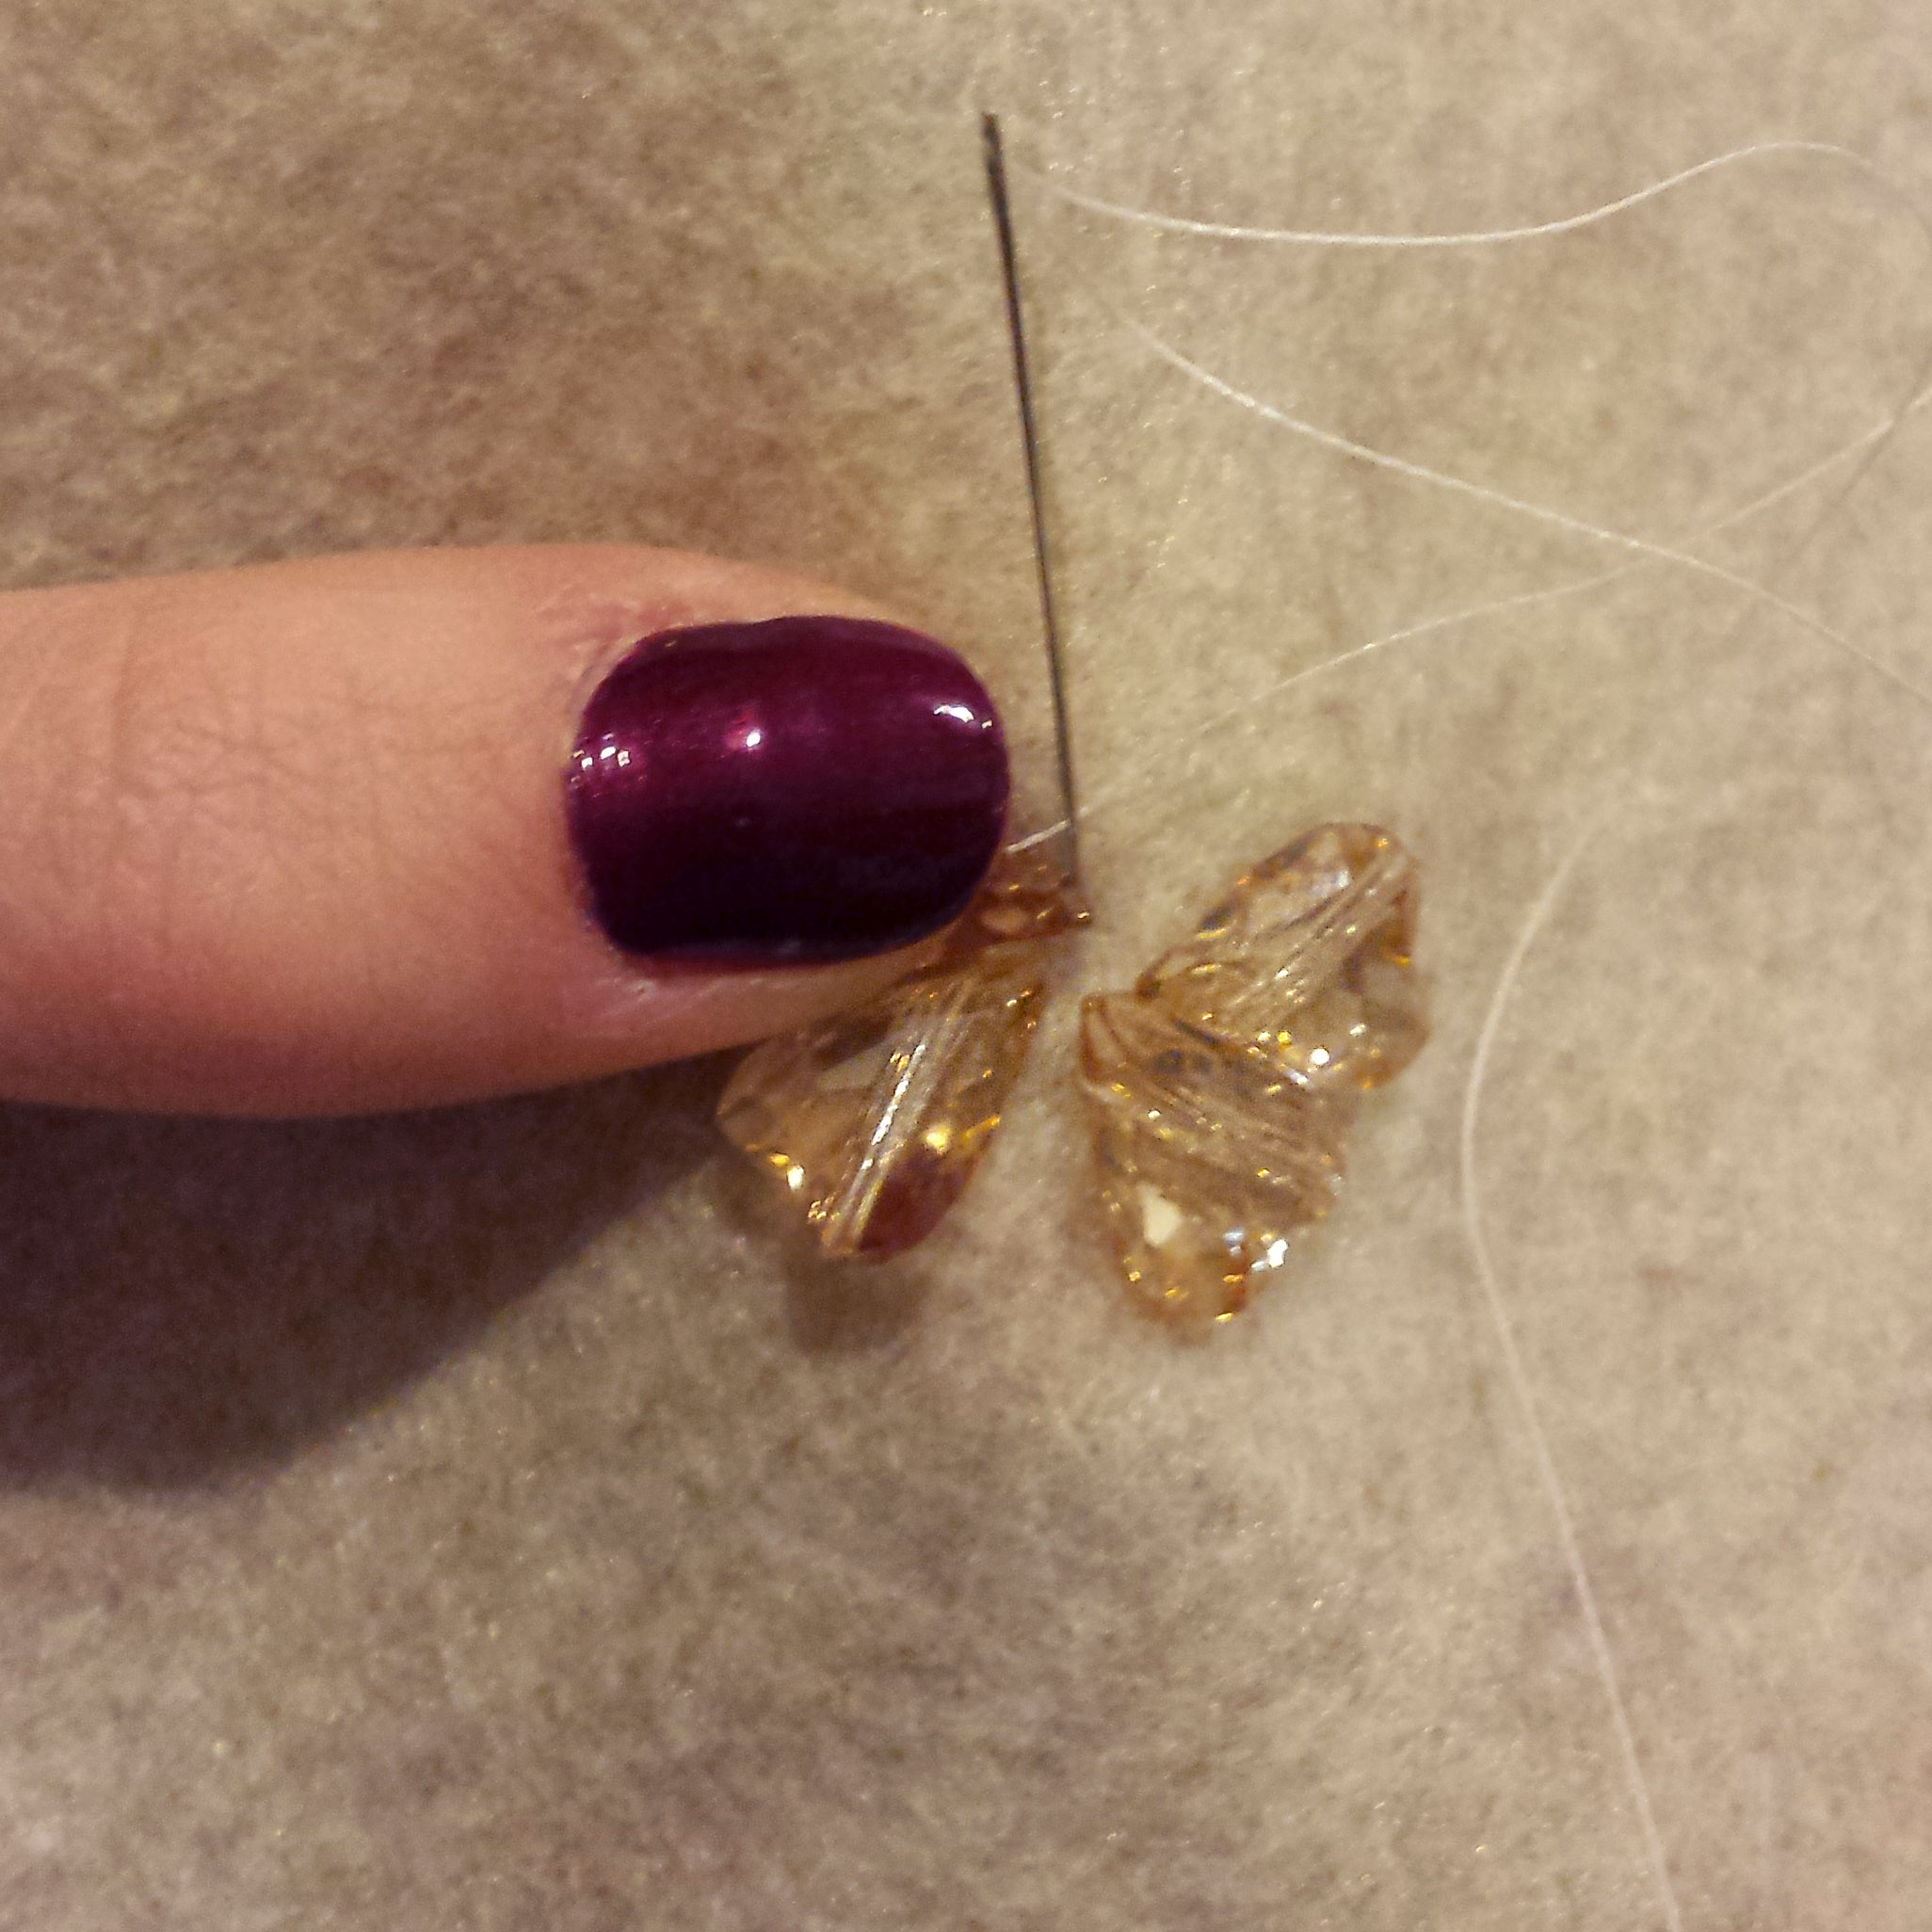
3.   Continue doing this for the center crystals (ie. my ‘petals’) and expand to any other large crystals you have (ie. my ‘leaves’). Once you have each of these sewn on, leave your thread where it is. No need to knot anything.

20141117_185953  20141117_190511 20141117_195809

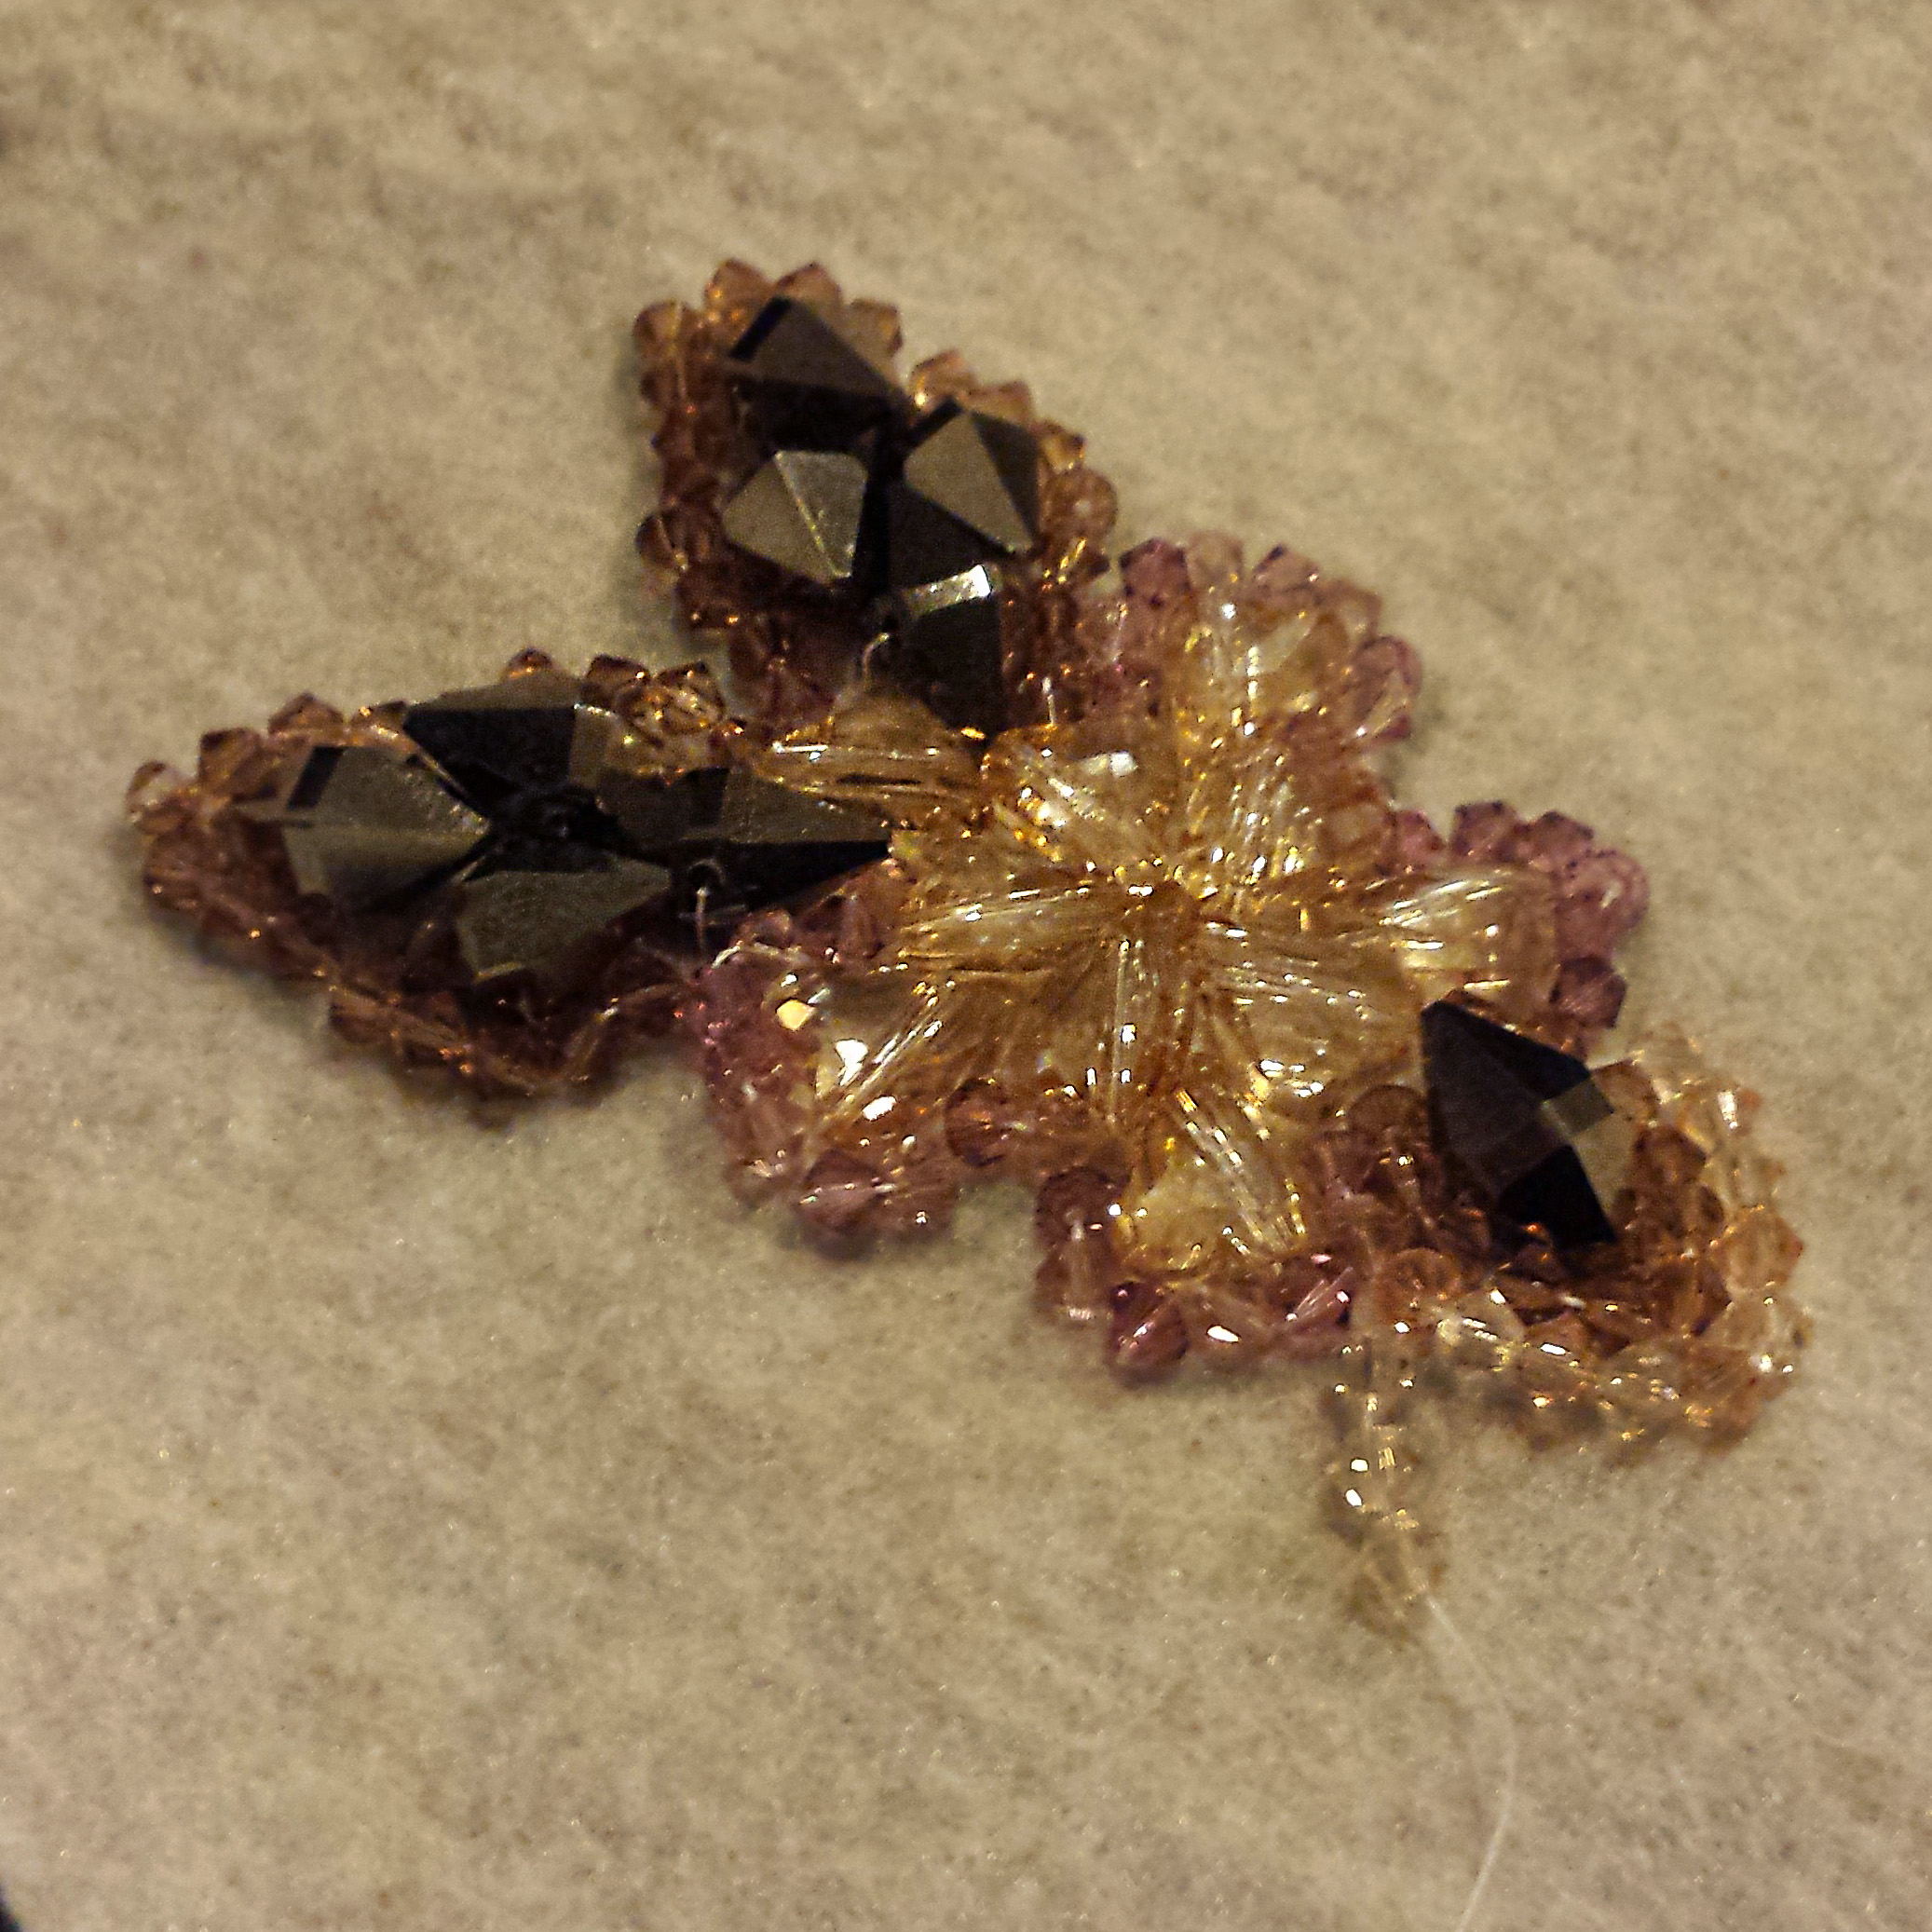
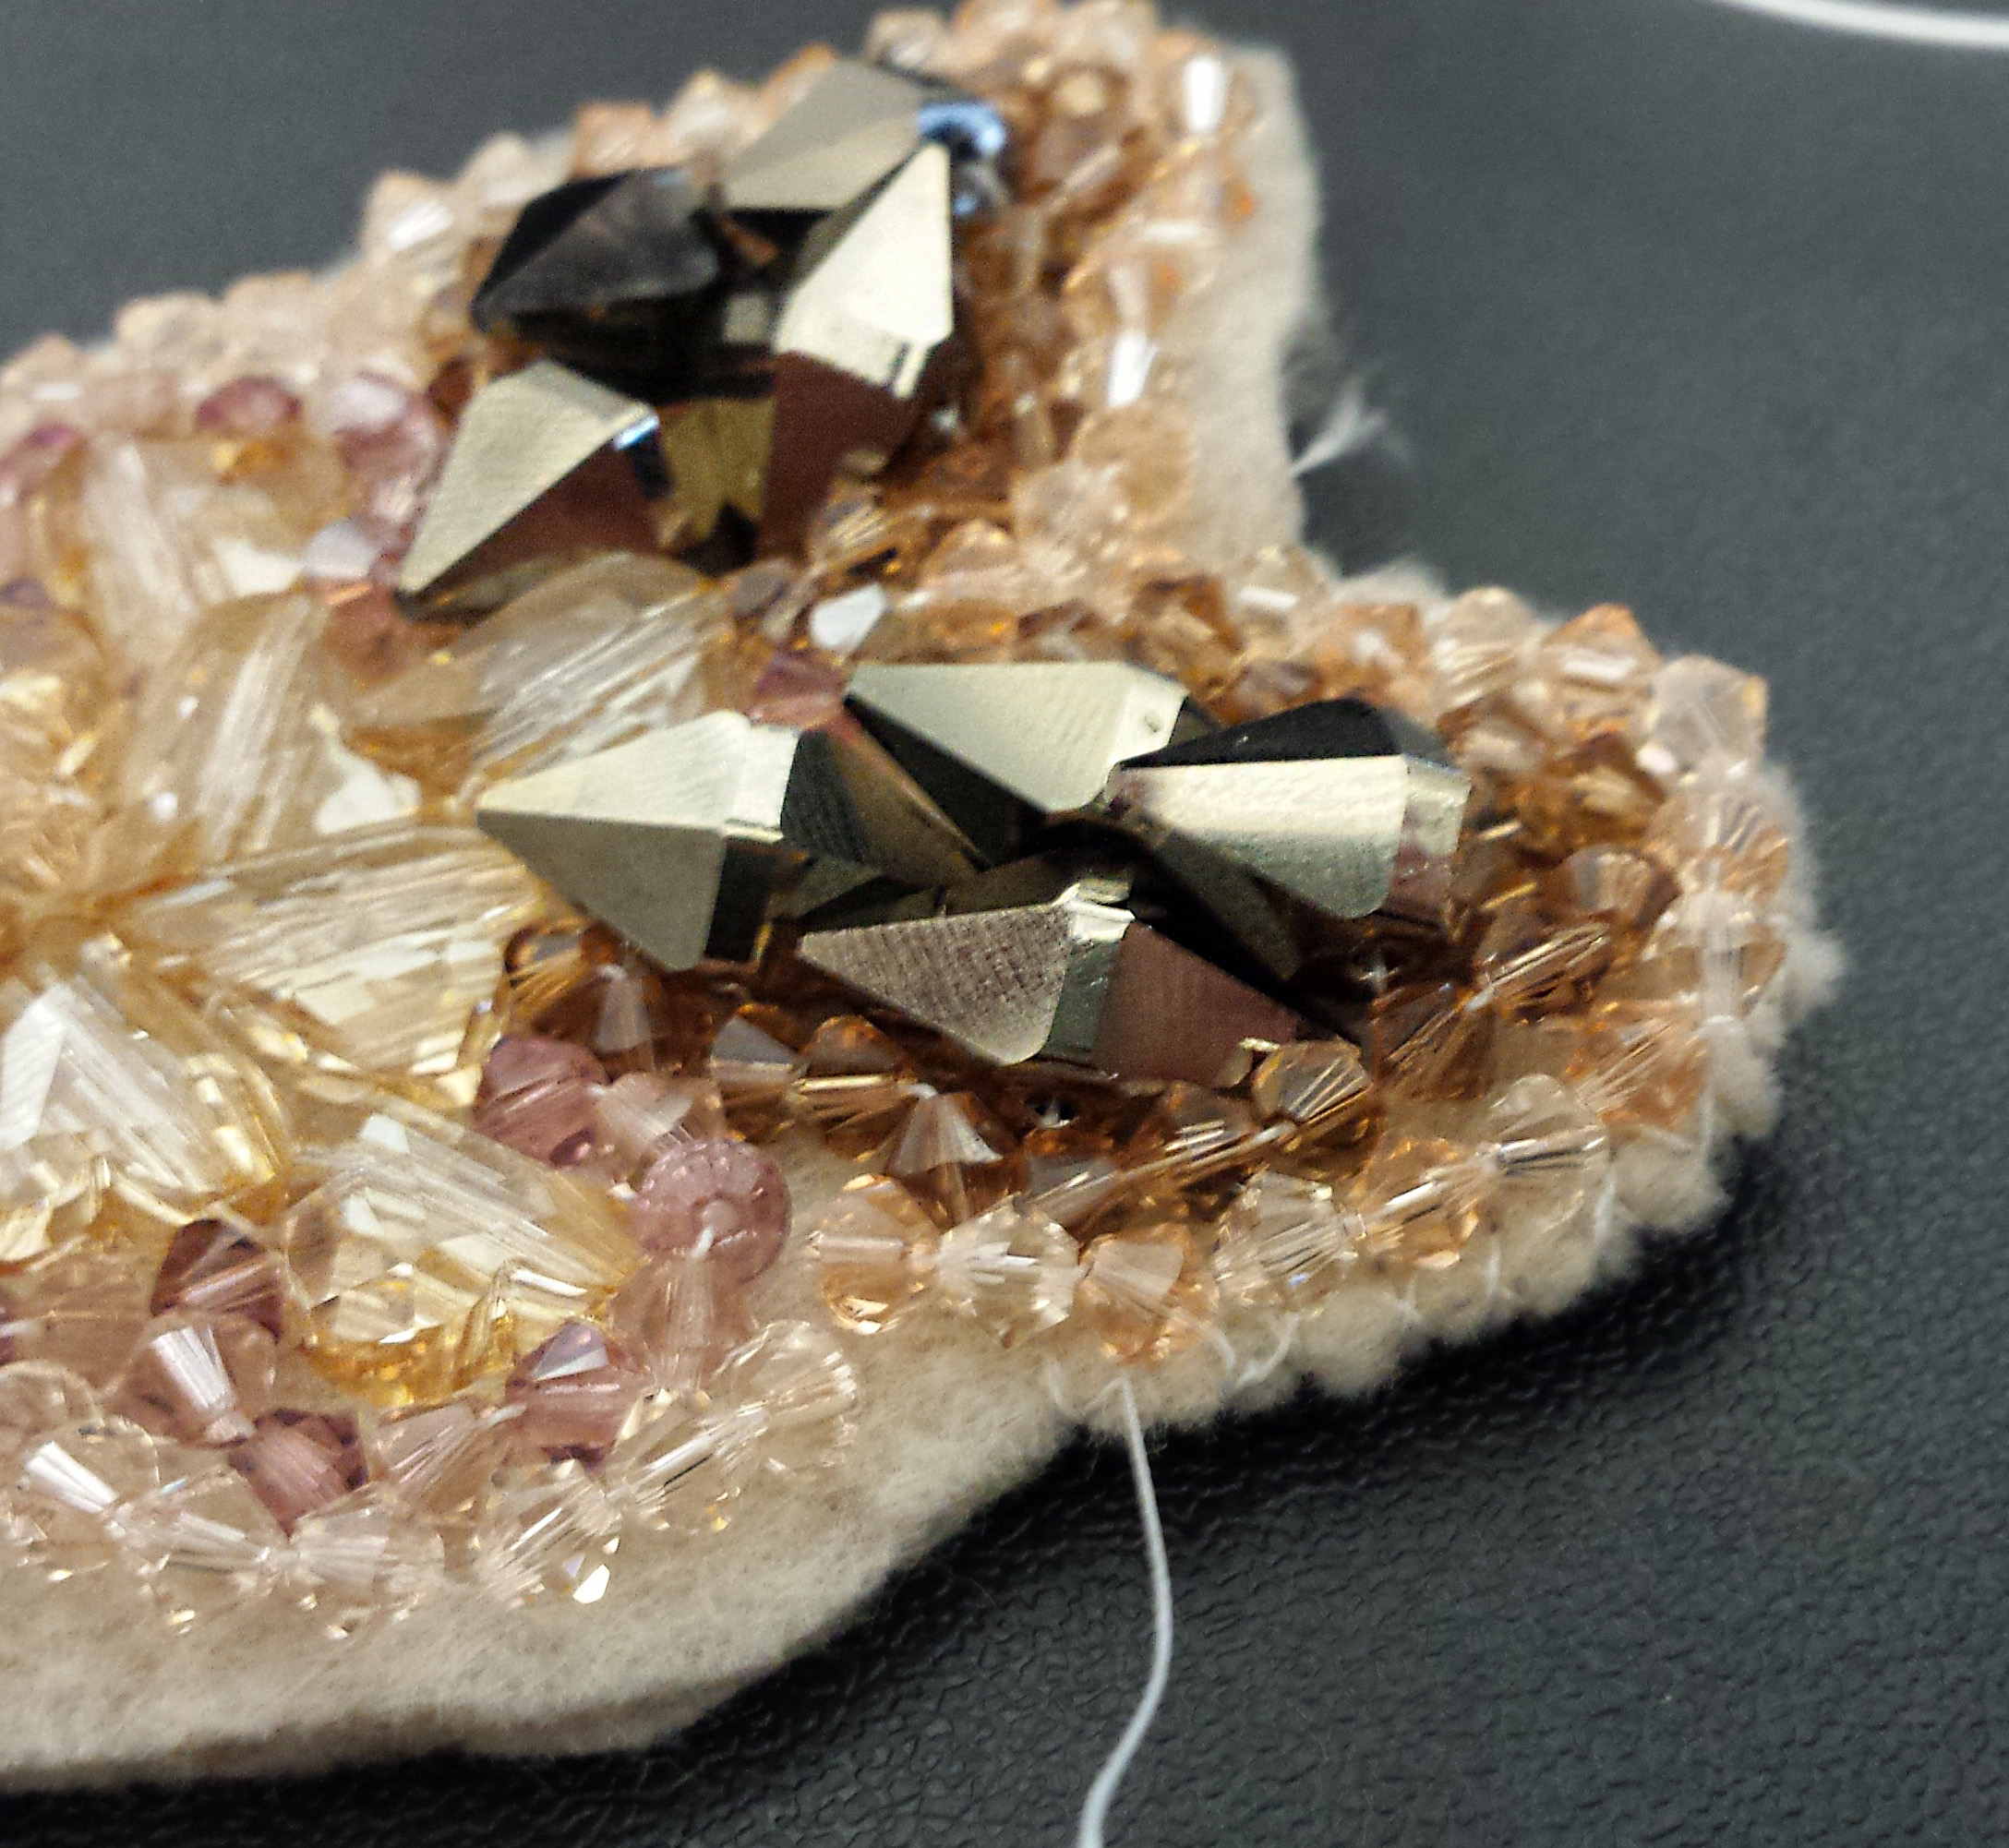
4.   Go ahead and grab your smaller beads – Here, I’m using the 4mm Swarovski Bicone Crystal Jams. We will begin where your left your thread after completing the larger crystal beads. Place 2 bicone crystals on your needle and push them down the thread. I wanted to arrange my bicones around my larger crystals as an outline. As soon as they fit snug against the felt, insert your needle back into the felt, staying close to the edge of the bicone. Continue your way around, using two bicones at a time

This is a fun time to play with color! My outlines consist of 3 or 4 different colored bicones, and they really play off of each other in different lights!

**If you ever run out of thread, just tie a knot on the backside of the fabric, and start a new needle & thread!**

20141117_195820 (1)

20141117_201412 (2)

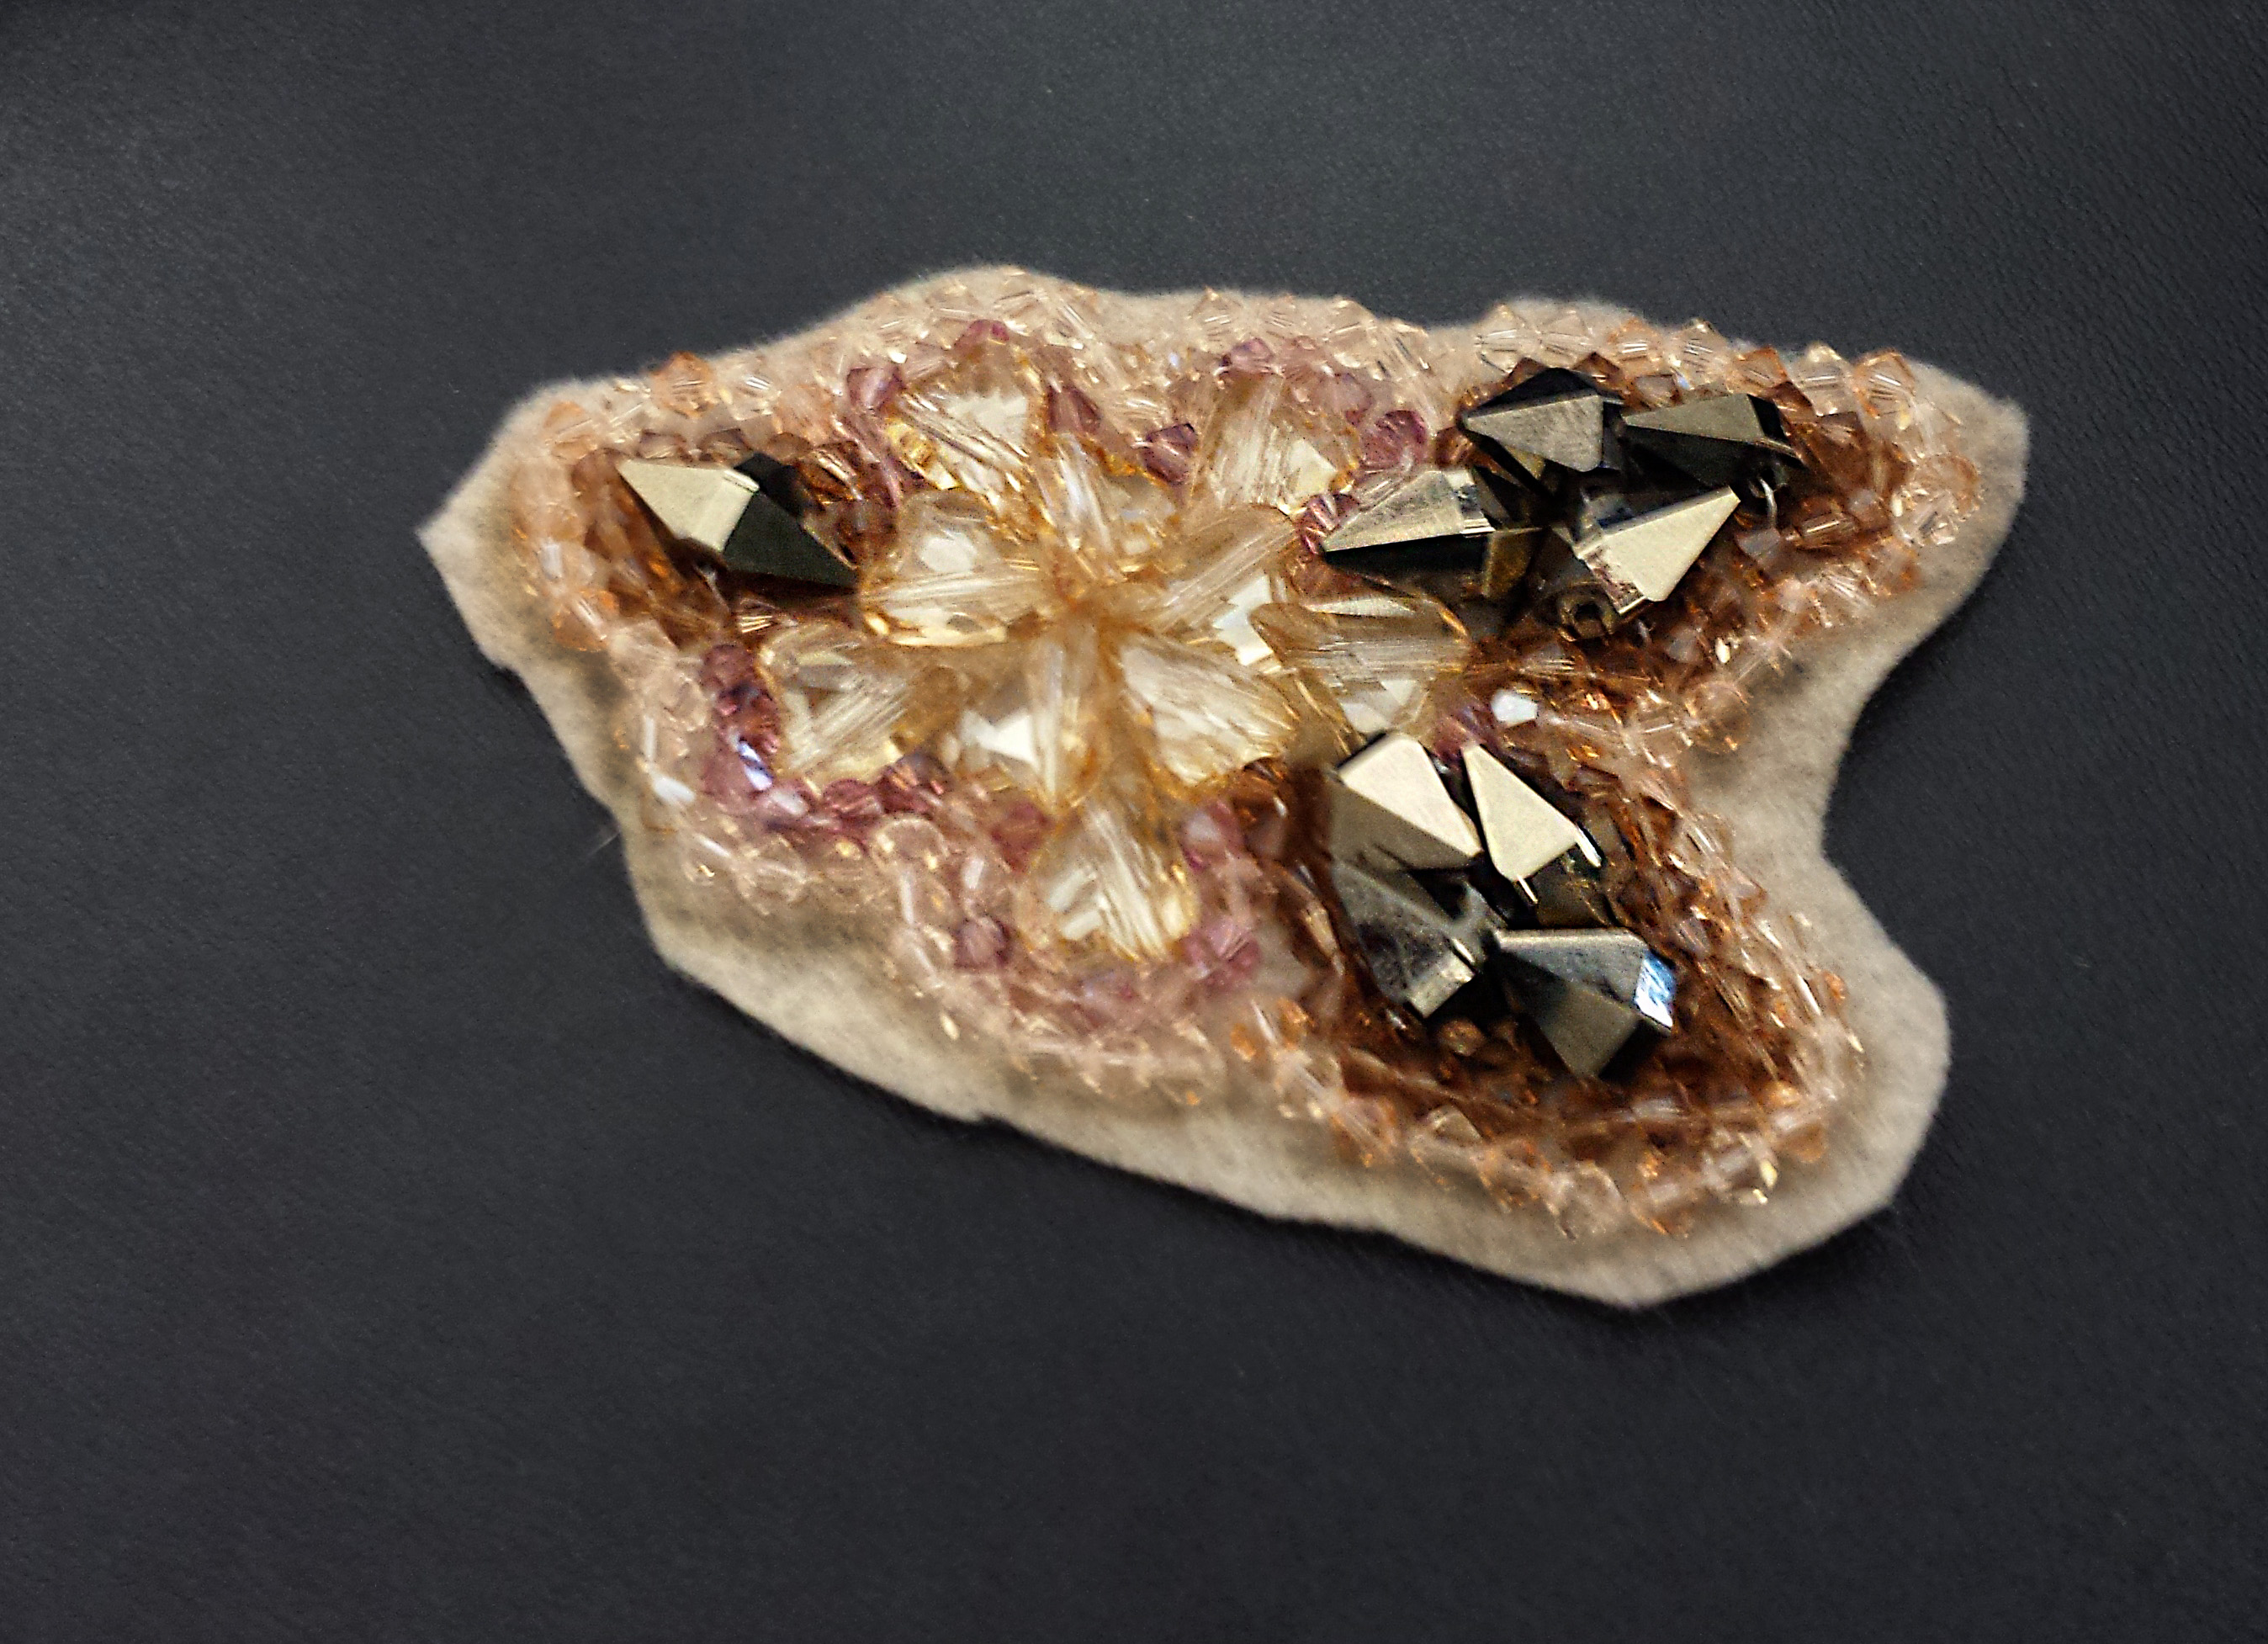
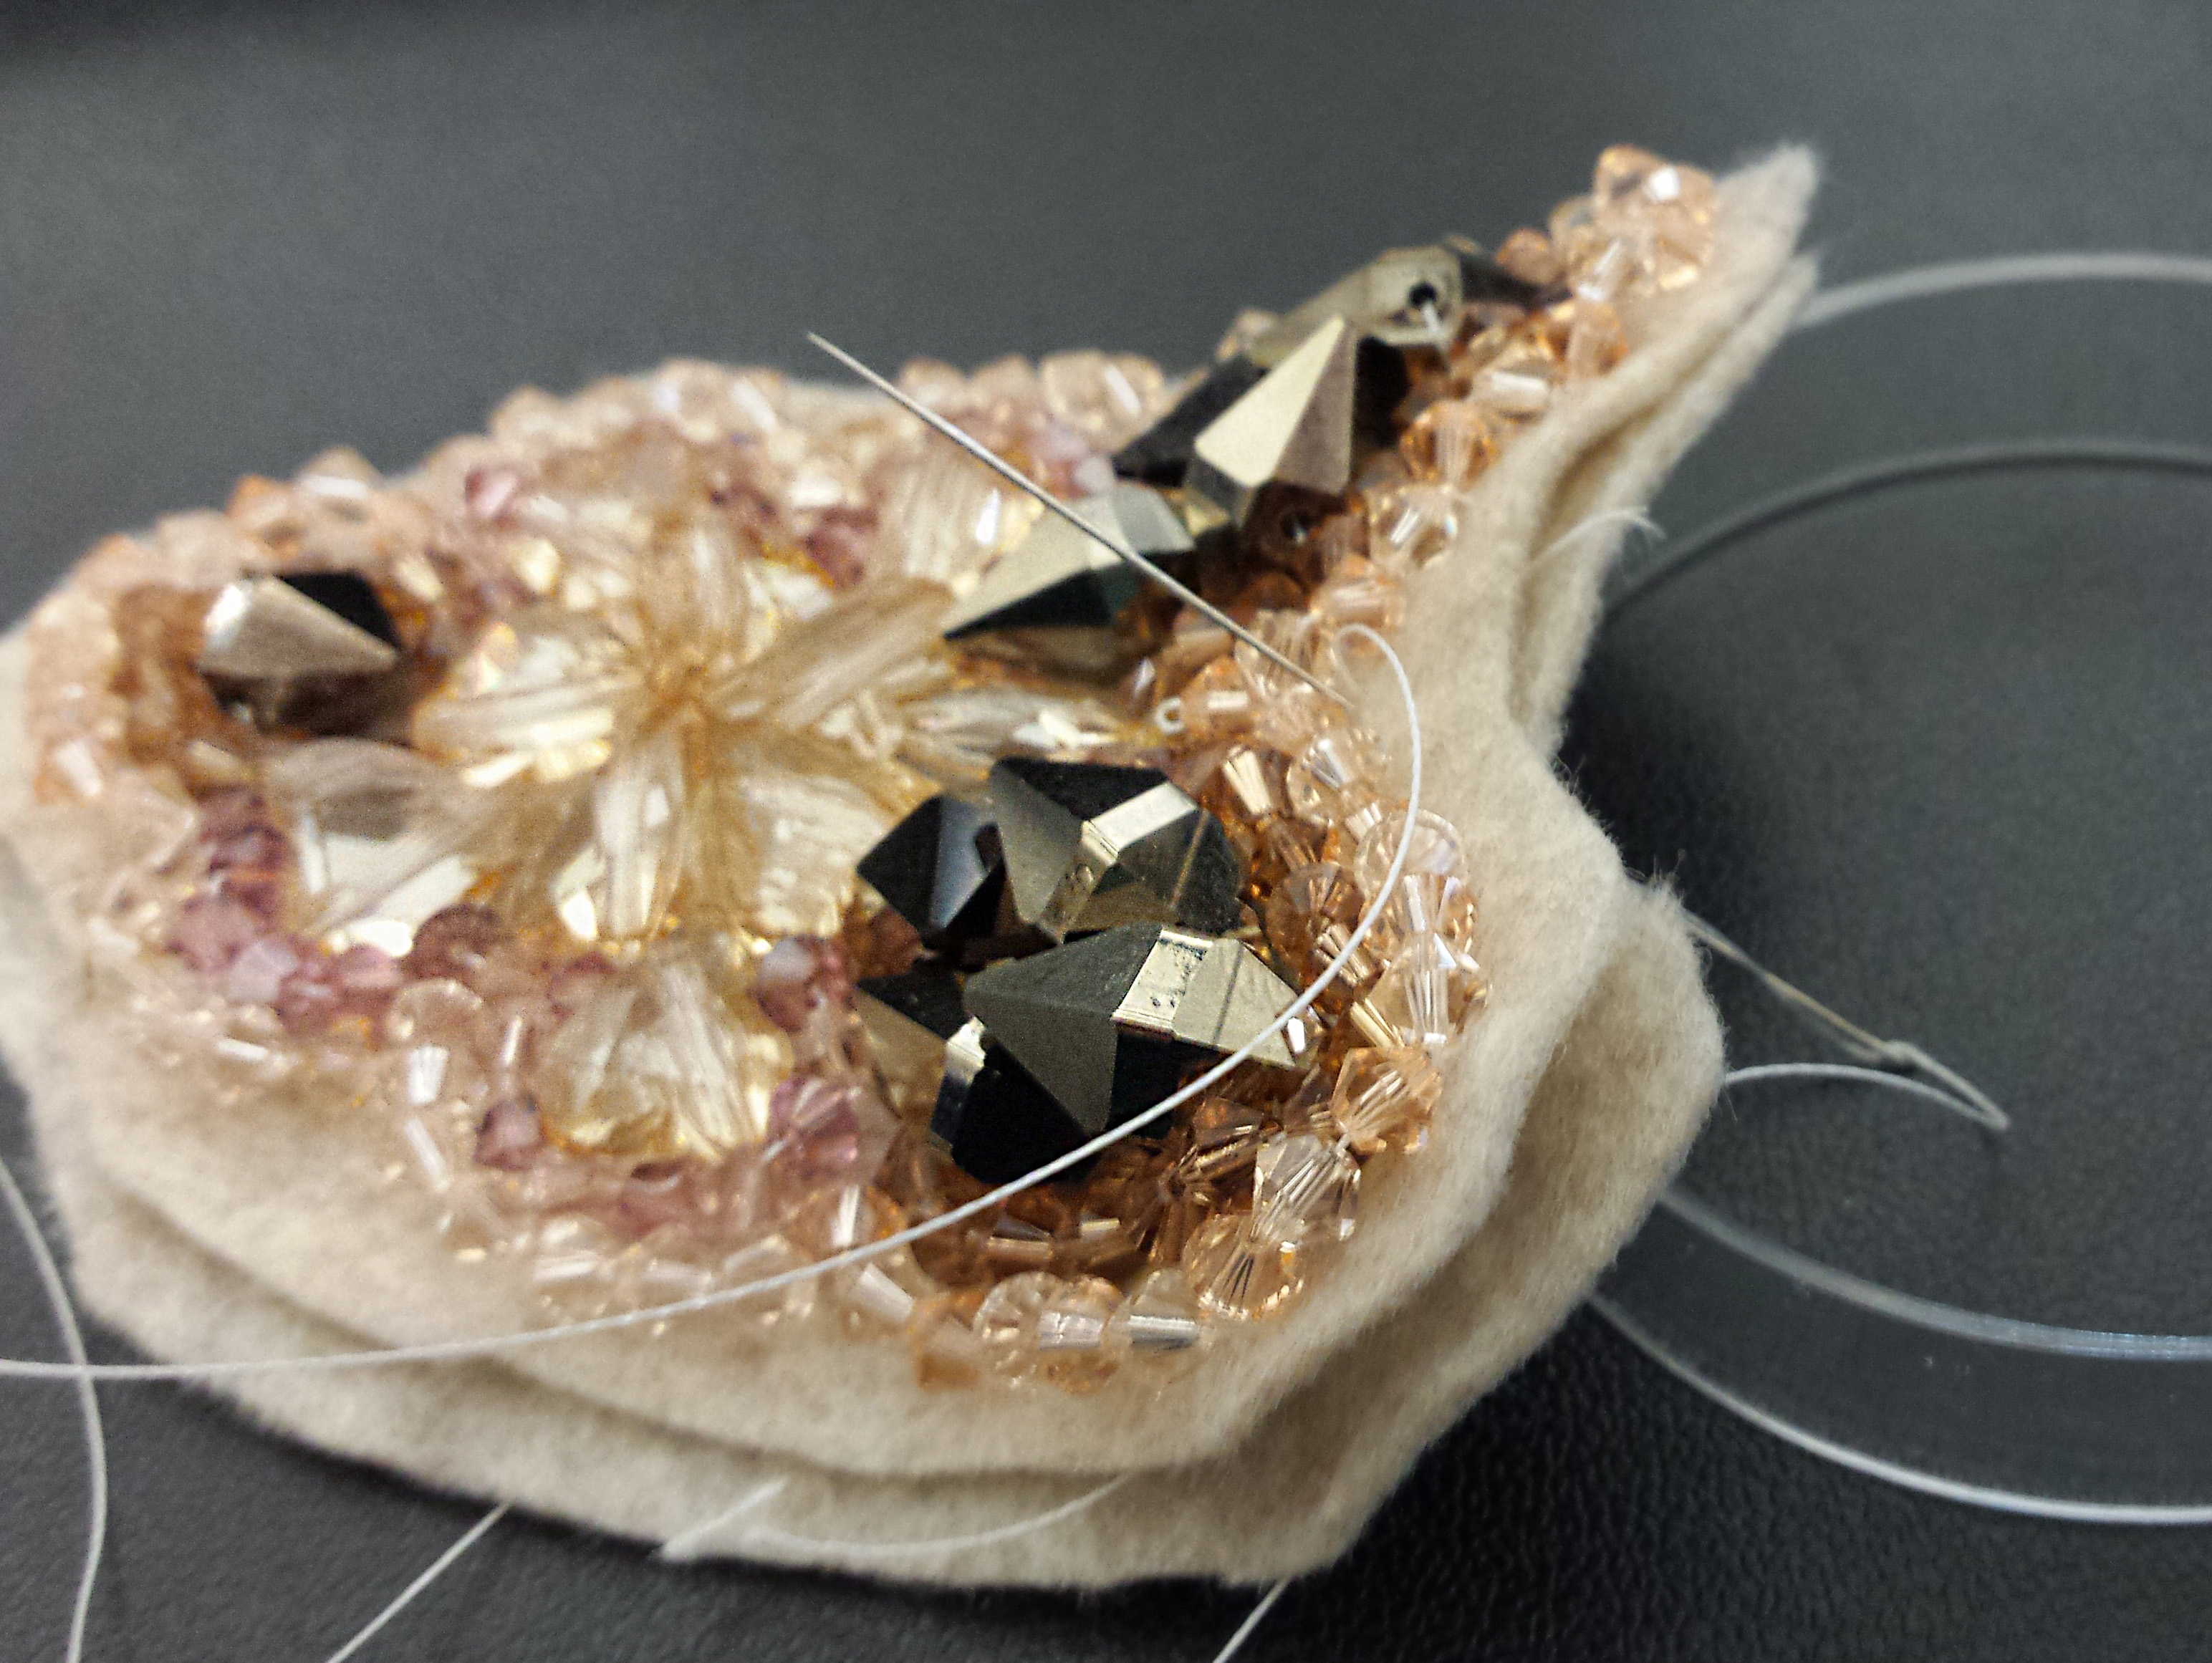
5.   Once I made my way around, I decided to add a second outline with the bicones. It is completely up to you – be creative and try some different things! Once you have finished sewing all of your Swarovski Crystals, insert the needle down through the front side and tie a knot in the back; you can use the same knot technique that was demonstrated earlier!

20141117_210512

Creating a Finished Edge

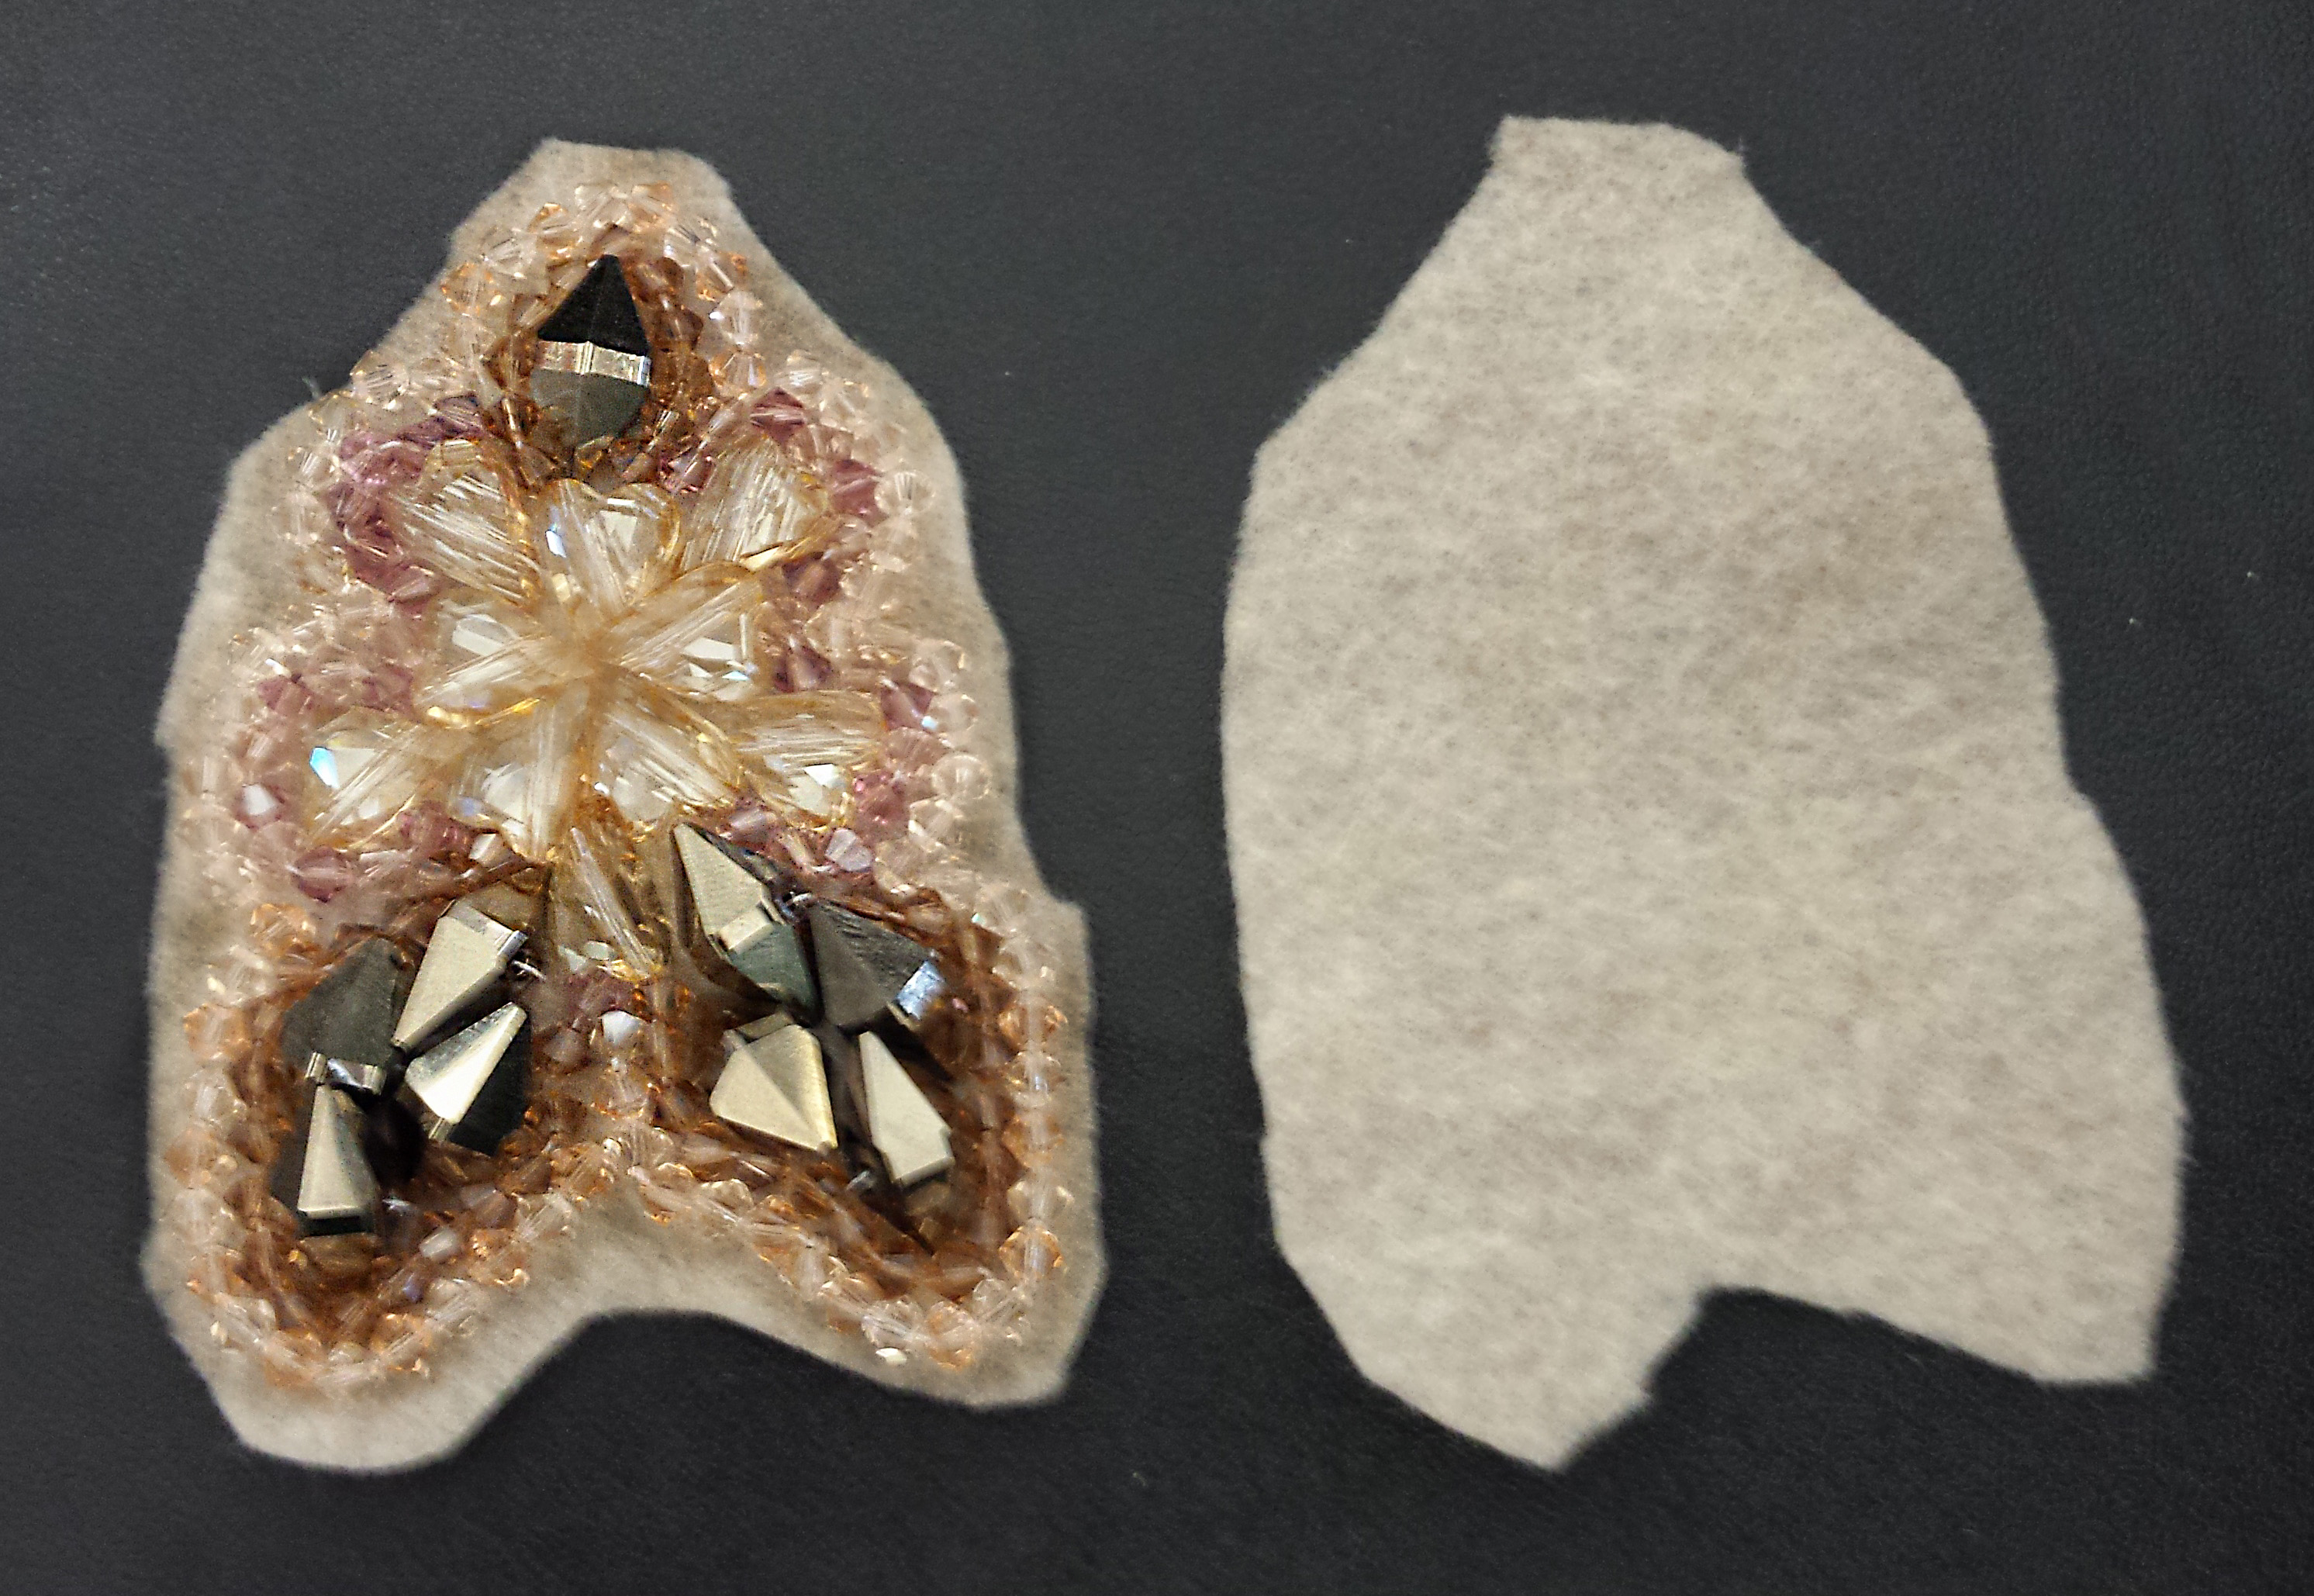
1.   Cut the felt around the crystals, leaving 1/4 inch allowance on the outside.

20141118_132730

2.    Take your second piece of felt and cut an identical piece

20141118_132951

3.   Time to start with some fresh thread! Tie the same knot as shown above and insert the needle from the backside, to the front side like below. Pull the needle through until the knot is snug underneath.

20141118_133025

4.   Grab your second piece of felt and place it underneath your original piece. Insert your needle through both pieces of felt, starting with the new piece. See photo below for reference. Pull all the way through; the felt should curl up as you pull the thread as tight as you can.

This second piece of felt hides all of the thread work you have underneath, while also stabilizing and protecting these stitches from wear and tear.

20141118_133633

5.   Start working your way around the felt, using the same technique in step 4. You can see the difference in the two photos below – I have completed the technique on the upper right hand side.

20141118_134355 20141118_134407

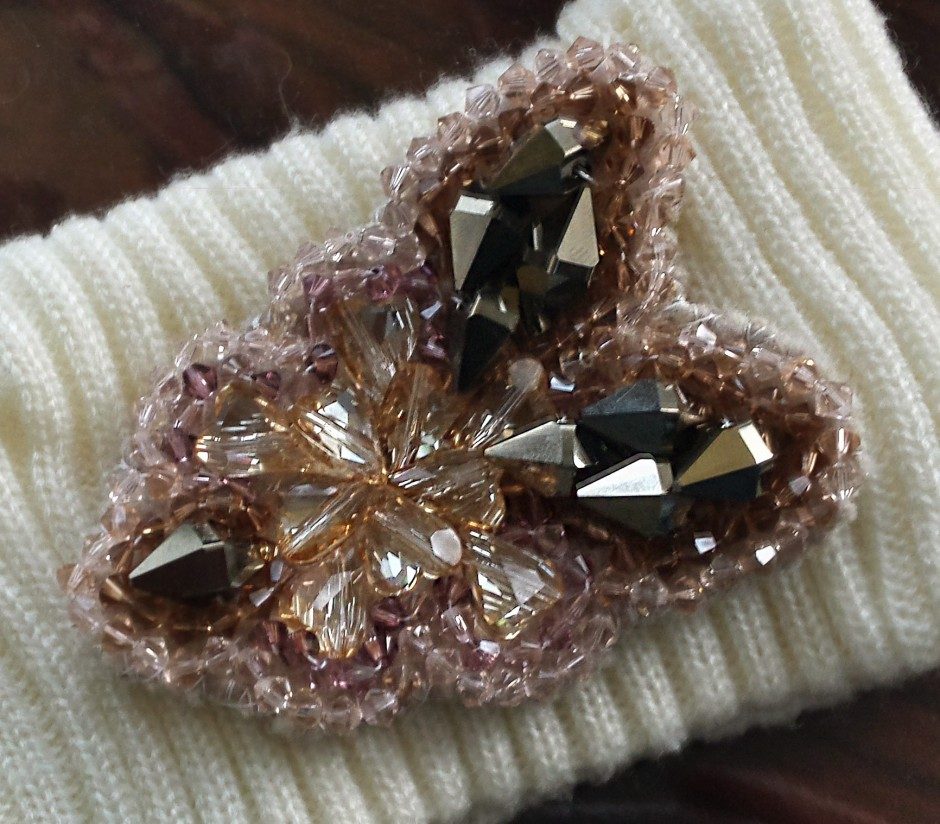
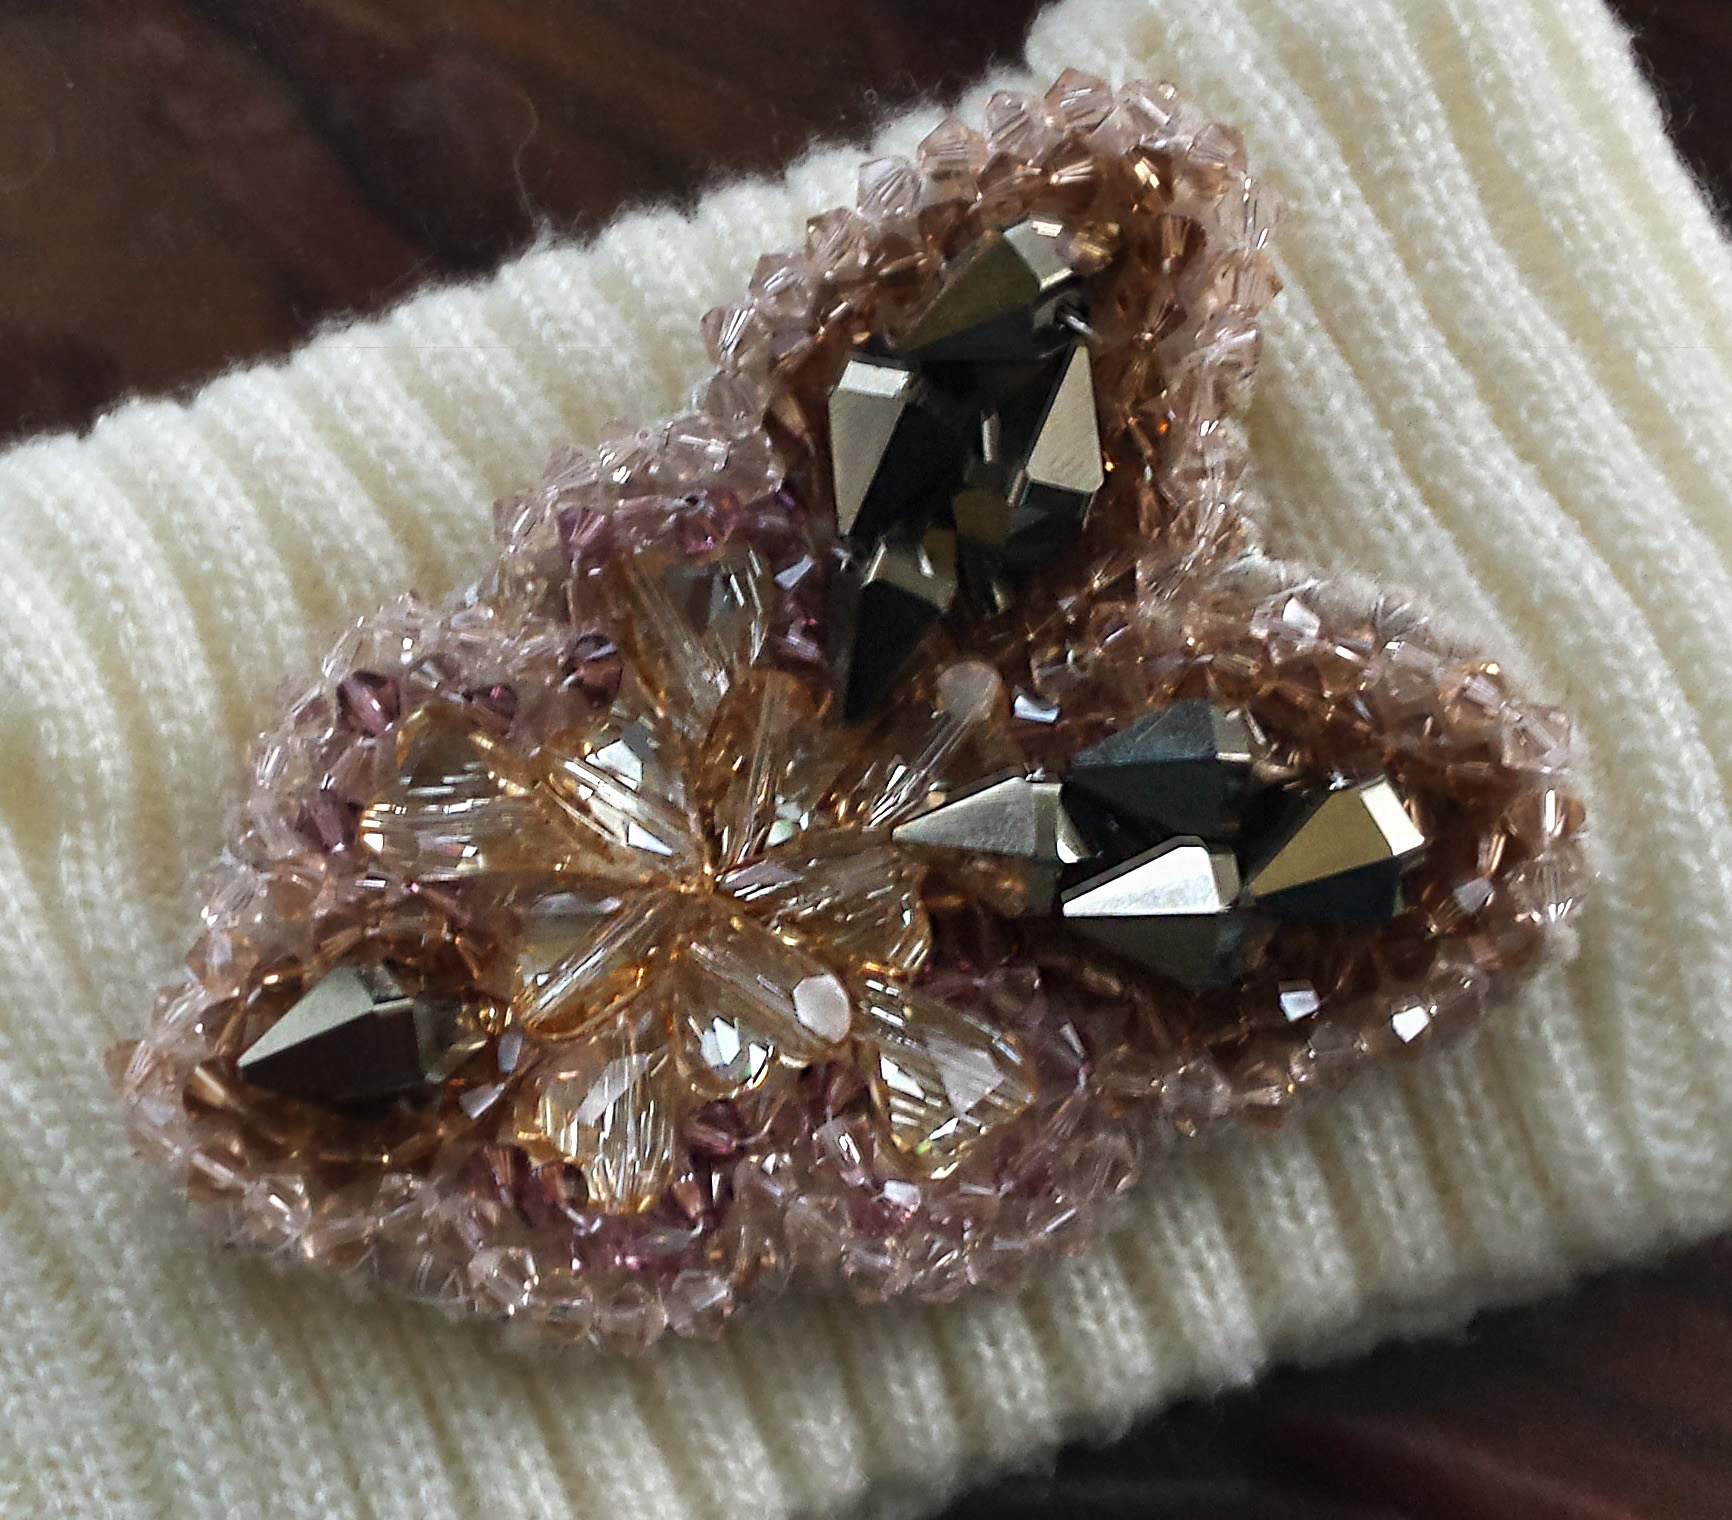
6. Once you have completed this step, your applique is complete! You can use this for scarves, headbands, gloves, apparel, etc. I have attached this to a headband, and I used the same technique from steps 4 & 5. It’s that simple!

20141119_152633_

20141119_152648_

All of us at Rings & Things would love to see any applique work you have created! Please send us pictures or post them below! 🙂

Happy Winter!

– Laura

How to make crystal angel earrings

October 28, 2014

When I first saw the cool shape of Swarovski’s crystal dome beads (from their Fall/Winter 2014/15 Innovations), two thoughts immediately came to my mind – bell and angel skirt.

Dome Bead Innovation

Dome Bead Innovation

This tutorial shows you how to use these sparkling faceted beads to make angel skirts for earring designs. The exact same combinations can also be used to make single angels for pendants, bookmarks, gift tags, and more!

There are two styles of Swarovski dome beads to choose from. The large dome beads give you a more elongated shape:

#5541 Large Dome Bead

Article 5541 Large Dome Beads

The small dome beads have a more rounded out bell shape:

#5542 Small Dome Bead

Article 5542 Small Dome Beads

The main components of any crystal angel design are: halos, heads, wing beads, and bodies:

Angel Earrings in Progress

Angel Earrings in Progress

TierraCast makes a variety of wing bead styles. Additional wing beads are also available in base metal and sterling silver.

Various Metal Wing Beads

Various Metal Wing Beads

Popular bead styles for halos include heishi, and beaded heishi beads as well as rhinestone rondelles.

Metal Halo Beads

Metal Halo Beads

Here are several combinations of halos, wings, and bodies in different colors and sizes. For a complete parts list of supplies ready to buy, click each image below! (Or browse our Rings & Things Design Gallery.)

Heavenly Angel Earrings

Heavenly Angel Earrings

Lilac Shadow Angel Earrings

Lilac Shadow Angel Earrings

Angel in Training Earrings

Angel in Training Earrings

Blue Shade Angel Earrings

Blue Shade Angel Earrings

Christmas Angel Earrings

Christmas Angel Earrings

Forest Fairy Earrings

Forest Fairy Earrings

Other popular shapes for body include the Teardrop bead and the cone-shaped Swarovski Crystal Artemis bead.

Crystal Angel Earrings with Teardrop Beads

Crystal Angel Earrings with Teardrop Beads

Artemis Crystal Angel Earrings

Artemis Crystal Angel Earrings

Keep in mind that angels can be any color! Choose whatever colors you like for whatever mood you’re in!

Dark Fairy Earrings

Dark Fairy Earrings

No matter whether you’re preparing for Christmas or you’re a year round angel aficionado, take inspiration from these designs and create your own heavenly host.

~ Rita

CzechMates Memory Wire Bracelet Tutorial

September 25, 2014

I love the Picasso finishes and and unusual colors of CzechMate 2-hole tile beads and other CzechMate 2-hole beads. But it’s hard to find a project with them that doesn’t involve needles and intricate beadweaving.

So … here it is! When I discovered pliers designed for looping ends of memory wire, I decided on an ombre chevron cuff bracelet. This 4- to 6-row ombre chevron design takes advantage of the CzechMate color combinations, and is easy to “string” on memory wire. The outside row uses a few seed beads (or bugle beads) near the edges, because their sizes are so compatible with these 2-hole beads.

Memory Wire bracelet made with 2-hole CzechMate tile beads

My first 2 ombre CzechMate bracelets. Rather than wrapping the memory wire around your wrist three times like most memory wire bracelets, these are cuff bracelets.

For a petite wrist, use standard stainless steel memory wire. For larger wrists or a looser fit, use stainless steel anklet memory wire. (Don’t be swayed by the word “anklet” — it’s actually an excellent bracelet size.)

Cutting Memory Wire:

When cutting any type of wire, wear eye protection, or at least make sure your bits of wire will end up someplace safe, not in anyone’s eye. Cup your free hand over the end, and aim the wire downward at a soft surface like a flocked bead mat.

Tools and Memory Wire:

Memory wire is strong, springy steel — much tougher than most jewelry wire. It requires strong, durable tools, both for cutting and bending. I tried cutting steel wire with my cheap cutters and one blade SNAPPED, shooting across the room in 3 pieces. I also dented high quality cutters that were not designed to cut steel. I strongly suggest a pair of heavy-duty flush cutters and a pair of memory wire looping pliers. They aren’t too expensive, and they work great for lighter-duty projects as well.

Step 1. Practice Making Loops:

Although Memory Wire Pliers make it easy to make consistent-sized loops, steel wire is tougher to bend than other jewelry wire. I recommend practicing memory wire loops before you begin adding beads. This helps you make all your loops at the same angle, and avoid chipping your end beads.

CzechMate Memory Wire Bracelet - Practice

Cut four 2″ pieces (each about 1/4 of a circle). Practice making a loop at each end, with both loops on the same plane (or angle).

Memory Wire - How to Make Nice Loops

How to Make Nice Loops with Memory Wire

1. Grip one end of the wire firmly in the pliers and use your fingers to smoothly wrap the wire around the small side of the pliers. Don’t let it twist upward or downward.
2. About halfway around the pliers, release the plier grip on the wire, and get a new grip so you can finish making your circle.
3. Close the loop ALL the way — don’t leave a spot for beads to slide down inside a gap in the loop.

Repeat at other end. Grip the wire’s tip, push around, release, re-grip, and finish pushing. Take a look at your circles — are they the same size and angle, or are they twisting ickily in random directions? Make a few more until it’s easy to make nice consistent loops on the same plane. Also note that these loops are all to the OUTside of the circle, not the inside:

Memory Wire Loop - Do and Don't

For bracelet comfort, make all loops curve to the outside, not the inside of the arc.

Step 2. Assemble your beads:

Appletini TOHO Seed & Bugle Bead Mix

Appletini TOHO Seed & Bugle Bead Mix

TOHO seed bead mixes work excellently with CzechMate 2-hole tile beads. There are great color mixes to choose from, and you can use 3 large seed beads, 4 small seed beads, or a single bugle bead as perfect-size spacers.

A few beads from each assortment are too tiny to fit on memory wire, or too big to fit next to a Czechmate, so save those for future projects.

Step 3. Make the bracelet:

Cut 4 pieces of wire, each about 1-1/8 coils long (Like going all the way around the clock face from midnight to 2pm.).

3a. Cut 4 pieces of wire, each 1 to 1-1/8 coil long. Make sure they are all the same length.
Carefully round 1 end of each wire.

CzechMate Memory Wire Bracelet Step 3b

3b. For a 2-color bracelet, count out 21 tile beads of each color, in sets of 3.

For a 1-color bracelet, use approximately 42 beads. For a 3-color bracelet, count out 15 tile beads of each color in sets of 3. Lay them out in the order that you’ll use them. You might not use all the beads you laid out, but it’s easier to keep your pattern going correctly if you lay out the beads in advance.

String 1 bead.

3c. String 1 tile bead.

Pick up a 2nd wire, and string 1 bead. String a 3rd bead onto both wires.

3d. Pick up a 2nd wire, and string 1 tile bead.
String a 3rd tile bead onto both wires.

String 2nd color using same pattern.

3e. String 2nd color using same pattern.

Don't worry that the beads and strands flip and flop around at this point.

Don’t worry that the beads and strands flip and flop around at this point.

End with 2 tile beads. Make sure you have at least 1/2" (12mm) of wire left.

3f. End with 2 tile beads. Make sure you have at least 1/2″ (12mm) of wire left.

3g. After your last 2 beads, push beads snug (but not super tight), and trim wire to approx. 1/2″ if necessary. Next, very carefully round the end wires for both strands (one wire at a time). Abrupt / harsh movements may chip the end bead.

Take another of your prepared wires, and string 4 seed beads, or a single bugle bead. Place these next to your strung CzechMates … do they look good? If not, pick a different color or size and test it before you begin the next step.

Back at the beginning, feed a new piece of prepared wire through the other hole in one of your first beads.

3h. Back at the beginning, feed a new piece of prepared wire through the other hole in one of your first beads.

3i. Where the wire comes out, add 3-5 seed beads (or a bugle bead) so they are the same total length as a Czechmate tile bead or slightly shorter.

Feed through next CzechMate, add bugle or seed beads, repeat to end of bracelet.

3j. Feed through next CzechMate, add bugle or seed beads, repeat to end of bracelet.

Repeat for 4th row, trim excess if necessary, and carefully round the ends.

3k. Repeat for 4th row, trim excess if necessary, and carefully round the ends. (Click image for close-up.)

Tips & Errata:

Do your best to make the loops all face the same direction, but don’t be hard on yourself if they don’t. Here is my first bracelet, with wonky ends and a chipped bead. When I taught a class on how to make this bracelet, I introduced the “practice making loops” step, and not a single person chipped a bead!

Example of bad loops on my first memory wire bracelet.

Close-up of bad loops on my first bracelet. The tips listed above should help you make better loops and avoid chipped beads.

By my 3rd bracelet, I realized it’s much easier to finish the ends if the strands (after looping) are tiny bit shorter than one full coil, so now I design these more like cuffs than bangles.

Czechmate and Memory Wire - Finished Cuff-Style bracelets

It’s much easier to finish the ends, if each strand, after looping, is slightly shorter than one full coil, more like a cuff than the bangles I originally envisioned.

You’ll soon perfect your ability to make all your loops at the same angle. After that, these are quick and easy to make, so make a bunch for gifts or to sell!

Czechmate Memory Wire Bracelets

Variations on a theme.

Depending on the size of your spacer beads, some bracelets spike up a bit in the middle, and others curve up at the outside edges. This is part of the fun with these designs. Used in this pattern, I think the CzechMates™ Two Hole Triangle Beads look like tiny Stegosaurus / dragon spikes.

Parts & Supplies:

Any questions? Please ask! (Click on “Comments” or “Leave a Reply” below.)

How can you tell if gemstone beads are genuine or imitation?

April 28, 2014

We recently received this email asking whether gemstone beads (especially from China) are fake, and it’s a great opportunity to address not only her question, but related questions that we frequently get over the phone and in our Showroom.

Hello,

I have recently come across some articles that say gemstones exported from China are fakes or contaminated. As a large distributor, do you test the products or suppliers before you re sell the items? If so, what are your findings? In general, do you think there is much truth to the speculation about gemstones and semi precious stones exported from China being fake or contaminated? Thank you for your help. –Lauren

Russ’ reply:

This is a great question. Thanks for giving me the opportunity to describe how we deal with misinformation and misleading names in the bead industry. We’ve struggled with this for years ever since I learned from a rockhound that most black onyx started out as chalcedony treated with sugar water and then heated.

The simple answer is yes, there is a lot of misrepresentation and misleading information about beads from China and elsewhere.
No, it’s not just beads from China that are enhanced or misrepresented. It’s not that simple. Enhancing or misrepresenting gemstones is not limited to Chinese suppliers.

Most buyers do not realize that gem enhancement is ancient, easily 2500 years old. Black onyx enhancement is reported in the notebooks of Pliny the Elder.

Some examples of treated or commonly misrepresented stones:

Black onyx is treated with sugar and "carmelized" with heat.
Black onyx is treated with sugar and “carmelized” with heat.
Red carnelian is treated with acid in which iron has been dissolved and then heated.

Most blue sapphires are heat-treated yellow sapphires, often by the miners.

Manmade Hematite Beads and Pendants
Most hematite beads are a manmade sintered iron oxide product, leading to names like Hematine, Hemalyke and hemalike.
All the "fruity quartz" names from a few years back are merely pretty glass.
All the “fruity quartz” names from a few years back are merely pretty glass.
"Opalite" is not a laser treated quartz. It's a pretty glass with an opalescent quality.
Opalite” is not a laser treated quartz. It’s a pretty glass with an opalescent quality, similar to milky opal crystal and Czech glass beads.
Turquoise dyed magnesite beads
Magnesite is a neutral stone that takes dyes and treatments very well.

Most beads sold as “Chalk turquoise”, and too many beads on the market as “turquoise” or “stabilized turquoise” are really dyed magnesite.

Broken (and cut) magnesite nuggets showing both natural and dyed versions.
Broken/cut magnesite nuggets showing natural and dyed versions. (Click image for close-up.)
Turquoise Beads
Most turquoise beads on the market are stabilized turquoise, hardened with resins. (This enhancement is usually revealed, but confusion exists between stabilized turquoise and dyed magnesite.)

Although we are not gemologists at Rings & Things, and we don’t have fancy lab facilities or an X Ray Def machine in-house, we do use tried-and-true simple tests when we’re unsure about a batch of beads. When we receive unusually bright beads, or lovely even-colored beads strung on cord the exact same color, we put them in a bin of water for a few hours (or even weeks) to test if they are colorfast. We break occasional beads to see what color and/or texture is inside. We send out samples from metal suppliers for destructive assay to verify silver content and lack of lead or cadmium content. There is no equivalent testing facility for most gemstones sold as beads. The GIA (Gemological Institute of America) does a great job testing precious stones but they are not much help for inexpensive stone beads.

We break occasional beads to see what color and/or texture is inside.
We break occasional beads to see what color and/or texture is inside. (Click image for close-up.)

We ask a lot of questions from our suppliers. We research on the internet and ask others in the gem and bead industry. We track new stones names on the gem forums (particularly mindat.org.)

We make mistakes, but when we discover we’ve used the wrong description or name we quickly change to the correct one and admit our error.

Editor’s note: One example is Thunder Agate:

Thunder Agate beads, mined near Thunder Bay, Ontario, and cut in China.

Our first batch of Thunder Agate was sold to us as Lake Superior Agate (the official gemstone of the state of Minnesota), but a customer in Minnesota told us “…it would be very hard to get any large Lake Superiors and the colors are not those of our area”. So we looked closer, and questioned the vendor, who said the rough is from the Thunder Bay area of Ontario (which is close, but not quite the same as the official stone). So we immediately re-tagged our beads, and sent a corrected email.


Part of the problem with beads from China is language and culture. Chinese names are often descriptive rather than technically mineralogical. The characters for turquoise in Chinese mean “Green tree stone.” Anything that looks like “Green tree stone” might be called turquoise.

chinese characters for turquoise stone
The characters for turquoise in Chinese mean “Green tree stone.”

Jade is very important in China but the word “Yu” for jade is used for many different stones that are used the way jade is used in China. Here is a quote that Barbara in Beadcollector.net wrote during her visit to Beijing Geological Museum:

‘Jade’ in China describes all polycrystalline and cryptocrystalline mineral aggregates and a few non-crystalline materials that are suitable for carving and making into jewellery. The characteristics are beauty, colour, moderate hardness, tough and fine texture, and as well as nephrite and jadeite includes opal, serpentine, quartz, turquoise, lapis lazuli, malachite, dushun yu, marble, natural glass, rhodocrosite, sodalite, and rhodonite.

You see the problem this causes? In the West, only jadeite and nephrite are really jade.

I agree that many stone beads coming from China are sold with inaccurate names or descriptions.

  • Some misrepresentation is intentional because the fake will sell better if the buyer thinks is is a more expensive stone.
  • Some is misunderstanding the level of mineralogical detail or accuracy we in the West want.
  • Some is that the importer does not ask enough questions of the cutter or Chinese exporter and passes on inaccurate names.
  • Some is mislabeling by the Chinese exporter because they do not understand the English words.
  • Some is simply lack of knowledge about stones and not caring to find out what they are selling.

For example, a Chinese seller understands that dyed magnesite is not real turquoise and that “stabilized” means the stone is enhanced. This leads to a dealer with 2 piles of blue beads, one labeled “Stabilized Turquoise” and the other called “Natural Turquoise.” The stabilized pile was really blue dyed magnesite. The “natural” was real turquoise hardened with clear resin. Natural to us means that nothing has been done to enhance the stone. “Natural” to that dealer meant that it started out as real turquoise.

On Etsy and on Chinese sites I see blue dyed magnesite sold as dyed howlite. They tried to be accurate (and knew it wasn’t turquoise) but are using the wrong stone name.

Examples of Natural and Dyed Howlite
Examples of Natural and Dyed Howlite. Shown: Untreated white howlite donut, surface-dyed howlite donut, and strand of dyed howlite beads represented by the seller as “natural turquoise.” (I paid $75 for this necklace in the 70’s. It’s part of Rings & Things’ collection of fake turquoise. We learn from mistakes. ~Russ)

A lot of stones can be dyed or enhanced with stronger colors. Lately we’ve seen many common stones with intense colors added to them. Stones this intense should almost always be labeled as “dyed” or “enhanced”.

Bright Dyed / Enhanced Agate beads
Bright Dyed / Enhanced Candy Jade and Agate beads.

We try to accurately label enhanced and dyed stones. From our old printed catalog:

Some stones are simply dyed, which is not always colorfast. One way to avoid getting caught with stones that “run” when they are worn, is to look at the cord or plastic line the beads are strung on. If the cord is stained with blotches the same color as the beads, then beware. We avoid stones that look like they will “run”, so our altered beads are generally enhanced with various trade secrets such as the centuries-old methods for coloring black onyx and carnelian, or dyes that only come off when exposed to acetone or acid.

We label gemstone beads in our catalog and online store with the following symbols and terms:
+ enhanced,
* manmade, and
~ descriptive name.
There isn’t room on the tags for explanatory paragraphs, so on each stones Category page in our web store, we have more information about the stones. Scroll down below the Carnelian beads on this page for an example. To see all of this information in one place, you might also be interested in our Gemstone Beads Index (sorry, no longer in print – but almost all of the information from it, is in the headers and footers of our Gemstone Beads Categories in our online store, and we’re working on getting the remaining information live again); it has a great deal of information about each stone (where it is mined, and how to care for it, as well as common enhancements or other important information).

+ Enhancements can include:

Dye/stain/acid to change the stone’s color or make natural color more pronounced or uniform.
Heat treatment to produce an effect such as crackling or color change.
Irradiation (harmless to the wearer) to create a new color.
Plastic/resin/wax to harden the exterior, making it more durable.

~ Descriptive Name

The names for these beads are meant to describe what they look like, rather than identify what they are made of. These are generally accepted, common terms including “new jade” (a serpentine) and “African turquoise” (a jasper). They are genuine, natural gemstones that resemble more-expensive stones, and make excellent substitutes.

* Manmade

You’ll find that many online sellers, and nearly all of the “big box” stores don’t clearly label manmade gemstones. Goldstone, for example, has been made in Venice since the 17th century, but few end consumers are made aware this is a fancy glass rather than a gemstone grown by nature.

Stones carved from “block” should be called manmade, but many sellers call them “stabilized” or “reconstituted”, or don’t question them at all. Genuine malachite has become rare, very expensive, and nearly impossible to find as beads. Our manmade malachite is a nice imitation carved from block.

Large pile of manmade imitation turquoise block at a Chinese Materials seller visited by Russ Nobbs in 1996.
Large pile of manmade imitation turquoise block at a Chinese Materials seller visited by Russ Nobbs in 1996. (Click image for close-up.)

I’ve collected many pictures of fake and misrepresented turquoise on my Pinterest page to help educate buyers: http://www.pinterest.com/russnobbs/turquoise-imitations/

What can you do to avoid buying misnamed and misrepresented beads? Buy from dealers you trust and who can tell you about the material. Ask questions when you shop. Ask detailed questions. If you are uncomfortable with the answers or the prices, don’t buy. Do some of your own research by checking the information in our gemstone category pages, Gemstone Index, or other sites and lapidary books.

I hope this answered most of your questions. I appreciate your business and your questions.

—————————————-
Russ Nobbs, Founder & Director
http://www.rings-things.com – Spokane, WA – USA
Shop gemstone beads now:

Additional questions can be posted at our Facebook page, or using the “Add a response” link below.

Links updated 2016-01-08. ~Polly Nobbs-LaRue. Russ, we miss you.

Edited December 2021to update links.


Lariat Round Up

January 21, 2014

I have been more and more drawn to Lariat style necklaces lately, and seeing lots of them pinned on pinterest. This inspired me to create several lariat necklace tutorials for the Rings & Things jewelry design gallery and to look to our other designer’s past contributions to this jewelry style.

What is a lariat necklace? It is an open-ended necklace with no clasp. It is fastened by threading one end of the necklace through the other. Lariat necklaces frequently have beads or tassels at the end, and are typically worn with the ends in front.

Foliage Lariat Chain Necklace

Foliage Lariat Necklace

The assymetrical Foliage necklace design is similar. Clusters of SWAROVSKI ELEMENTS xilion crystal bicones are spaced along the curb chain, and again the chain goes through one of the charms to lock the second charm in place, however, the spacing of the bead clusters limits the adjustment to the final length that can be done by the wearer.

Tour de Belgium lariat

Tour de Belgium lariat

The Tour de Belgium long lariat design is designed to be worn doubled. A large fluted bead locks the charm dangles in place. Some adjustment to the final length can be made by varying the length of the doubled section of drawn flattened cable chain.

Giddy Up lariat necklace

Giddy Up Suede Lariat

The Giddyup lariat is made on suede lace with SWAROVSKI ELEMENTS. The ring is tied just off center of the length of leather, and the crystal briolette dangles slip through the ring. The metal components of this true lariat style necklace are plated, to economize.

The Ladylike lariat design is also made with suede lace. This luxe necklace pairs sterling findings with freshwater pearls and sparkly glass. While the components are minimal, the design has impact.

The Corralled Pearls necklace has no findings, and no metal. Thin leather cord, usually not strong enough for stringing, can transform into a bold design when many strands are gathered together. The use of a battery operated bead reamer allows the hole on these freshwater pearls to be made larger for stringing. Simple overhand knots create the loop (clasp) and also hold the pearls in place.

I hope you like this roundup of lariat designs. All of the components to make each of these designs are available right here at Rings & Things. Remember to check our design gallery for a variety of jewelry styles and jewelry design inspiration!

~ Rita

Create a Charm Bracelet

January 13, 2014

 Charm Bracelet

Moondance, a free DIY bracelet project, using sterling silver, keishi pearls and faceted Swarovski crystal beads was designed by Sondra Barrington of Rings & Things.  This handmade jewelry design features flower, petal and leaf bead caps made of sterling silver as well as center drilled keishi pearls in a beautiful shimmering silvery gray/light blue color. Free instructions for creating this handmade, heirloom quality charm bracelet at www.rings-things.com.

Create a beautiful, heirloom-quality charm bracelet using freshwater keishi pearls, Swarovski faceted crystal beads, and unique sterling silver bead caps,  charms, and findings.

A four-piece jewelry making tool set and basic assembly techniques are all you need to create this stunning bracelet. I recommend using the Chain Stā tool which suspends the bracelet horizontally making it easier to see where you are placing charms.

Create Eight Styles of Charms

For this design, charms were arranged in the following pattern:

  1. Place an Ethereal Pearl Charm every 5 links.
  2. On the 3rd link after Ethereal Pearl, attach  Oopsy Daisy Charm.
  3. On the 4th link after Ethereal Pearl, alternate Falling Leaf & Delicate Sprout Charms.
  4. On the 1st link after Ethereal Pearl, alternate Tender Bloom & Budding Flower Charms.
  5. On the 2nd link after Ethereal Pearl, alternate Cherry Blossom & Fresh Shoot Charms.

Ethereal Pearl Charm

The ethereal pearl charm features  freshwater center-drilled keishi pearl and a sterling silver ball-end head pin (available at www.rings-things.com.)

Create 7 Ethereal Pearl Charms using: Center-Drilled Freshwater Keishi Pearl 2″ Ball End Head Pins 4mm Round Jump Rings

Oopsy Daisy Charm

The oopsy daisy charm features a Swarovski faceted crystal bead, a sterling silver four leaf bead cap, and a sterling silver ball-end head pin (available at www.rings-things.com.)

Create 6 Oopsy Daisy Charms using:
6mm Round Faceted Swarovski Crystal Beads
Four-Leaf Sterling Silver Bead Caps
2″ Sterling Silver Ball End Head Pins

Falling Leaf Charm

The falling leaf charm features a Swarovski pearl, a sterling silver leaf charm, and a sterling silver ball-end head pin (available at www.rings-things.com.)
Create 3 Falling Leaf Charms using:
Sterling Silver Flower Bead Cap 3mm Swarovski Crystal Pearl Beads 2″ Ball End Sterling Silver Head Pins
 4mm Round Sterling Silver Jump Ring
Tiny Leaf Charm

Delicate Sprout Charm

 The delicate sprout charm features a Swarovski pearl, a sterling silver flower charm, a sterling silver flower bead cap, and a sterling silver ball-end head pin (available at www.rings-things.com.)
Create 3 Delicate Sprout Charms using: Sterling Silver Flower Bead Cap 3mm Swarovski Round Crystal Pearl Beads 2″ Sterling Silver Ball End Head Pins 4mm Round Sterling Silver Jump Rings Sterling Silver Pansy Charms
]]>

Create a Custom Personalized Necklace

December 6, 2013

Personalized jewelry is very popular, and quite simple to create! A four-piece jewelry making tool set and basic assembly techniques are all you need to create custom necklaces.

Earth Mother, a custom mother's necklace includes birthstone charms, a butterfly charm and three flowers on a silver charm.  This free DIY custom memory necklace project by Sondra Barrington of www.rings-things.com features sterling silver, swarovski crystal, gemstones and personalized charms.This free DIY custom memory necklace project by Sondra Barrington of www.rings-things.com features sterling silver, swarovski crystal, gemstones and personalized charms.

(Click for larger image)

It is easy to personalize jewelry using birthstone-color gemstones and Swarovski crystal, along with a sterling silver charm or two. Rings & Things sells a huge selection of lightweight budget-friendly sterling charms and necklace chains.

Add-a-dangle using faceted, round, cube and other shaped gemstones!  This free DIY custom memory necklace project by Sondra Barrington of www.rings-things.com features sterling silver, swarovski crystal, gemstones and personalized charms.

Chains are easily adorned with add-a-dangle, or add-a-gemstone charms. To create these assorted dangles, you just need a selection of small beads from your stash and some sterling ball-end head pins.

Blessed Mother Necklace features gemstone beads and a cube bead as the birthstone charms and a sterling silver fish faith charm. This free DIY custom memory necklace project by Sondra Barrington of www.rings-things.com features sterling silver, swarovski crystal, gemstones and personalized charms.

(Click for larger image)

These colorful dangles allow you to add several birthstones to a custom piece, or accessorize it according the whimsy of the wearer. A mixture of natural stones, freshwater pearls and Swarovski crystals is very popular. Making oversized loops on the dangles makes it easy to slide them onto nearly any chain without adding a jump ring.

Add-a-dangle birthstone charms of Swarovski round crystals! This free DIY custom memory necklace project by Sondra Barrington of www.rings-things.com features sterling silver, swarovski crystal, gemstones and personalized charms.

If you sell custom necklaces, consider displaying the basics in a fun display (along with a few completed samples):

  • A tray of sterling silver charms
  • An assortment of pre-made add-a-gemstone dangles
  • A variety of pre-made add-a-birthstone crystal dangles
  • A few styles of sterling silver necklace chains.

This necklace, Adorable Auntie, includes charms representing each niece and nephew! This free DIY custom memory necklace project by Sondra Barrington of www.rings-things.com features sterling silver, swarovski crystal, gemstones and personalized charms.

(Click for larger image)

This jewelry also makes great gifts and mementos for friends, family and other loved ones. Have fun making these darling necklaces!

Make Your Own Halloween Jewelry

September 24, 2013

Halloween has always been one of my favorite holidays – I suppose because I love having an excuse to wear a costume. Honestly, candy has nothing to do with it! 😉

Apparently I’m not the only one who loves dressing up in ghoulish attire because our Halloween beads & charms are selling as fast as fun-size candy at the grocery store !

Below you’ll find 5 DIY Halloween jewelry tutorials, from cute to classy! You can make these projects with beads and supplies from Rings & Things. Happy jewelry making as the clock ticks towards Halloween …

Mmmwwwuuuaaahaahaahaahaa!

“Charmed” Bracelet

Fun charm bracelet made with TierraCast charms.

“Charmed” Bracelet

This hauntingly cool charm bracelet is made by attaching TierraCast Halloween charms and 4mm round Czech glass firepolish beads to a ready-made chain bracelet blank complete with clasp.
Click here for a full parts list, suggested tools, & tips.

“Ceramic Pumpkin Trio” Earrings

Easy jack o' lantern earrings project.

“Ceramic Pumpkins Trio” Earrings

Who doesn’t love easy earring designs? Choose from 3 different ceramic beads to make your favorite version of these cute seasonal danglers. The kidney wires insure a secure earring design that won’t fall out even during serious bouts of trick or treating!
Parts list, tips, & suggested tools here.

“Craneos y Flores” Bracelet

Gemstone skull bracelet.

“Craneos y Flores” Bracelet

One of our most popular designs this season is the “Craneos y Flores” bracelet which links gemstone skulls and ceramic spacer gear beads. This project is great for el Dia de los Muertos too!
Get the parts list, suggested tools, and tips here.

“Vintaj Pumpkin” Earrings

Autumn harvest earrings project.

“Vintaj Pumpkin” Earrings

These stylish harvest earrings pair Vintaj Natural Brass petal blanks, TierraCast leaves, and large bone beads colored with Vintaj Patina inks. This makes a great mixed media project for those of you who want to expand your jewelry making skills!
Click here for parts, how-to tips, & suggested tools.

“Fang’s” Pin

Metal work framed spider bar pin.

“Fang’s” Pin

For those of you who want to try metal stamping and riveting, this is the perfect project for you! Frame a spooky creature of your choice with a custom stamped brass frame. You’ll create a top-notch bar pin for your party agenda.
Suggested tools, parts list, and design tips can be found here.

Lady skeleton plastic cameo

Lady Skeleton Cameo ~ not a project, but isn’t it cool?

Okay, I admit this lady skeleton cameo isn’t a completed project, but it’s currently my favorite Halloween component. It’s available in two sizes, too! Choose from 25x18mm and 40x30mm.
What cool stuff can you make with it?

If the above projects aren’t enough to get your spine tingling, find more Halloween & Day of the Dead jewelry projects in our Design Gallery.

Keep in mind that you can always take the basic idea of a project and morph it into your own design. Don’t be afraid to experiment … Dr. Jekyll and Dr. Frankenstein would approve! ~ Melissa

Create a Hinged Metal Memory Journal

July 18, 2013

Use a hinge to turn shrine-shaped metal blanks into a journal!

Decide on the layout, location of the hinge and other decorative elements. Using a checkered hammer, apply texture to the top and bottom panels of the journal. Patina, file rough edges and clean.

Hinged Pendant Memory Journal Rings & Things. This free DIY jewelry project features metal etching, metal stamping, dapping and riveting. Antique brass, nickel silver, copper and natural agate were used in creating this design. The one-step looping plier was used for the handmade chain.

Layout

Cut the hinges, which can be as wide or as narrow as you choose. For 3/32 tubing, make hinges that are one-half inch deep. You need an odd number of hinge tabs. Measure, mark and saw tabs into the top panel. Use plenty of cut lube to prevent the saw blade from sticking when cornering.

Hinged Pendant Memory Journal Rings & Things. This free DIY jewelry project features metal etching, metal stamping, dapping and riveting. Antique brass, nickel silver, copper and natural agate were used in creating this design. The one-step looping plier was used for the handmade chain.

Create Hinge Tabs

Using wide, flat nose pliers, crease and fold each tabs up to a 90 degree angle. The position of the fold determines whether the hinge will be visible from the front of the pendant, or only from the back side. Keep the textured sides face up, so the design is consistent.
Carefully roll tabs into cylinders using chain nose pliers or medium bail making pliers. Leave hinges a bit loose until after you have inserted the tubing, then you can tighten for best fit.

Hinged Pendant Memory Journal created by Sondra Barrington of Rings & Things. This free DIY jewelry project features metal etching, metal stamping, dapping and riveting. Antique brass, nickel silver, copper and natural agate were used in creating this design. The one-step looping plier was used for the handmade chain.

Roll Into Cylinders

Use a tube cutting jig to cut a length of tube 1mm longer than the width of your piece (for 1/2mm on each side).

Hinged Pendant Memory Journal created  Rings & Things. This free DIY jewelry project features metal etching, metal stamping, dapping and riveting. Antique brass, nickel silver, copper and natural agate were used in creating this design. The one-step looping plier was used for the handmade chain.

Cut Tubing

Slide tubing down the channel and finesse hinges as needed. Rivet tubing into place to finish the hinge. Open and close hinge to ensure a proper fit.

This free DIY jewelry design by Sondra Barrington features antique brass, nickel silver, metal etching, dapping and creating hinges.

Assemble Hinge and Insert Tubing

Working with the bottom panel, lay out etched metal pieces for the cover and inside page. Cut, file and patina as necessary. Leave sufficient room for the hinge to lay flat against the bottom panel.

Hinged Pendant Memory Journal created by Sondra Barrington of Rings & Things. This free DIY jewelry project features metal etching, metal stamping, dapping and riveting. Antique brass, nickel silver, copper and natural agate were used in creating this design. The one-step looping plier was used for the handmade chain.

Lay out Etched Metal Page

Measure, mark and punch holes for decorative rivets, accents and center piece (using the small side of the hole punch).

Hinged Pendant Memory Journal created by Sondra Barrington of Rings & Things. This free DIY jewelry project features metal etching, metal stamping, dapping and riveting. Antique brass, nickel silver, copper and natural agate were used in creating this design. The one-step looping plier was used for the handmade chain.

Prepare Embellishments

Using two-part epoxy, carefully glue the etched metal panels into place.

Hinged Pendant Memory Journal created Rings & Things. This free DIY jewelry project features metal etching, metal stamping, dapping and riveting. Antique brass, nickel silver, copper and natural agate were used in creating this design. The one-step looping plier was used for the handmade chain.

Lay out Etched Metal Page

Using a dapping set, dome two small round shapes that can nest one inside the other. Patina, file away any rough edges and clean the domed metal. Layer, and rivet domed metal nests onto the top panel. Connect top and bottom panel with rivets. Use a tube rivet at the top so that you can thread a jump ring through it (if you choose).

Hinged Pendant Memory Journal created by Sondra Barrington of Rings & Things. This free DIY jewelry project features metal etching, metal stamping, dapping and riveting. Antique brass, nickel silver, copper and natural agate were used in creating this design. The one-step looping plier was used for the handmade chain.

Rivet Domes Into Place

Carefully clean and polish the pendant before attaching the necklace chain.

Hinged Pendant Memory Journal created by Sondra Barrington of Rings & Things. This free DIY jewelry project features metal etching, metal stamping, dapping and riveting. Antique brass, nickel silver, copper and natural agate were used in creating this design. The one-step looping plier was used for the handmade chain.

Clean Finished Pendant

Handmade jewelry looks great on a custom beaded necklace, on leather cording, silk ribbon or chain. I created a necklace by making individual links using the one-step looping plier, eye pins, metal beads and natural agates. The links were connected using jump rings.

Hinged Pendant Memory Journal created by Sondra Barrington of Rings & Things. This free DIY jewelry project features metal etching, metal stamping, dapping and riveting. Antique brass, nickel silver, copper and natural agate were used in creating this design. The one-step looping plier was used for the handmade chain.

Memory Journal Necklace

This free DIY Memory Journal pendant was created by designer Sondra Barrington of Rings & Things. This necklace features riveting, metal etching, antique brass shrine stamping blanks, dapping, and metal stamping. The chain was created in an ombre pattern using natural agate gemstone beads, TierraCast antique brass bead caps, metal heishi trade beads and the one-step looping plier with antique copper head pins.

Spring 2013 Pantone Color Trends Giveaway

April 29, 2013

Pantone Spring 2013 Giveaway

Enter to win our Resin Flower Gluing Kit. Just comment at the end of this post  — by May 6, 2013 — with your favorite Pantone Spring 2013 Color Trend to be entered into our drawing.

win a resin flower gluing kit

In celebration of Spring, here are the Spring 2013 Pantone Color Trends. Just click on any of the color swatches below and find the treasures available in our online store. Also visit our Design Gallery  for all the designs you see here and many more. All designs are FREE – no login required!

banner-spring13_emerald banner-spring13_grayedjade

banner-spring13_tendershoots  banner-spring13_lemonzest

banner-spring13_nectarine banner-spring13_poppyred

banner-spring13_linen banner-spring13_africanviolet

banner-spring13_duskblue banner-spring13_monacoblue

Comment now with your favorite Pantone Spring 2013 Color Trend to win. Contest ends May 6, 2013.

~Jan