Browsing Category

Featured Findings

Silver filled jewelry: what exactly is it?

July 6, 2011
silver filled earrings

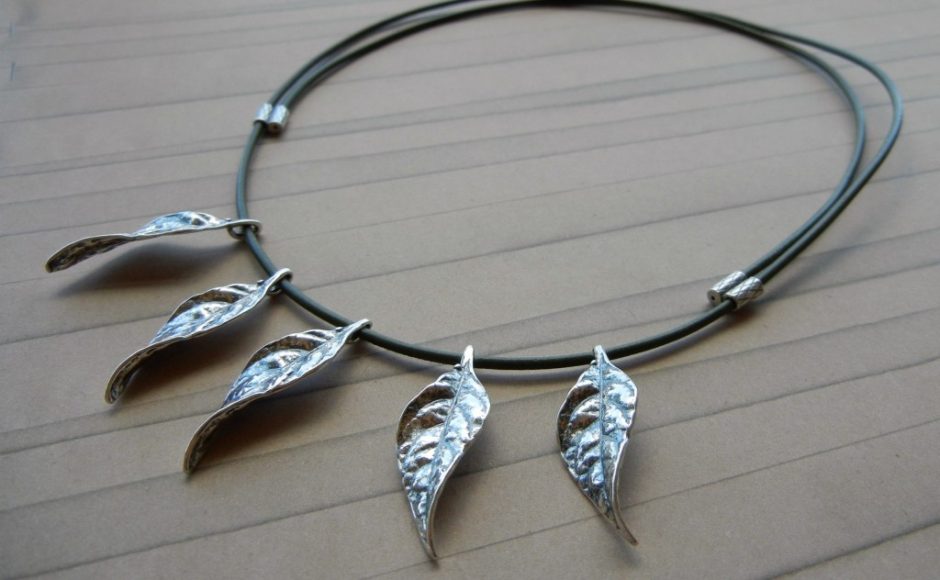
Earrings made with silver filled head pins and ear wires.

If you use sterling silver in your jewelry, you have felt the pain of rising silver prices. Although the market always fluctuates up and down a tad unpredictably, it feels like it has only gone UP lately. Because it has!

Many jewelry designers have been forced to switch materials or to use less sterling silver in their designs to compensate for the increased costs. However, the quality and look of sterling are popular for good reason. Hence the rise of affordable new silver filled wire, beads and jewelry findings on the market!

Continue Reading…

Silk ribbon necklaces: how to finish the ends

June 10, 2011

Ever wanted to turn a pretty ribbon into a necklace, but weren’t sure how to make it wearable? Here are a few of our favorite methods for finishing the ends of silk ribbons.

1. Add a clasp – any clasp!

Simply string large-hole spacer beads or soldered jump rings, then one half of your clasp, onto one ribbon tail. Thread the tail back through the spacers/jump rings and tie a knot on the end. Slide the spacers/rings to adjust the necklace length. Mollie used a button and oval link to form the clasp on this sweet pea pod design, but you could use any kind of clasp. You could also omit the spacers/rings and just tie the clasp to the ribbon for a non-adjustable design.

With the jumbo lobster clasp, I just tied a loop on the opposite end instead of adding a ring.

2. Glue on necklace adjusters (2020 update: sorry, these are no longer available)

Since the silk ribbon has tapered ends, Rita folded the ends over two times to make them fit securely into the adjusters. She used G-S Hypo Cement for a secure fabric-to-metal bond with no mess.

3. Bolo!

To create a bolo necklace, just connect a bolo slide to the back of a pendant and slide it onto the ribbon. While Jaci titled her piece Sweet Lolita, I can’t help thinking of it as Bolo Betty. She designed it, so she wins of course.

4. Tube bead slider (not pictured)

Run both ends of the ribbon through a large-hole tube bead, running opposite directions or in the same direction: either way works. Tie knots on the ends, and add some embellishments if you like.

5. Just tie a bow!

Seems too obvious, right? Although it might feel “unfinished,” this method is comfortable, adjustable and it allows you to remove the pendant.

We’ll cover how to finish flat ribbon, like velvet, and round cording, like leather, in future blog posts. Let me know if you’d like tips for any other materials! ~ Cindy

How to use heat to patina brass charms and filigrees

March 31, 2011
bee charms, raw and with heat patina

One before and two after applying heat patina. Check out the rainbows on the middle bee!

Ah, brass. Beautiful brass. I love everything about using brass in my handmade jewelry … except its raw brassiness. Brass is affordable, easy to work with, and available in all kinds of fun charms and filigrees. And while giving raw brass an antique patina with an oxidizing solution such as Win-Ox really is not difficult, my favorite method of coloring brass is the torch! It tones down that brash brassiness to a beautiful warm glow that is infinitely more appealing to my eye.

bee charm torch

Torching the bee charm only took a few seconds.

Applying heat to give the metal a patina is so easy – and clean! No chemicals, no rinsing, no waiting! Sometimes you can even get shimmery rainbows to appear by holding the heat on for a few extra seconds. (The same process works to heat patina raw copper.)

Heat patina raw brass filigree

Raw brass filigree, before and after meeting the torch flame.

You all know to set up a heat-proof work area before firing up your torch. This can be as simple as a cookie sheet. Tie back your hair, wear safety glasses and just plain BE SAFE. Do your homework before you start. A great book that explains all the necessities for working with a torch is Soldering Made Simple by Joe Silvera.

Butane is widely available at hardware stores.

Don’t feel fired up to experiment? You can buy Vintaj natural brass jewelry components, most of which have already undergone a chemical-free process to give them their rich color.
Plated brass filigrees are also available. But I encourage you to try heat patina. It is the safest way to let your inner pyromaniac out to play!

Velvet ribbon adds a luxurious feel to this brass bracelet.

Here is a gorgeous brass jewelry example by Mollie to inspire you! She soldered a raw brass bee to a Vintaj connector to make this bracelet and used both heat and Win-Ox to patina the pieces. ~ Cindy

Want to keep that perfect heat/torch patina that you’ve achieved? Nikolas #2105 Clear Silver Lacquer is the product we’ve most often heard recommended by teachers and jewelers, to protect heat patinas and other colors on silver, copper, brass, and bronze. Follow the manufacturer’s instructions on the packaging, to seal and protect your jewelry. When properly applied to metal surfaces, it forms a coating that protects from oxidation, perspiration, sulfur, and abrasion.

Please note, that this item does require special hazardous shipping, so be sure to select UPS GROUND as your shipping choice during order checkout.

More bottle-cap jewelry designs!

March 15, 2011

Did you catch the bottle-cap jewelry we recently featured? (It’s cute!) It shows off three techniques–packing tape, glass tiles, and epoxy stickers.

Here’s another take: using resin in bottle caps. Over to designer Rita…

Crowned bracelet

CROWNED bracelet

What you need for the “Crowned” bracelet:

Qty. Stock # Name
3 each #55-075-17-43 Bottle cap, 17mm (chrome)
3 each #55-075-32-43 Bottle cap, 32mm (chrome)
3 each #83-220-25-02 1″ round epoxy stickers, Nostalgic 2
1 each #40-337-9 Bracelet blank, 7.2″, disk and loop, hammered oval (black gunmetal)

Tools and supplies:
3 buttons (artist’s stash)
Magic-Glos UV resin (#82-501-01)
UV Light (#82-593)
Epoxy 330 (#60-230)

Hints:
* Seal buttons inside mini bottle caps first.
* Glue bottle caps to bracelet blank.
* Then apply epoxy stickers.


Milky Way cufflinks

MILKY WAY cufflinks

To make the “Milky Way” cuff links:

Qty. Stock # Name
2 each #55-075-17-43 Bottle cap, 17mm (chrome)
2 each # Cuff link, 10mm pad (white)


Tools and supplies:
Images from scrapbooking paper
Scissors
Clear packing tape
Hypo cement (#
60-250)
Magic-Glos UV resin (#82-501-01)
UV light (#82-593)
Epoxy 330 (#60-230)

Hints:
* Cut image to size.
* Seal with packing tape and cut out.
* Adhere to bottle cap with hypo cement.
* Apply UV resin.
* Attach cufflink findings with epoxy.


How Many Stars clip

HOW MANY STARS clip

Materials Rita suggests for the “How Many Stars” clip:
Qty. Stock # Name
1 #46-881-266-3 Amate Studios™ 26mm bottle cap bezel pendant, silver plate
2 #28-333-89 lampwork glass chili pepper beads, red
12″ #47-036 22-gauge round wire, silver plate (cut two 6″ pieces)
2 #37-167-3 8mm round jump rings, silver plate
1 #30-620-50-3 31x15mm oval swivel clip, silver plate
1 #82-500-08 8oz EasyCast epoxy resin kit

Tools and supplies:
scissors
colored craft paper
Mod Podge®
paintbrush
resin mixing set (#82-599)
antacid tablet (!)
flat-nose pliers (#65-080)

Hints:
* Seal the front and back of paper with Mod Podge to prevent the color from bleeding. Glue this to the bottom of the bezel cup to prevent it from floating.

* Coat the antacid tablet with Mod Podge to prevent it from dissolving in the resin.


3 Bonus Tips!

Tip 1: For additional details about techniques used in these designs, see the technique sheet: Gluing Hints for Metal Findings

Tip 2: View free jewelry-making technique sheets (PDF files) for scads of designs like these!

(You’ll need Adobe Acrobat Reader. You can download it free here.)

Tip 3: …Secret…a whole nother kind of bottle-cap jewelry is coming soon to Ring s & Things’ online store…

Project Alert: Getting Creative with Hair Sticks

March 9, 2011
Here at Rings & Things, we are always trying to spice up our stock with fun new items.

Ruby Ballerina, a free hair pin design

“Ruby Ballerina” Hair Sticks with Red Sparkly Glass

Recently, we have delved into the enchanting world of hair findings. Our design team was challenged to use some of our new findings to make some unique hair decorations. I was given the task of creating something with our cherry
hair sticks that resemble chopsticks.

I wanted to make something easy, yet whimsical that could cascade through your locks and add a touch of “ooh-la-la” to the ordinary messy bun. I came up with two designs, that could easily be altered to fit your style or match any outfit. Simply pick whatever beads you like! You could go fun and flirty or sophisticated and elegant (think wedding party?). Whatever you decide, this project is easy, affordable and a great way to tackle the winter blues!

Hippie Chic Ballerina Hair Stick, a free jewelry design from Rings & Things

“Hippie Chic Ballerina” Hair Stick with Buddha Head Beads

Make your own Hair Sticks with:

Here are a few more ideas for creating hair findings! Or take a peek at our Jewelry Design Gallery for tons of free project ideas!

“Spring Flowers” Hair Clip by Cindy Morris

Rings & Things' free jewelry design, The Birds bobby pins

“The Birds” Bobby Pins by Jaclyn White

Rings & Things free jewelry design: Blue Bee bobby pin

“The Blue Bee” Bobby Pin by Sondra Barrington

Check out some of our other fun hair findings at Rings & Things and let the creativity begin! We have a great selection of bobby pins, hair combs, barrettes, and hair picks waiting for your personal touch!

Tiffany

Rings & Things Showroom

Design Team


PS: here are some handy links to some other how-to’s in the Rings & Things blog!

Alternatives with TierraCast®!

February 17, 2011
Alternatives with TierraCast®!
Expanded design options? Yes! with TierraCast’s new Alternatives Collection. Featured:
brass oxide (antiqued brass) components and
black (gunmetal) components. TierraCast Alternatives were created to fill the needs of current trends among bead stores & designers. Your favorite TierraCast beads and jewelry findings now come in these great new finishes!
Find your favorite TierraCast beads in antiqued brass (aka brass oxide).

TierraCast Brass Oxide Finish

Find your favorite TierraCast beads in black finish (aka gunmetal).

TierraCast Black Finish

Jewelry Inspirations:

Combine black finish beads and niobium findings for a smart look!
“Wisdom & Knowledge” Earrings
Make this black gunmetal necklace with glass focal for a look that's all the buzz!
“Bee Mine” Necklace
Discover how electrifying your design options are with TierraCast Alternatives and Swarovski crystals!
“Vitrail Voltage” Earrings


Chain that charms

February 7, 2011

Guest blogger, Rings & Things’ Nory, suggests:

Make a jingle to your design jangle with our inspiring new
Charm Chain.

This dangle chain is bound to add movement and improvement to any design!

"Bell Flowers" bracelet by Mollie Valente

Within this unique style of chain, choose from several style variations:

"Greek Goddess" earrings by Tiffany White

Each soldered link has two charms attached. This Charm Chain or Fringe Chain, as some folks have started calling it around here, appears in 5 plating styles:

  • antiqued brass
  • antiqued copper
  • antiqued silver
  • matte black
  • matte silver

"Spring Skies" necklace by Cindy Morris

We currently offer Charm Chain in a generous meter portion (3.28 Feet), and a bulk 10-meter spool (32.8 Feet).

A week ago, I challenged some of our in-house designers to come up with a design project using our Charm Chain with whatever else they felt “charmed it together”. I gave each designer half a meter of the 40-092-02-AB, the classy leaf design in antique brass pictured above, and let them loose to creatively construct these wonderful designs seen here.

A meter of this chain makes 9 pairs of 2″ earrings… With more than enough jingle in a meter to get any design dangling off the ground, try it out and tell us how you love it!

Castings call!

December 19, 2010
Cast a Spell on Jewelry Designs
Use lead-free pewter castings to make great centerpiece focals for jewelry designs! Wire-wrap them, glue them or encase them. They can be metal stamped, bent, hole punched, colorized and more. Their versatility is sure to cast a fashionable spell on your new jewelry creations! … More: New Back-Order Policy & “Notify Me” Feature.
Rings & Things News Flashes
Versatile lead-free pewter castings make great jewelry focals!

Lead-Free Pewter Castings

Jewelry Inspirations:

Adorn a pewter casting with a Swarovski rivoli, bee charm and Adirondack(R) alcohol inks.
“Fly Bee Free” Pin
This simple pewter-focal design can be worn as a necklace or bolo.
“Poseidon’s Steed” Bolo Necklace
Metal stamp a pewter casting to create this personalized design!
“Starshine” Necklace