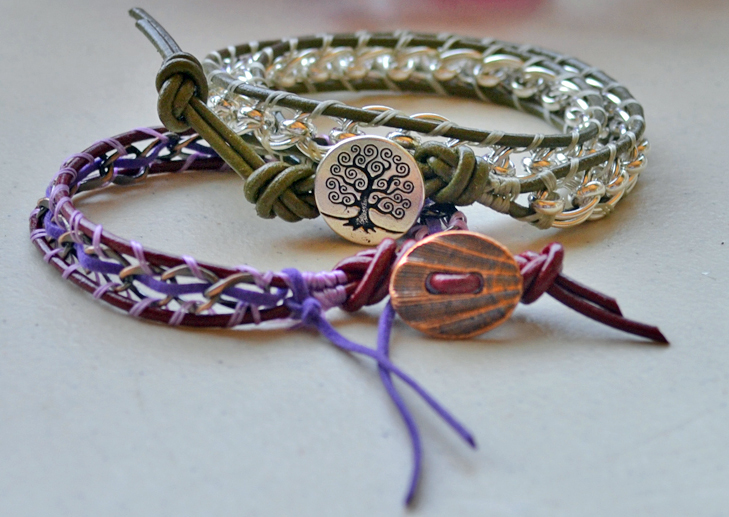
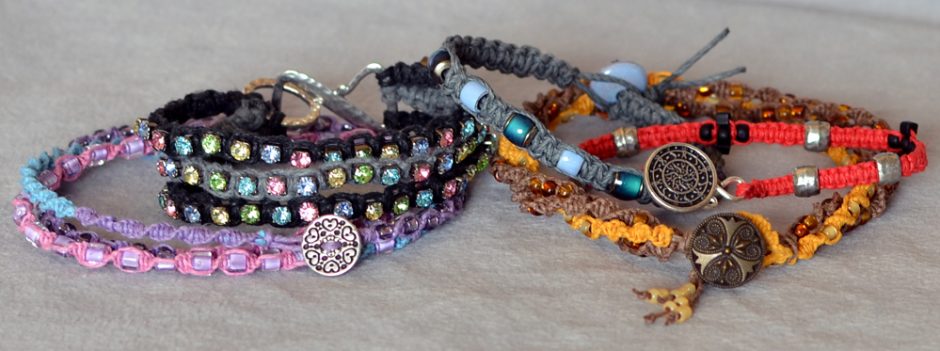
Lashed wrapped leather bracelets aren’t just popular because they look great — they’re also a hit because once you know a couple tricks to get started, they are an easy and fun DIY jewelry project to make! A great twist on this hugely popular style is to lash chain instead of beads to leather cord. Read on to make your own leather and chain wrap bracelets! Continue Reading…
Button, Button, What to do with buttons?
June 18, 2013I love a good button. I think most bead hoarders have a button tin somewhere as well. The materials used for buttons range from the simple and inexpensive to exotic and pricey. Obviously buttons have a practical use in sewing and clothing design, but they can be great additions to DIY jewelry as well.
Buttons as beads:
By their nature, buttons tend to have either a shank, with an opening for thread, or 2-4 holes for sewing. These holes and openings mean your buttons can substitute for beads and work as connectors in jewelry design. See round TierraCast buttons with a leaf pattern in New Leaf Earrings and bone buttons sewn on the Boston Bracelet.
Buttons as clasps:
Whether for popular wrapped lashed leather bracelets, or for necklace designs, adding a button to one end of your design and creating a simple loop or series of loops at the other end will complete your creation. The Dark and Dangerous Bracelet uses a cast pewter Spiral Button for the closure.
Buttons as Cabochons or Cameos:
Disk & Loop Bracelets make up into quick finished jewelry by gluing buttons to the disks. If the button has a shank, you may need to trim it and file the surface, then add your favorite adhesive, and you have quickly created a new accessory. Cute as a Button Bracelet uses an assortment of plastic “accoutrements” by Tim Holtz for decoration.
Copies of Buttons:
Have a one-of-a-kind or vintage button that you love, but don’t want to part with? 2-part silicone molding material works great to make a mold of your treasure that you can re-create in polymer or resin and use time after time. Silicone molds were quickly made of the buttons in this picture. Reproductions of the buttons (without the pesky shanks) were easily made with Amazing Resin and SuperClear Resin. For more information on making molds, see our previous blog: Making Your Own Molds is a Hoot.
Buttons you can buy from Rings & Things:
Rings & Things carries buttons in materials such as bone,
and SWAROVSKI ELEMENTS crystal
Making a Button:
Do you have an item without holes that you want to use as a button? Easily glue a plastic button shank to your piece to create a button. These work great for turning resin, polymer clay, hand-made glass, and ceramics into useable buttons. Since these shanks are plastic, they don’t have the sharp edges that you sometimes find on metal shank findings. The set shown above are made from resin flowers, colorized with gilders paste, and attached with E-6000.
Changeable buttons:
With a button cover and some glue, you can create a decorative cover that can be transferred from garment to garment, covering the plain or boring buttons used in manufacturing. This set is made with super clear resin, colored with dye and glitter, and attached with E-6000.
Our pinterest board “Buttons” has further inspirations for using buttons and great handmade buttons.
~ Rita
Create a Healing Shrine
June 6, 2013Making handmade jewelry for someone is a unique and inspiring way to show you care. This “Healing Shrine” was created for a friend suffering from cancer. It was inspired by our new brass “window” blank shapes and a recent trip to Santa Fe, NM.
Each year, thousands of people pilgrimage to El Santuario de Chimayo seeking blessings. Many visitors take a small amount of “holy dirt” from the site, in hopes of a miraculous cure for themselves or someone who could not make the trip. I chose to encase my “holy dirt” in a glass portal, that I nested inside a brass reliquary. Following are instructions for how-to create this DIY jewelry design using stacked brass layers and cold connections.
First, envision your shrine and decide how you want it to look and feel. Decide on contents for your glass bottle. Unscrew the top loop from the cork in the glass vial. Measure, mark and punch holes for rivets (using the small side of the hole punch).
Stamp word “heal” on the metal band designed to hold the glass vial. Measure the band to ensure that it is going to fit.
Using bail making pliers, bend the center of the band into a curved shape, leaving each end flat. Cut to shorten as needed. File the ends.
Rivet the stamped metal band into place after double-checking that it will snugly hold the glass once it is assembled.
Insert tube rivets in holes between the front and back of shrine, stacking copper heishi trade beads between the layers (to fill the space and strengthen the connection between the top and bottom layers).
Rivet them into place. Note: Be careful, it is very difficult to reinstall the heishi spacer beads if they fall off the tubes!
Patina and clean. Using two-part epoxy, attach a magnet to the back side of the shrine. Carefully fill vial with contents.
Once the glue has cured, pop the glass vial inside the band. This DIY jewelry project can be a pendant, magnet or pin.
How to Macramé a Hemp Bracelet
May 7, 2013Growing up in the 1970’s, I predictably spent part of my childhood making macramé. In fact, I spent hours tied to the ends of masses of cording creating the ubiquitous plant hangers that have become an icon of the era. Call me sentimental, but I got a warm and fuzzy feeling when asked to dust off my knotting fingers and make a hemp macramé bracelet for Rings & Things’ Blog.
Continue Reading…Add color and shine with Gilders Paste
February 4, 2013Gilders Paste, trying various methods and materials, and deciding I like it! Rings & Things has added an assortment of colors. Each tin is 1.5 oz of wax-based medium, and is enough to cover 30 square feet of metal, wood, resin, et cetera. You can apply Gilders Paste with a cloth, cotton swab, or fingertip. Thin with paint thinner, turpenoid (but not turpenoid natural) or mineral spirits to transform the highly concentrated Gilders Paste for brushing, sponging, staining, washing or spray painting. I suggest having the following tools handy when you plan to colorize with Gilders Paste:
- Soft Rag (an old cotton t-shirt worked well)
- Baby Wipes
- Small Mixing cup
- Disposable (cheap) small paint brushes
- Palette
- Stir Sticks
- Mineral Spirits – from the hardware or craft store.
- Non Stick Craft Sheet
- Apron
I don’t really mind getting my hands dirty. I didn’t have the foresight to use a craft sheet, so the table was gilded along with the objects. After I was done, the plastic table cleaned up good as new with some mineral spirits, and my hands cleaned up fine with soap and water. If you are more particular (and don’t want any gilding of your fingernails), you may want to wear latex or nitrile gloves. Drying time varies depending on substrate and surface preparation, approximately 60 minutes to the touch on dry debris-free surfaces and 12 hours for complete cure time. If polishing or burnishing is required, allow 12 hours drying time. Rubbing the base coat immediately after application with a dry cloth or slightly wet with thinner will remove Gilders Paste from the relief detail and highlight depressed details. Lightly brushing Gilders Paste over the top will highlight the relief details. This is patina color on a reproduction Ching dynasty coin. I scraped a little paste out of the tin, and then wet the paint brush with mineral spirits and mixed it together on the palette until I had a paintable consistency. I put on a fairly thick coat. After an hour or so, I buffed off the excess paste, and this was the result (with a un-gilded example for contrast). This is a nice use of the Gilders Paste for faux aging. The color was a bit paler than I hoped for so I mixed some African bronze paste into my patina color. I painted a new layer of paste onto the opposite side of the coin, and the new color was more to my liking. This is a filigree cross in antiqued copper plating, which I colored with verdigris Gilders Paste. For this color, I still mixed in the mineral spirits, but I applied the color with a stir stick. After drying and buffing, the verdigris color is subtle, but it counters the reddishness of the copper metal. This color was nice, but I wanted a bit more shine, so I layered german silver Gilders Paste over the verdigris. Here is the filigree with the metallic layer lightly buffed off, and the original plating for contrast. Too much of the verdigris was covered now, so I went back in for a 3rd layer, verdigris paste on top of the previous two applications. After some more drying and buffing time, this was my final result: My next experiment involved resin flowers. I was curious about the results on a highly dimensional, non-metallic item. I thinned out violet Gilders Paste, and applied it to 3 colors of resin flower with a paintbrush. After drying, this was too tricky to just buff with a cloth, so I touched up the high points with my cloth, and then used a dry brush to remove excess paste from the crevices. The two lower flowers are un-colored. The flowers with the paste have an almost velvety look to them. This is another antiqued copper plated filigree. The piece on the right has iris blue Gilders Paste applied directly with a cloth. The piece on the left has been layered. White Gilders Paste on the filigree makes the iris blue top layer more visible. Both of these are dried and buffed. Next I tried colorizing some silver plated wavy disk beads. I thinned out the iris blue and damson pastes, and applied them to the beads with a brush. This is after buffing, with a shiny bead in the center for contrast. The lighter the metal color is to start with, the greater contrast the paste seems to make. I tried out the rusty red pinotage color Gilders Paste on both silver plated flower charms and antique brass filigree. This was my chance to paint the flowers red. For these items, I added a bit of mineral spirits to my brush, and conditioned some of the paste directly in the tin. Lastly, I wanted to mix colors, as opposed to layering them. I mixed the pinotage with the German silver Gilders Paste in the palette. Both of these colors happened to be creamier than some others, so I didn’t need to thin them down. I applied this mixture by brush to a raw brass filigree and got a lovely metallic pink finish. The manufacturer says Gilders Paste will be permanent in 24 hours. It will accept an over coat such as clear lacquer, varnish, urethane, or powder coating to achieve a uniform appearance where the paste was not used, or to provide further durability to areas where repeated handling is required, such as a door knob. Due to the anticipated increased wear for jewelry, I tested 4 different products for sealing Gilders Paste.
The first 3 sealers all worked great. The spray sealer was the easiest to use, but the fumes from it can be quite obnoxious. I sealed one of the filigree crosses with the glaze, and the other with glossy accents. To me they look identical. The renaissance wax, however, provided unanticipated results. Due to the cleaning components of this product, it stripped most of the color from the item I applied it to. The disk on the left was the original gilded iris blue wavy disk. The disk on the right has had renaissance wax applied, which lightened the color. It is good to know that this may work to lighten a color without fully removing it if that is ever your desired effect. Be aware that the consistency of this product will vary from color to color and from tin to tin. If you have a tin with creamy consistency, enjoy it. If the product is crumbly, (whether it came that way, or you left the lid open) don’t ever consider it “bad”. You can re-constitute the paste with mineral spirits, a few drops at a time. So, having tried Gilders Paste, I’m hooked. Now I need to figure out what colors to buy to start my collection. ~ Rita
EnCapture Artisan Concrete
February 4, 2013We tested the new EnCapture Artisan Concrete Kit!
This “unique texture-rich medium for jewelry making” is designed for embedding treasures such as glass, gemstones, metal, buttons, wire and beads to create visual interest and contrast. Here are some tips for using it!
Mixing: We found the easiest way to mix the concrete was making a slurry (or thin paste) by putting a small amount of the base material in the mixing cup and adding the activator. To the slurry, mix in the base material and pigment incrementally until you have achieved the desired color and consistency.
Application: You can extend the life of your concrete while you are working by covering the mixing cup with a damp paper towel. We recommend you remove excess concrete from your embedded treasures as you work using a damp paper towel, cotton swab or toothpick. It is easier to remove when it is moist than after it starts to dry.
Hamsa Hand in Heart Mosaic Necklace – Tutorial
Finishing Touches: If you do not like large grains of sand from the concrete being visible in your design, you may be able to bury them by gently poking them down into the wet concrete with a toothpick.
- The kit
- Bezel Cups (for this concrete product, deeper bezels work better than shallow bezels)
- Resin & Jewelry Clay Tutorials
How to solder jewelry with Simply Swank tools
June 27, 2011How to make a sliding adjustable necklace
June 23, 2011How to coordinate colors…automatically
June 13, 2011[stextbox id=”info” caption=”This one put a song in my head: “…Ride a painted pony, let the spinnin’ wheel spin!” “]
How to coordinate colors…automatically: “Ride a painted pony, let the spinnin’ wheel spin!”
[/stextbox]
Don’t be seen on that painted pony without coordinating the colors!
Swarovski’s “Create Your Style” program introduces a brilliant–and fun–color tool:
(Cue the calliope music, as you head off to play Color Carousel at Rings & Things’ website) 🙂
Another use for crimping pliers
May 13, 2011Thanks for sharing a tip (comment below),
and thanks for sharing this blog with a friend!
Crimping pliers (crimpers) are special pliers designed for a very specific purpose: to crimp (fold) crimp beads onto beading cable such as Beadalon or SoftFlex. (Our beading cable technique sheet illustrates this very well.)
But here is another use for them: use your crimpers to tuck wire tails. The concave shape helps pull the wire in close to the wrap without chipping the bead underneath – especially handy when you are working with glass beads or crystal!
Snags are a drag. Do you have any similar tips for keeping wire tails tucked where they belong? ~ Cindy