Browsing Category

Fun

Twelve Days of Christmas Jewelry Designs: 12 – Fairy Doors

December 12, 2011

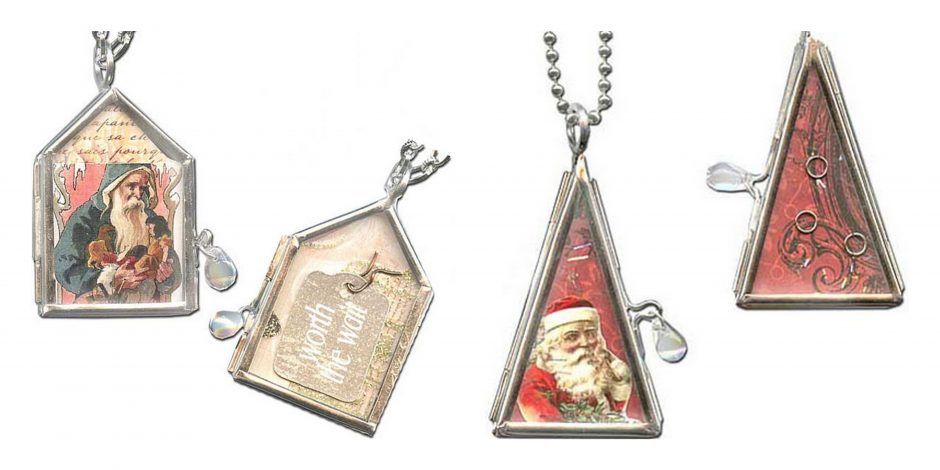
A super easy way to create some holiday magic is with our exclusive brass fairy doors. These precut metal shapes with cutouts can be stamped, hammered, riveted, painted, patinaed, layered…so, so many options! Mollie used one to make her sister a sweet keepsake necklace (Day 6). Sondra added a stamped tag to one of her designs on Day 11. Earlier this year, Polly made several sweet pins and pendants by sandwiching pieces of recycled tins between the riveted layers. Basically, the designers here are in love with them – and it isn’t just us! Sondra’s Victorian Christmas fairy door design just won Vintaj’s blog contest!

sondra barrington christmas vintaj winning design

Also, jewelry designer extraordinaire Molly Alexander shared with us the design below that she created with our heart fairy doors for Art Bead Scene’s November Challenge. It is just too lovely not to share. Merry Christmas! ~ Cindy

Molly Alexander design

Twelve Days of Christmas Jewelry Designs: 11 – Stamped Metal Gift Tags

December 8, 2011

let-it-snowThe best thing about metal stamping is the ability to personalize jewelry and ornaments with the exact words, phrases and names you want. Hammering metal is one of those instant gratification crafts. In just a few minutes you can create a completely customized gift that will be functional for years. Below are some examples of custom gift tags and other gift items to inspire your Christmas crafting. Continue Reading…

Twelve Days of Christmas Jewelry Designs: 10 – Velvet Bookmarks

December 5, 2011

Yes, it is just my opinion, but I’ll say it as though it is a fact: books always make great gifts. I love giving books. I love receiving books. And it is easy to make pretty ribbon bookmarks to personalize your gifts even more!

velvet-ribbonsStart with a length of beautiful
velvet ribbon.

bead-marked-booksUse choker clamps to attach beads and baubles to the ends.

velvet-ribbon-bookmarksAmy’s bookmarks are in our design gallery, where you’ll also find a list of the exact supplies she used to make them.

Sure, Kindles and other e-readers are gaining popularity, but nothing really compares to curling up with an actual paper book and a big mug of your favorite beverage. Make the moment even more indulgent with a luxurious bookmark! Need a jewelry-making book to gift (to a friend or maybe yourself)? Here are three recommendations:

Jewelry Lab by Melissa Manley

Wire Style 2 by Denise Peck (includes DVD)

The Encyclopedia of Contemporary Jewelry Making Techniques by Vanetta Seecharran.

Happy reading! ~ Cindy

Twelve Days of Christmas Jewelry Designs: 9 – Hinged Picture Frames

December 1, 2011

Family photos. Collages. Upcycled Christmas cards. Meaningful quotes. There are many keepsakes and bits of nostalgia that are worth framing for the holidays. It is really fun to solder your own pendants and ornaments, but if that’s not your thing – or you want unique shapes without having to cut glass – or time is of the essence – Rings & Things has a pretty amazing selection of hinged memory picture frames to choose from. Just insert two images and you have a reversible pendant or piece of art!

Continue Reading…

Twelve Days of Christmas Jewelry Designs: 8 – Ceramic Holiday Cookies Charm Bracelet

November 30, 2011

Me. Want. Cookies! When I was in junior high, one of my mom’s friends actually paid me to make Christmas cookies for her cookie exchange each December. I was thrilled to be earning money. She paid me well, but was still getting an amazing bargain considering how many hours I spent rolling dough and piping frosting.

I still like baking, but chocolate chip is about as fancy as it gets. Detailed little gingerbread houses are a thing of the past – or a thing for jewelry. Check out these adorable little ceramic Christmas cookie beads:

cookie-houses-crystals

Ceramic cookie houses with Swarovski crystal bicones.

Amongst our rather large selection of hand-painted Peruvian ceramic beads I also found cute little ceramic gift boxes and ornaments:

ceramic-gift-box-beads

Presents!

ceramic-ornament-beads

These little guys would make great earrings.

There are a many other cuties available, but I digress. Today’s Christmas jewelry project is a charm bracelet using the cookie beads and sparkly little crystals.

Supplies Needed for Charm Bracelet:

Charm bracelet with toggle clasp

Head pins – you can get away with using shorties, but longer are fine too.

Ceramic cookie beads

4mm Crystal Jam bicone mix (I used Karma Chameleon)

Metal spacer beads

Jump rings

Jewelry-making tool set

This design is a great opportunity to perfect your technique for making simple loops! Simply string beads on a pin, bend wire 90 degrees, trim the wire to about 4mm (1/6th of an inch), grab the very end of the wire with round-nose pliers and loop it back over to touch the base of the wire. The metal spacer beads are decorative, but they also help fill the ceramic bead holes.

making-wire-loops

The anatomy of a wire loop.

crystal-pins

Assembly goes faster if you make a little production line out of it.

Once you have all the dangles made, group them together however you like and attach them to the bracelet using jump rings. It seemed to be missing something, so I added a TierraCast gingerbread man charm and a
fern green bicone drop as an accent near the clasp to finish my easy Christmas cookie charm bracelet.

catch-me-gingerbread-man-bracelet

Can’t catch me!

And now I’m off to find some more cookies – edible ones this time! ~ Cindy

Twelve Days of Christmas Jewelry Designs: 7 – Faux Stained Glass Soldered Ornaments

November 23, 2011
faux-stained-glass-frosted

Capture the look of snow falling – even if it is raining outside!

Have you heard of Tim Holtz? If you make jewelry, perhaps not. However, he is wildly popular and famous amongst scrapbookers or mixed-media artists. Rings & Things started carrying some of his Idea-ology trinkets and components because they make fun additions to mixed-media designs (both jewelry and jewelry displays!). And then we added his line of alcohol inks because they can be used to colorize metal and other non-porous surfaces. And now we’ve added his acrylic paint dabbers. I watched his video on how to use the paint dabbers to create a resist for alcohol inks and was intrigued. Watch the video, you’ll see what I mean.

tim holtz headlock

Oh, boys.

So Tim – pictured above with our buyer Nory in a headlock! – demonstrates the inks on paper. I wanted to use the process on glass – specifically memory glass slides – in order to make a faux stained glass ornament. One of the coolest things about the alcohol inks is how you can blend them together. My theory was that if I did all my inking and painting on the inside surfaces of the glass, the colors would be safe from the ravages of time.

Continue Reading…

Twelve Days of Christmas Jewelry Designs: 4 – Beaded Snowflakes

November 17, 2011
beaded snowflakes

Making beaded snowflakes is a fun project for anyone old enough to not put beads in their mouth!

Day 4 is an ultra-simple, instant gratification project: beaded snowflakes. Simply take a wire snowflake form and add beads. This is an ideal project for using up leftover beads, especially sparkly glass beads!

snowflake wire formsThere are several options for keeping the beads in place:

  1. Use crimp beads. (Use a crimp with loop at the top to make it easy to hang).
  2. Glue the last bead in place.
  3. Use round-nose pliers to loop the end of the wire.
  4. french wire keeper on wireOr – the easiest and best in my opinion – use a French wire keeper. French wire keepers are little rubber stoppers that keep earrings in place – or beads on snowflake forms. French wire keepers also make great pin backs, or clutches/nuts for post earrings. A very versatile little jewelry finding indeed!
window-beaded-snowflakes

Dress up the view with sparkly snowflakes!

Winter – and the cold & flu season – is upon us. I didn’t post day 4 of the 12 Days of Christmas jewelry designs yesterday because I never made it out of bed. Silly head cold. So let that be a lesson to you all – it is never to early to start your holiday projects because you never know what interruptions you might face!

Happy beading! ~ Cindy

Twelve Days of Christmas Jewelry Designs: 3 – Lampwork Glass Bead Zipper Pulls

November 15, 2011
candy-glass-zipper-pulls

Candy bead zipper pulls make a great gift for someone sweet!

Quick, cute and affordable gift idea: zipper pulls! Zipper pulls are actually quite functional when you’re wearing gloves or mittens – why not make them pretty, too? Here are the three things you must do to make beady coat decorations strong enough to withstand a blustery winter.

split ring pliers

That hooked jaw will save your manicure.

  1. Use beads that are large enough to grasp when you’re gloved up. If the bead holes are large, like on many of the holiday lampwork glass beads I used, add small beads on both ends. (Small Czech glass flower beads make convincing cellophane wrappers on silver-foil glass bead candy.)
  2. String beads on a headpin and make a wrapped loop. A basic loop won’t cut it here.
  3. Use split rings instead of jump rings to attach your baubles to a swivel clip or clasp.
split ring pliers

Pliers make this so much easier!

You’ve heard the song “Save a Horse, Ride a Cowboy”? Well, save your nails – use split ring pliers! Just insert the hooked jaw into the split ring and squeeze. Now slide both the swivel clip and beaded pin onto the ring.

peppermint candy zipper

Mint candy freshens up any outfit.

Well done. You’ve just learned how to make great gifts for under $1 each! ~ Cindy

Twelve Days of Christmas Jewelry Designs: 1 – Swarovski Crystal Tree Earrings

November 11, 2011

Hi bloglandia! The holidays are sneaking up on us like stealthy ninjas. Whether you have been making jewelry for years or would like to make your very first pair of earrings, these super sparkly crystal Christmas tree earrings are a fast and fun way to whip up some holiday spirit. Over the rest of November, I’m going to share twelve holiday jewelry designs, most of which are simple and sweet. All of them make great DIY gifts or highly sellable products for your next craft show. Today’s detailed instructions for how to make beaded earrings should make it possible for you to make a variety of jewelry designs – the more you practice making wrapped loops on head pins, the easier it gets!

Supplies for one pair of Crystal Christmas Tree Earrings

crystal-tree-earring-parts

Earring parts – you’ll also need a set of the basic jewelry pliers.

  • One pair of ear wires (I’m using sterling silver filled – less expensive than sterling, but the same look and quality for people who can’t wear base metal. Learn more.)
  • Two 2″ head pins (since the pin won’t touch the wearer, I think it is ok to use silver-plated pins if you like, instead of sterling silver. 1.5″ head pins will work too, but longer pins are easier for beginners to wrap.)
  • Three to five graduated sizes SWAROVSKI ELEMENTS crystal margaritas in one color (I used Crystal Vitrail Medium in 8mm, 10mm, 12mm and 14mm)
  • Two 4mm crystal cube beads
  • Two 3mm crystal bicones (I used Fuchsia)

Step by Step Photo Instructions for Making Crystal Tree Earrings

stack-a-bead-tree

Stack the crystals on a head pin.

grip with round nose pliers

Grip the pin with round nose pliers.

Bend wire away from you.

rotate pliers

Turn just your wrist to rotate the pliers a quarter turn away from your body, like so.

bend-wire-fwd

Pull the wire back towards your body, looping it over the top jaw of the pliers.

wire-facing-you

Now the wire is pointing back towards you.

rotate-pliers-again

Rotate your wrist towards you again to move the pliers into this position.

close the loop

Now there is room to close the loop (push the wire away from you).

grip the loop

After you’ve closed the loop, switch to chain nose pliers to grip the loop.

wrap wire tail

Grip the tail with flat nose pliers and wrap it around the wire.

wrapped wire loop

Stop wrapping when you reach the crystal.

Trim the excess wire.

Trim the excess wire.

tuck the wire tail

Squeeze gently with chain nose pliers to tuck the wire tail in tight with the wrap.

attach ear wire

Open the ear wire just like you’d open a jump ring. Add the crystal tree and close the ear wire.

complete crystal tree earring

Ta da! One sparkly tree earring. Now repeat all the steps to make its mate!

Green and red make the classic color combo, but there are plenty of other options. Foiled crystal margaritas look like icy trees, especially when paired with blue trunks and stars. Fern Green is an even “greener” green than Emerald, while the Crystal Vitrail Medium I used are mostly green with all kinds of reflected colors. I paired it with pink for a slightly less traditional look. I like to use the “Browse by Crystal Color” page on Rings & Things website to pick crystal color combos. Here are a few other crystal Christmas trees made with SWAROVSKI ELEMENTS:

crystal tree options

More sizes and colors of Christmas tree earrings – the smooth one is made with a Fern Green Artemis bead instead of margarita crystals.

Now that you know how to make these crystal tree charms, you can attach them to anything: use them as pendants, zipper pulls, cell phone charms, tree ornaments or wine glass markers if you like! ~ Cindy