Browsing Category

Jewelry Tools

Best Riveting Tool Set

July 22, 2013

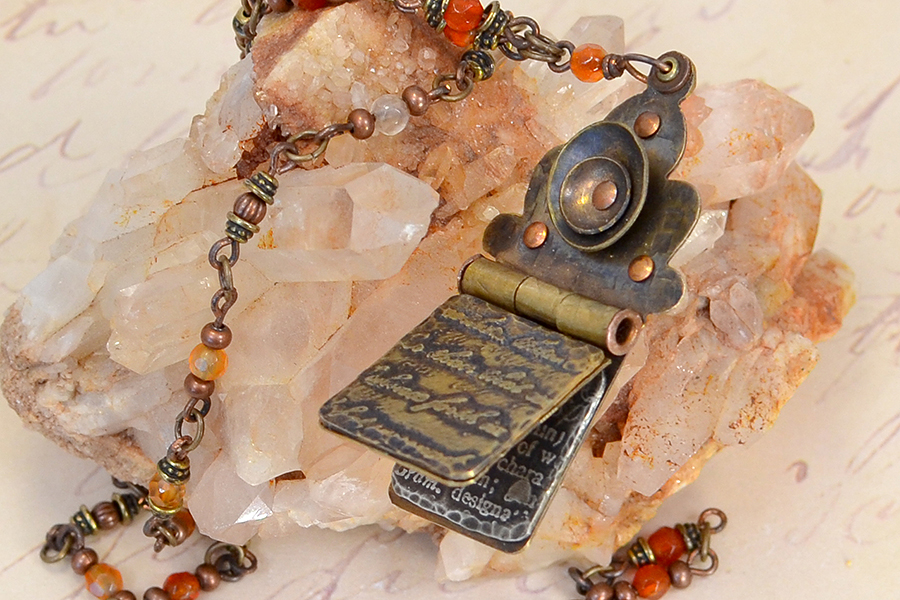
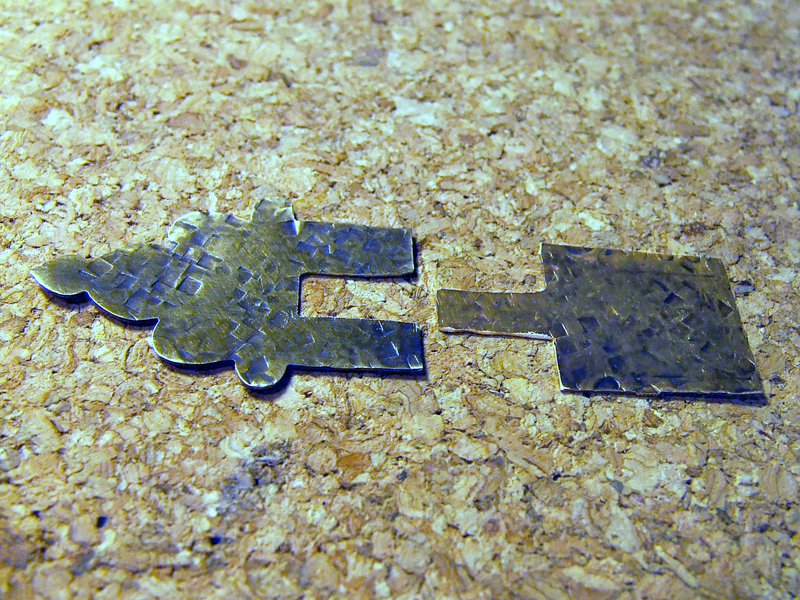
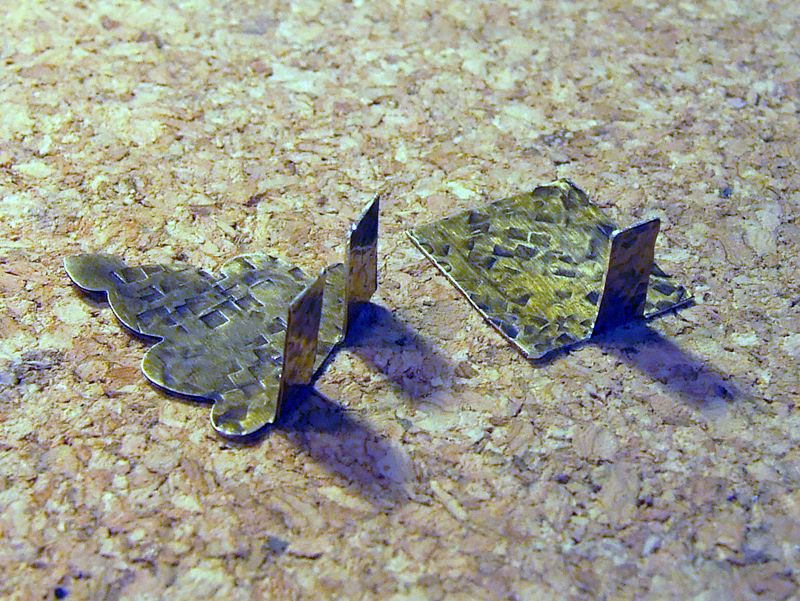
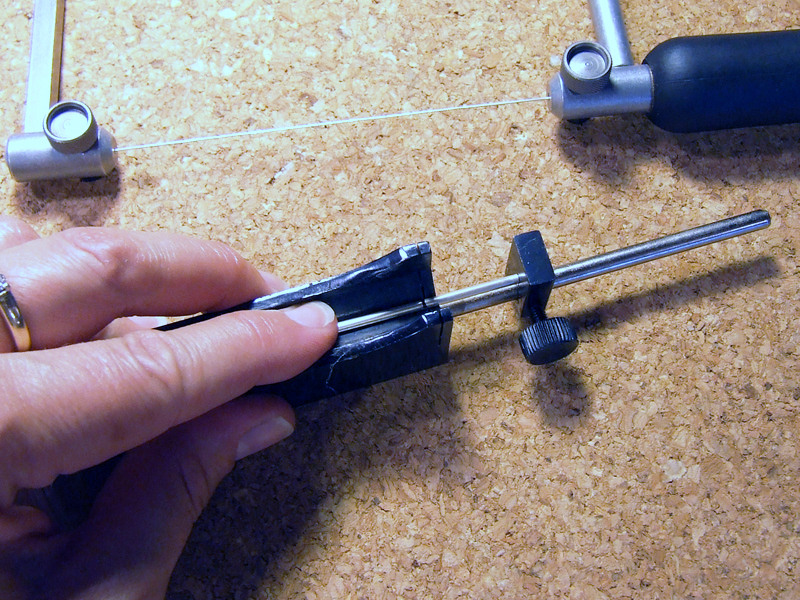
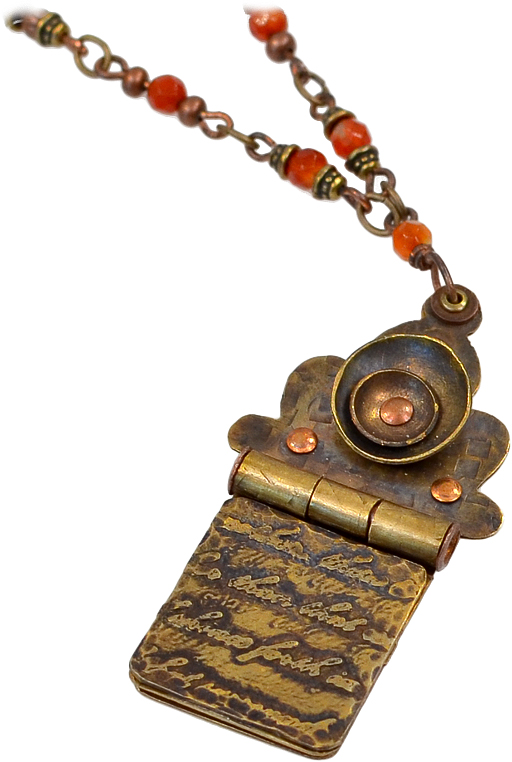
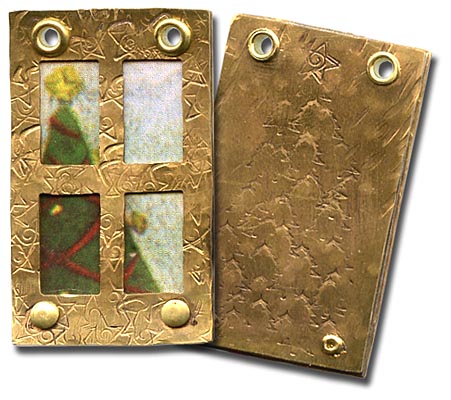
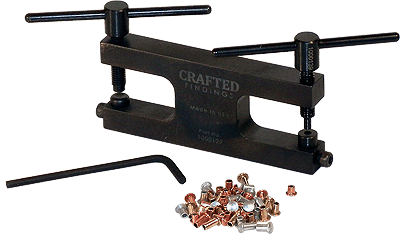
With 100s of rivets, eyelets, and related tools to pick from, the #2 riveting question I get is:

What are the best tools to easily
set both rivets and eyelets?

The answer depends on whether you want to rivet mostly leather, or mostly metal.

For leather, see my Riveting with TierraCast Leather Findings tutorial.


For metal and mixed media, the best set of riveting tools is…

Continue Reading…

Create a Hinged Metal Memory Journal

July 18, 2013

Use a hinge to turn shrine-shaped metal blanks into a journal!

Decide on the layout, location of the hinge and other decorative elements. Using a checkered hammer, apply texture to the top and bottom panels of the journal. Patina, file rough edges and clean.
Hinged Pendant Memory Journal Rings & Things. This free DIY jewelry project features metal etching, metal stamping, dapping and riveting. Antique brass, nickel silver, copper and natural agate were used in creating this design. The one-step looping plier was used for the handmade chain.

Layout

Cut the hinges, which can be as wide or as narrow as you choose. For 3/32 tubing, make hinges that are one-half inch deep. You need an odd number of hinge tabs. Measure, mark and saw tabs into the top panel. Use plenty of cut lube to prevent the saw blade from sticking when cornering.
Hinged Pendant Memory Journal Rings & Things. This free DIY jewelry project features metal etching, metal stamping, dapping and riveting. Antique brass, nickel silver, copper and natural agate were used in creating this design. The one-step looping plier was used for the handmade chain.

Create Hinge Tabs

Using wide, flat nose pliers, crease and fold each tabs up to a 90 degree angle. The position of the fold determines whether the hinge will be visible from the front of the pendant, or only from the back side. Keep the textured sides face up, so the design is consistent.
Carefully roll tabs into cylinders using chain nose pliers or medium bail making pliers. Leave hinges a bit loose until after you have inserted the tubing, then you can tighten for best fit.
Hinged Pendant Memory Journal created by Sondra Barrington of Rings & Things. This free DIY jewelry project features metal etching, metal stamping, dapping and riveting. Antique brass, nickel silver, copper and natural agate were used in creating this design. The one-step looping plier was used for the handmade chain.

Roll Into Cylinders

Use a tube cutting jig to cut a length of tube 1mm longer than the width of your piece (for 1/2mm on each side).
Hinged Pendant Memory Journal created  Rings & Things. This free DIY jewelry project features metal etching, metal stamping, dapping and riveting. Antique brass, nickel silver, copper and natural agate were used in creating this design. The one-step looping plier was used for the handmade chain.

Cut Tubing

Slide tubing down the channel and finesse hinges as needed. Rivet tubing into place to finish the hinge. Open and close hinge to ensure a proper fit.

This free DIY jewelry design by Sondra Barrington features antique brass, nickel silver, metal etching, dapping and creating hinges.

Assemble Hinge and Insert Tubing

Working with the bottom panel, lay out etched metal pieces for the cover and inside page. Cut, file and patina as necessary. Leave sufficient room for the hinge to lay flat against the bottom panel.
Hinged Pendant Memory Journal created by Sondra Barrington of Rings & Things. This free DIY jewelry project features metal etching, metal stamping, dapping and riveting. Antique brass, nickel silver, copper and natural agate were used in creating this design. The one-step looping plier was used for the handmade chain.

Lay out Etched Metal Page

Measure, mark and punch holes for decorative rivets, accents and center piece (using the small side of the hole punch).
Hinged Pendant Memory Journal created by Sondra Barrington of Rings & Things. This free DIY jewelry project features metal etching, metal stamping, dapping and riveting. Antique brass, nickel silver, copper and natural agate were used in creating this design. The one-step looping plier was used for the handmade chain.

Prepare Embellishments

Using two-part epoxy, carefully glue the etched metal panels into place.
Hinged Pendant Memory Journal created Rings & Things. This free DIY jewelry project features metal etching, metal stamping, dapping and riveting. Antique brass, nickel silver, copper and natural agate were used in creating this design. The one-step looping plier was used for the handmade chain.

Lay out Etched Metal Page

Using a dapping set, dome two small round shapes that can nest one inside the other. Patina, file away any rough edges and clean the domed metal. Layer, and rivet domed metal nests onto the top panel. Connect top and bottom panel with rivets. Use a tube rivet at the top so that you can thread a jump ring through it (if you choose).
Hinged Pendant Memory Journal created by Sondra Barrington of Rings & Things. This free DIY jewelry project features metal etching, metal stamping, dapping and riveting. Antique brass, nickel silver, copper and natural agate were used in creating this design. The one-step looping plier was used for the handmade chain.

Rivet Domes Into Place

Carefully clean and polish the pendant before attaching the necklace chain.

Hinged Pendant Memory Journal created by Sondra Barrington of Rings & Things. This free DIY jewelry project features metal etching, metal stamping, dapping and riveting. Antique brass, nickel silver, copper and natural agate were used in creating this design. The one-step looping plier was used for the handmade chain.

Clean Finished Pendant

Handmade jewelry looks great on a custom beaded necklace, on leather cording, silk ribbon or chain. I created a necklace by making individual links using the one-step looping plier, eye pins, metal beads and natural agates. The links were connected using jump rings.

Hinged Pendant Memory Journal created by Sondra Barrington of Rings & Things. This free DIY jewelry project features metal etching, metal stamping, dapping and riveting. Antique brass, nickel silver, copper and natural agate were used in creating this design. The one-step looping plier was used for the handmade chain.

Memory Journal Necklace

This free DIY Memory Journal pendant was created by designer Sondra Barrington of Rings & Things. This necklace features riveting, metal etching, antique brass shrine stamping blanks, dapping, and metal stamping. The chain was created in an ombre pattern using natural agate gemstone beads, TierraCast antique brass bead caps, metal heishi trade beads and the one-step looping plier with antique copper head pins.

Quick and Easy 1-Step Looper Tutorial

May 10, 2013

I love jewelry with lots of sparkly adornment, but making simple jewelry loops can be tricky. Creating matching loops with the perfect shape requires skill and time. It’s little wonder the “1-Step Looper” is so popular — this magical tool makes consistent loops in one quick and easy step. In fact, the process is so quick, you might miss it if you blink. Continue Reading…

EnCapture Artisan Concrete

February 4, 2013

We tested the new EnCapture Artisan Concrete Kit!

This free jewelry project by Rings & Things uses bezel cups, jewelry grade concrete (EnCapture Artisan Concrete), Gilders Paste, rhinestone chain, vintage inspired filigree, black gunmetal chain and has a delicate flower bead as the center of the mini mosaic.

Flor Sepultiado Mosaic Necklace

This “unique texture-rich medium for jewelry making is designed for embedding treasures such as glass, gemstones, metal, buttons, wire and beads to create visual interest and contrast.  Here are some tips for using it!

This free jewelry project by Rings & Things features a stitched devil head lampwork bead as the centerpiece of a mini mosaic. Small beads surround the black white and red focal, which is set into Encapture Artisan Concrete (jewelry grade concrete). The small mosaic is held inside an inexpensive 1" round bezel cup.

Stitched Devil Mosaic Necklace

Mixing: We found the easiest way to mix the concrete was making a slurry (or thin paste) by putting a small amount of the base material in the mixing cup and adding the activator. To the slurry, mix in the base material and pigment incrementally until you have achieved the desired color and consistency.

Application:  You can extend the life of your concrete while you are working by covering the mixing cup with a damp paper towel. We recommend you remove excess concrete from your embedded treasures as you work using a damp paper towel, cotton swab or toothpick. It is easier to remove when it is moist than after it starts to dry.

Initial cleaning of the mini mosaic involves wiping away the excess jewelry grade concrete (Encapture Artisan Concrete) from the silver flower and rhinestone chain. Remove any excess concrete from the back of the gunmetal bezel cup. All parts available at rings-things.com

Work Time:  As the concrete starts setting within 5 minutes, you must work quickly!  Pre-arranging your design is very helpful.  We found it easiest to trace the bezel, and to mock-up the arrangement on paper.  This allows you to quickly and precisely place each item when it is time.   
Encapture Artisan Concrete (jewelry grade concrete) sets quickly. The lampwork cat head bead and smaller gemstone round beads were positioned into place before the concrete was placed, making it easier to create a small mosaic. All parts available at www.rings-things.com
Green Cat Mosaic Necklace
Design:  Including small beads in your design is easiest if you string them first (this way they can’t roll and move as easily). For a more elaborate or mosaic-style design, setting your treasures with a dab of two-part epoxy glue is recommended. Glue your items in place and allow the glue to fully dry before applying concrete.  
Trade beads, a Tierra Cast hamsa hand, an Amate primitive heart or art heart (arte heart) silver bezel were carefully glued into place for this small mosaic. The designer bezel will be filled with jewelry grade concrete (EnCapture Artisan Concrete) once the glue has dried. Free DIY jewelry project by designer Sondra Barrington of www.rings-things.com.

Hamsa Hand in Heart Mosaic Necklace – Tutorial

Finishing Touches:  If you do not like large grains of sand from the concrete being visible in your design, you may be able to bury them by gently poking them down into the wet concrete with a toothpick.

Once the product has cured, for a beautiful golden sheen, the brass brush works wonders!  If you do not want to alter the color of your finished piece, gently clean around embedded treasures with the straight carver.

Using a toothpick to place jewelry grade concrete (Encapture Artisan Concrete) into the small mosaic, around the silver flower and rhinestone chain. Carefully place the concrete to avoid getting it on the gunmetal bezel cup. All parts available at rings-things.com

In addition to the tools and supplies provided in the kit, we found the following tools and supplies very helpful:
* Damp paper towels/moist towelettes
* Extra wood mixing sticks
* Cotton swabs
* Tablet & pencil
* Extra disposable plastic mixing cups
* Extra dust masks
* Extra disposable gloves
This free jewelry project by Sondra Barrington of www.rings-things.com features a silver Amate primitive heart bezel. This deep dish art heart bezel has been filled with jewelry grade concrete (Encapture Artisan Concrete) and an assortment of trade beads, small silver beads and a Tierra Cast hamsa hand charm. The mini mosiac is hung from an inexpensive choker.
Links:

Cleaning and Polishing

December 7, 2012

Hi, guest blogger Rita here, with some information on cleaning, polishing, and keeping your metal jewelry clean.

There are a variety of products out there for cleaning and polishing, and whether you are trying for a specific finish, or wanting to keep your jewelry creations pretty after sale, knowing what to use can be very confusing.

Continue Reading…

Vintaj BigKick by Sizzix

April 16, 2012

favorite-bigkick-vintaj

Our precious…

Do you ever feel possessive of your favorite belongings? I moved our jewelry team’s Vintaj BigKick closer to the windows – a distance of maybe 15 feet – to get pictures and no fewer than three people stopped me!

decoemboss-necklace

Mollie made this sweet necklace during a demo in our Spokane showroom.

“What are you doing?!?”

“Where are you going with that?!?!”

sizzix-vintaj-jewelry-tools

Kickin’ it Vintaj style!

Really guys, the BigKick belongs to *all* of us – but I understand wanting to keep tabs on it: it is a super fun tool! Despite the name, the BigKick is actually a very small rolling mill. It is designed specifically to texture Vintaj Natural Brass blanks with their DecoEmboss folders and DecoEtch design plates.

bigkick-decoemboss-vintaj

Birds, trees, leaves, keys, clocks – embossing/etching folders are available in a ton of cute designs.

Simply choose a blank, lay it on the design, sandwich it between the plexi-glass plates and run it through the BigKick. The metal comes out with a reversible design, and since Vintaj brass has a natural patina, just few swipes with the metal reliefing block to polish the high points really brings out the details. (We’ve linked Vintaj’s YouTube demo videos right from the product listings in our online store if you’d like to see it in action!)

bigkick-vintaj-turn-handle

Simply turn the handle – it really is that easy to add beautiful texture to your jewelry!

We recommend using only Vintaj Natural Brass blanks with the BigKick machine as they are the right gauge and softness. If you use other items, you may be risking this precious machine! [ Update April 2016: These new 30-gauge aluminum blanks also work great! ]

One roll and you’ll be in love…

vintaj-embossed-heart-earrings

The Vintaj art heart blanks are sold in pairs – perfect for earrings!

If you’re buying a BigKick, you need three other things:

Embossing folders or etching plates

Flat Vintaj brass shapes/blanks

Metal reliefing block (sand paper or steel wool also work, but are not as easy to use)

And that’s it – instant gratification! Have fun kicking your style up a notch! ~ Cindy