Browsing Category

Jewelry Tools

How to make a knotted pearl necklace

November 4, 2011

knotted-crystal-pearl-necklace
Tradition. While often we just mindlessly follow it, sometimes it is nice to understand the reasons why. For example, pearl necklaces are traditionally knotted on silk cord. Why is this?

  1. If the strand breaks, the pearls don’t go flying every which way.
  2. The knots provide space and cushion, which prevents the pearl’s delicate nacre coating from getting damaged.
  3. It just looks good!

Ok, so #3 isn’t an official reason, but it must be as true as the first two. People have been making pearl necklaces for hundreds of years, so I’m sure someone would have figured out a different method if this one wasn’t attractive. But knotted necklaces are attractive. What I only recently came to understand is how attractive they are to make. Knotting seems like a lot of work. Thread and I often do not get along, but I am a huge knotting fan now due to one simple tool:

cord knotting tool
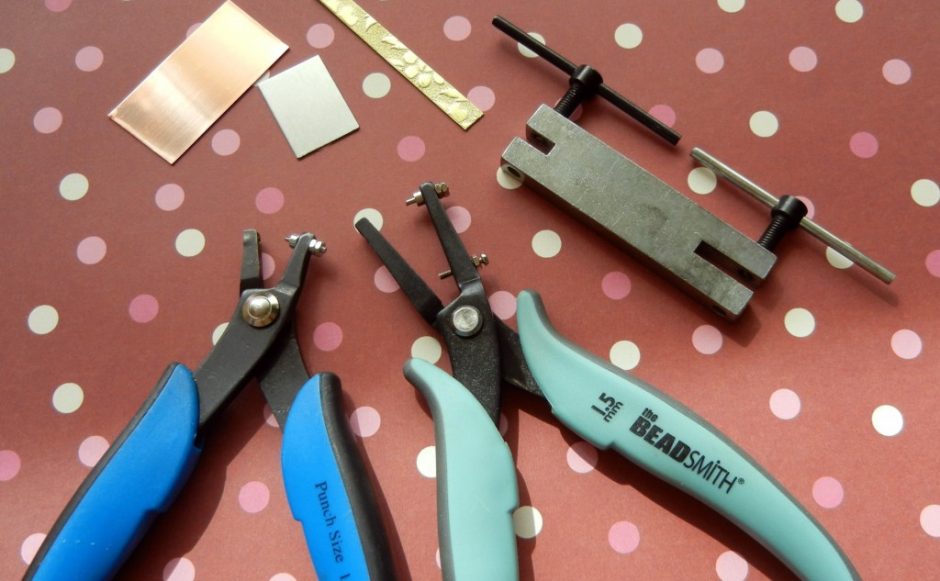
The knotter. The cord knotter is described as “an awl and tweezers in one handy tool.” I initially found this marketing claim to be discouraging, as anything involving tweezers sounds extremely tedious. But the knotter tool really does make a process that might otherwise require extra hands, several tools and loads of patience into something anyone can do. Watch this little video and you’ll see what I mean.

How to pick the right thread or cord for your necklace:

Conventional wisdom says silk cord is for pearls, while gemstone, crystal and other beads should be strung on nylon cord. The reason given is that sharp bead holes may damage the silk. However, one of the features of SWAROVSKI ELEMENTS redesigned 5328 crystal bicone beads is a smoother bead hole, which makes it less likely to damage the thread. As long as the cord isn’t jammed into the hole too tightly, and the beads aren’t too heavy, I’ve had good results with a variety of beads on silk cord. I prefer using the silk cord that comes with a needle end – it makes stringing so much faster!

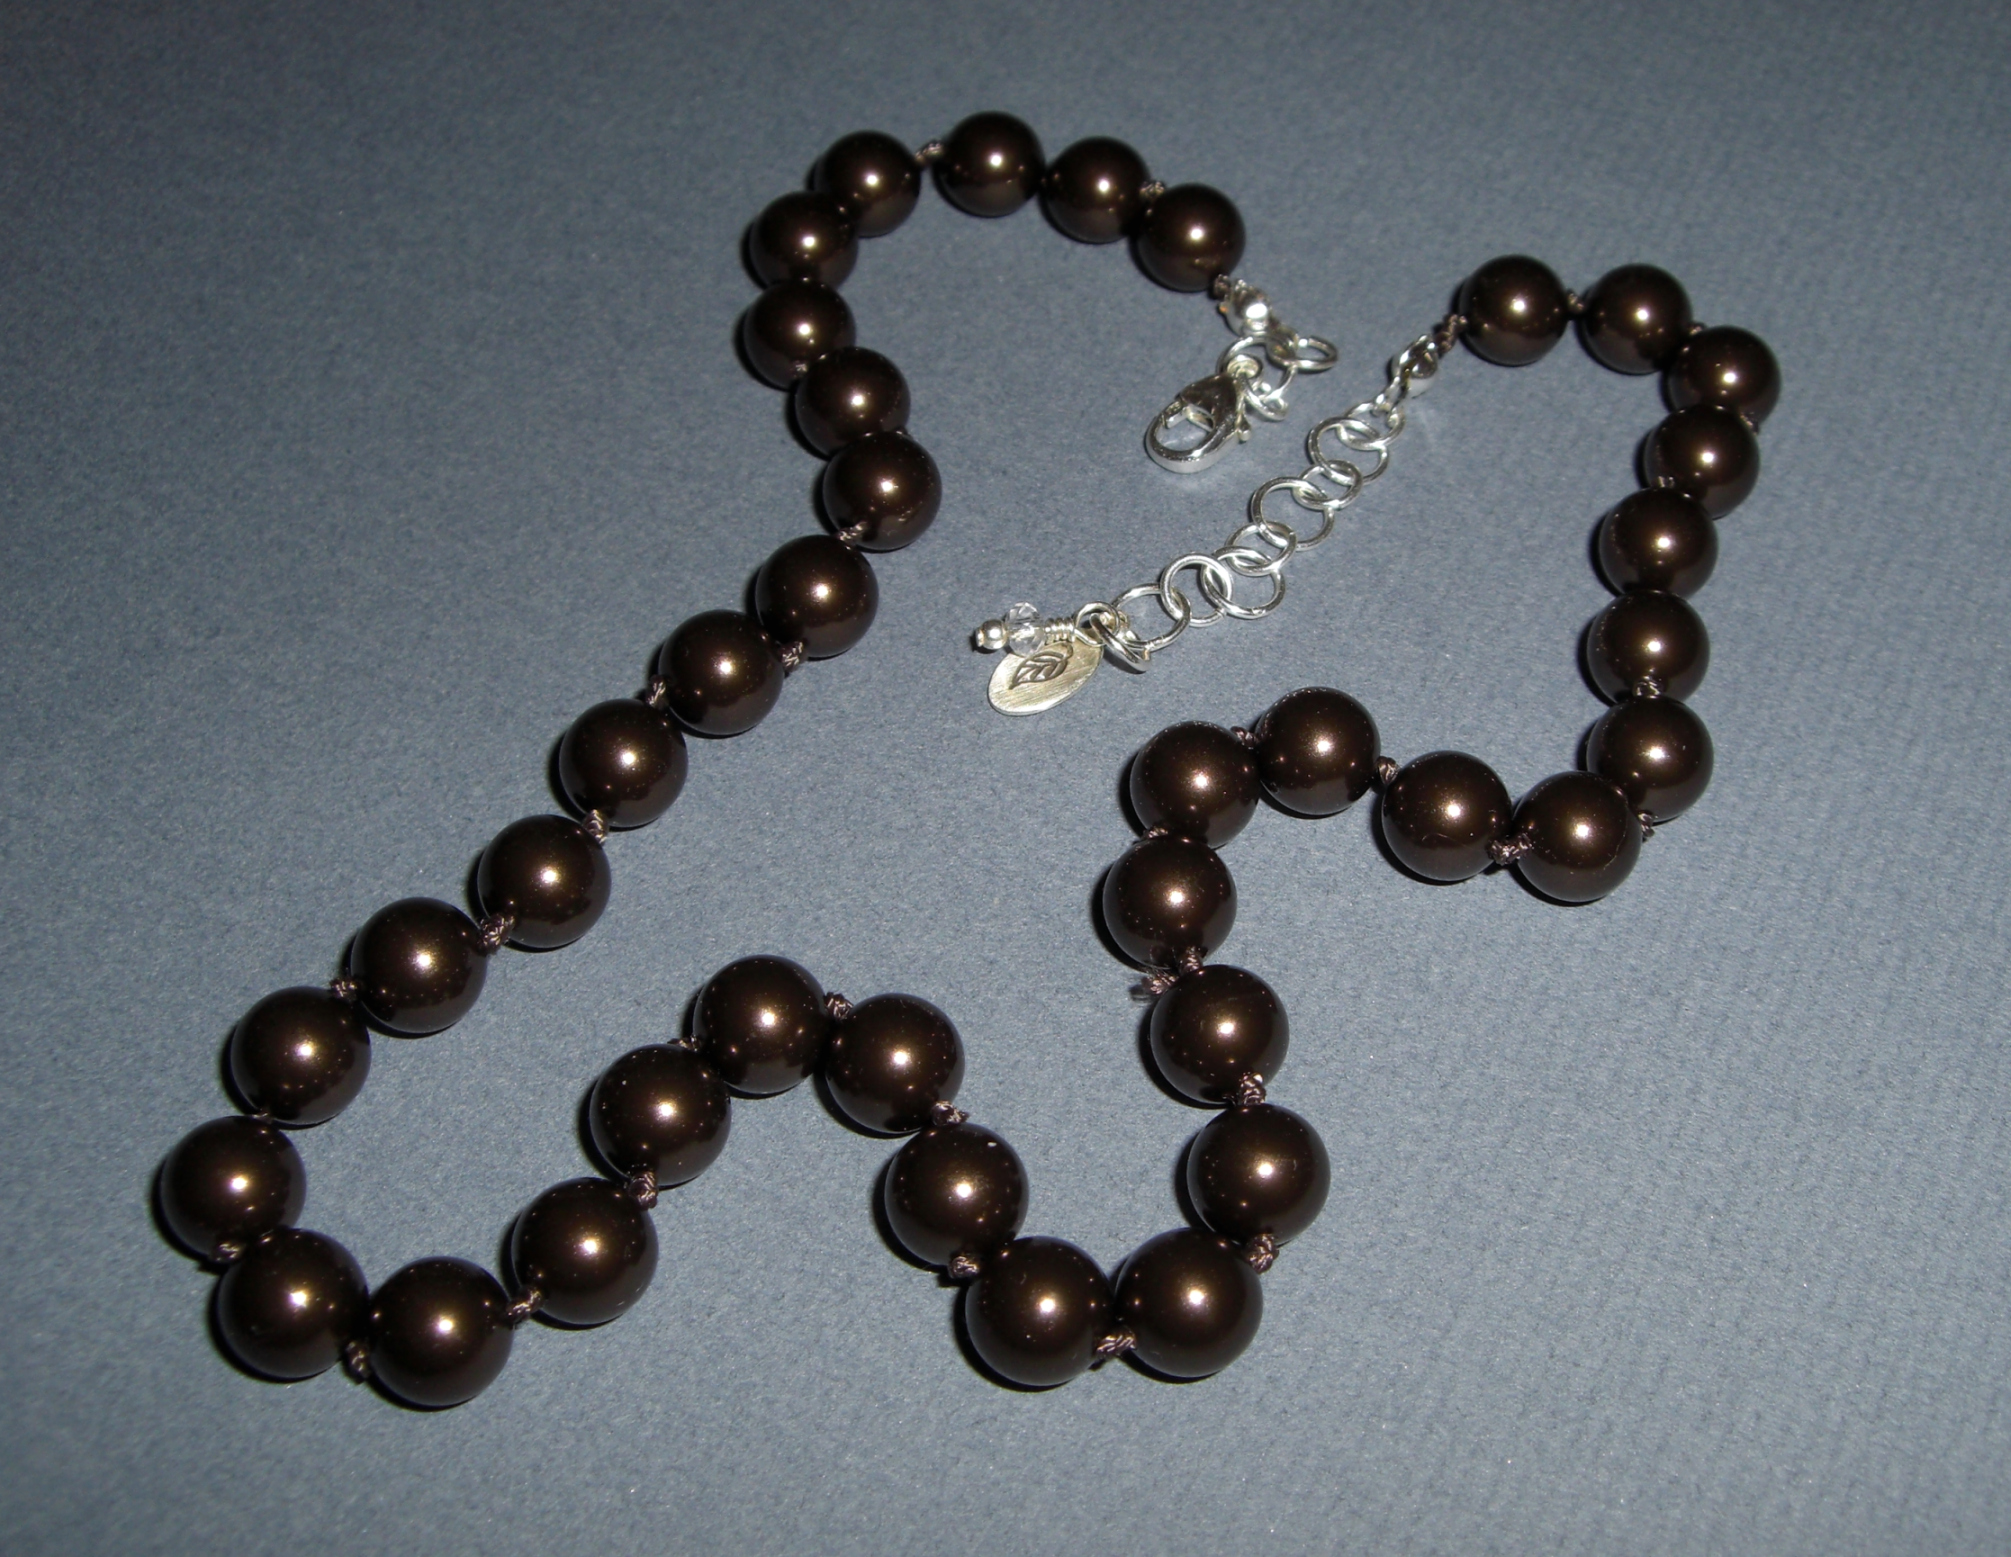
Freshwater pearls come in beautiful colors and have interesting variations in shape, but if you are looking for classic round pearls at an affordable price, crystal pearls are your best bet. They have consistent hole sizes and are much more durable than natural pearls (ie, a misplaced spritz of perfume or hairspray won’t ruin their finish). When you buy SWAROVSKI crystal pearls from Rings & Things, the pearls are already strung on a long, color-coordinated cord, which means you can completely eliminate the stringing step! Larger crystal pearls have larger holes, so sometimes the cord is doubled. I used 8mm pearls for this necklace, and found it wasn’t any harder to knot doubled cord.

How to add a clasp to a knotted necklace:

Most pearl necklace tutorials require that you ream (enlarge) the holes on the pearls closest to the clasp. This is so you can add French wire (bullion) over the cord end before tucking it back through a few beads and doubling a few knots. I chose to finish my necklace with bead tips instead. Bead tips are little clam-shell shaped findings that allow you to connect the thread to metal findings.

bead tip on silk cord necklaceThe best kind of bead tips are the “secure” type: adding a jump ring through the loops effectively seals the tip shut and allows you to attach a clasp or extender chain.

how to use a bead tip to finish a necklaceTying a seed bead inside the bead tip is the best method for ensuring that tip doesn’t slide off the end of the cord.

Amy, another of our designers, makes a lot of knotted necklaces. She likes to use French wire to finish the ends, but simply knots the end, secures it with a dab of Super Glue or Bead Fix, and hides the knot under a crimp cover. Her method avoids the reaming too!

More knotted necklace options:

  • Make it “endless” (long enough to fit over your head, or even long enough to wrap several times) – this way you don’t even need a clasp!

  • Instead of knotting the pearls or beads right next to each other, use gaps of cord as a design element. To make even spaces, wrap the cord around a piece of cardboard or other fairly sturdy material that you’ve cut notches into. (I recycled a plastic gift card). [2019 Editor’s Note: Beadalon now makes a “Tin Cup” knotter tool that you can adjust for evenly spaced knots, too! And yes, Wyatt has a great video for it, too.]

Thank you for putting up with the Oz-like transitions from color to black and white to color again in my photos – the light here has been gloomy and strange, making it hard to get good photographs! But when the weather is gray, it is a great time to play with a new jewelry tool like the knotter! 🙂 ~ Cindy

Upcycle cans and tins into jewelry!

October 7, 2011

Metal shears, a metal tin and the completed metal pin!

We all know recycling is a good thing, but upcycling is even better! Aluminum and tin cans can easily be turned into jewelry, but there are a couple of things to keep in mind:

  1. Metal edges can be wicked sharp. Make clean cuts and file off any jagged points. Quality jewelry metal shears make this much easier! Most tin snips and other shears from hardware stores are difficult to grip.
  2. Aluminum cans and most tins are too thin to be durable enough for jewelry by themselves. We suggest layering the metal you cut from recycled items. Three ways of doing this are riveting, gluing and/or coating the metal pieces.

Here are a few examples of how to turn packaging into lovely adornments:

pollys-tin-pins

Polly’s tin pins and pendants

Polly sandwiched her recycled metal elements between brass fairy doors, disks and gears. She riveted the pieces together using Crafted Findings’ riveting tool. Learn more about the riveting tool system here.

soda pop can necklace

The holes are lined with large eyelets from a scrapbooking supplier.

For this Soda Pop necklace, we cut disks out of cans and then glued them to brass disks to make them thicker. A circle template (commonly found in Art Supply stores and sometimes Craft Store) makes this task easier. Get more info in our design gallery.

soda can bobby pins

Layers of flowers punched from soda cans form these fun bobby pins.

Instructions for how Toni coated these pins with liquid polymer clay to make them safe to wear are in our design gallery.

Start looking at soda cans and other product packaging in a different way! I for one always check the bottle cap design when deciding on a beverage.

How I wish every city had an Upcycle Exchange Market (yikes! Link removed in 2019 … that link goes to something COMPLETELY different and unsavory now). It is a brilliant idea for reusing and redistributing crafty supplies and recyclables! Until then, ask your friends and family to help collect interesting materials for you. You might just upcycle something wonderful!

Affordable designer font stamps!

August 29, 2011

Fun fonts add more personality to stamped jewelry – even to stamped dog jewelry!

When stamped metal jewelry first became popular, most artists were limited to the basic block letters that were available in the market. But, wow, how things have changed! There are now many fonts available – fancy script fonts, playful lowercase fonts, swirly decorative fonts. How is a jewelry-maker to choose?

Well, one consideration is price. Our new font sets cost less than HALF the price of similar font sets on the market! Made by EuroTool, our quality stamp sets are available in five new fonts.

The letter ‘K’ on a brass heart with a crystal drop on antiqued ball chain. Simple and sweet!


Monogram
– 6mm high ornate script capital letters. Perfect for initialing and monogramming charms and tags.

The next four fonts are available in both uppercase and lowercase, so you can stamp with proper capitalization even!

I used uppercase Verona on this pendant.

Verona – a curly serif font with bubbly personality.

I like how the letters aren’t quite the same size in the Siena font – makes it look much more natural.

Siena – an easy to read sans-serif font that looks like very neat handwriting.

All uppercase Highland letters on this dog tag.

Highlands – clean handwriting with a italic slant. Sans serif.

Aras – a whimsical, playful font. It reminds me of the ever-popular Comic Sans font, but with serifs.

Metal stamps make impressions in sheet metal. When you hammer, the stamp displaces metal. The thicker the metal, the less you will notice the movement of metal: all you’ll see is the indent left by your stamp. On thin pieces, you’ll likely see a shadow of the stamping on the backside, and the edges might get kind of wonky. Sterling silver, brass, copper and even aluminum can be personalized with metal stamps. 24 gauge or thicker is best, but 26 gauge works too, as long as you don’t get too close to the edges.

Want to get started with metal stamping, but don’t know where to start? Check out both our metal stamping tool kit and our metal stamping blanks assortment. The kit includes basic uppercase block letters. For maximum enjoyment, add a set of the above font stamps and/or a few design stamps! For step-by-step instructions on how to make a stamped charm from sheet metal, check out our free Metal Stamping 101 page or our free technique sheet here.

I messed up almost immediately on my test piece, but it makes me think the letter ‘D’ could make a great decorative border!

One last tip: be sure to keep your stamps organized. These artistic fonts are especially easy to mess up (is that an ‘a’ or an upside down ‘g’ ??). Since the stamps will arrive alphabetized, take a moment to write the letter for each one on the side that faces you while you stamp. A fine-tipped Sharpie works great! ~ Cindy

Editor’s note: That was 2011, and I’m updating this in 2018 to fix old links … we have even MORE fonts and 100’s of design stamps now! See our full line of metal stamps (letters, number, punctuation and design stamps), stamping blanks, and metal stamping tools & accessories. ~ Polly

A quick guide to beading needles

August 23, 2011

Hello, bloglandia! Today I finally decided to finish the ends of a flat braid I made with a square Kumihimo disk. I recently blogged how to finish the ends of round Kumihimo braids (versions of which can be made with either the square or the round disk). What stalled me on finishing my flat braid was lack of a needle.

It just takes a few quick stitches to secure the braid before you cut off the knot and add a cord end. Make sure to use thread that matches your project so you don’t notice the stitches.

Since the flat braid is well, flat, you need stitch through the braid to keep it from unraveling. Sadly, needles and I don’t get along too well. It is never the poor needle’s fault. It is my fault for not choosing the right needle. When you treat all needles the same, instead of appreciating their unique qualities and character quirks, you can quickly run into frustration.

So today when Amy loaned me a needle, warning me it was a size 15, I said, “oh, that’s fine!” even though I had no idea what she meant. After several frustrating minutes trying to thread the darn thing, I learned. Size 15 is tiny. Check out this great bead needle and thread size chart from New Native Nation. You gotta love Spudmama!

While I’d long suspected that beading needles must be different than regular sewing needles, now I know why. As Spudmama explains, beading needles don’t “bulge” around the eye – this is what allows them to pass through seed beads multiple times for bead stitching and bead weaving projects. The smaller the number, the bigger the needle. (ex. size 10 needles are larger than size 15). Plus, “sharps” are stiffer than standard beading needles. Therefore, the smaller the project, the tinier and flex-ier the needle should be.

So, if you need a needle for something other than seed beading (like finishing a flat braid or making a wrapped leather bracelet) I recommend using size 12 sharp beading needles since they are (relatively) large and sturdy.

I used “choker clamps” designed for flat ribbon, such as velvet and organza, to finish the ends of my braid. There are teeth inside the clamp, so once you flatten the clamp firmly with pliers, it won’t slide off.

If you are brave enough to make tiny seed bead jewelry, refer to Spudmama’s chart and stock up on aspirin and magnifying glasses! Oh, and needle threaders! ~ Cindy

The easiest braided leather cuff bracelet ever

July 26, 2011

The magic braided cuff bracelet.

Hi bloglandia! I came across this great Magic Braided Leather tutorial today and immediately had to try it with our pre-made leather cuff bracelets. In less than 5 minutes I had a finished braided bracelet! Here’s how you can make your own:

Plain bracelet: the “before” shot.

Supplies:

  1. Leather cuff bracelet (mine is 0.5″ wide, dark brown)
  2. Sharp hobby knife

How to:

  1. Cut two slits in the bracelet blank, so that there are three strips or “strands.” (My strands are woefully uneven…I thought holding a ruler down next to the blade would help me cut a straight line, but the opposite occurred. I had much better luck just free handing.)
  2. Braid the three strands together. The bottom will get all twisted and tangly. Just ignore that until you’ve braided halfway.
  3. Then, holding your braid securely, untangle the bottom section by feeding the bottom bracelet end up through the tangle: “reverse braiding” if you will. It only takes 2 or three “reverse” maneuvers to make the bracelet straighten out.
  4. Then…just continue braiding. Untwist the bottom as needed and like magic the whole piece is one continuous braid!

Ta da! The “magic” braid.

As it gets worn, the leather braid will flatten out and get smoother, but I’m pretty happy with it as it is! ~ Cindy

Make hemp friendship bracelets and more with a Kumihimo braiding disk

July 15, 2011

Colorful hemp bracelets are fun for kids of all ages to make … by “all ages” I mean 8 to oh, 80.

I’ve been intrigued by Kumihimo braiding disks for a while now. Kumihimo (a Japanese form of braid making) is an easy way to make intricate multiple strand braids. Braiding bracelets is the perfect summer-time activity, as anyone who has been to summer camp can attest.

I used the “Spring” Hemptique assortment and round Kumihimo disk. Any type of thread or cord could be used. There is also a square disk available to make flat braids.

Most Kumihimo braids use 8 or 16 warps (each warp could be made up of multiple strands). I decided to try the 8-warp braid first. Since I was using 4 colors of hemp cord, I divided each color into two equal lengths and knotted them all together at one end (just a basic overhand knot). A basic rule of thumb is to have 3″ of each cord for each 1″ of braid length. If you are mixing different types of cord I would suggest estimating a bit higher.

Feed the knotted end through the center of the disk to get started.

Place one cord (or “warp”) next to each of the four dots on the board.

And start braiding! Bottom left cord goes to top left. Then top right cord goes to bottom right.

Now, the instructions told me to rotate the board 90 degrees so that I was always working from top to bottom, but I found it much easier to hold the board in one position and just apply the pattern. As long as you don’t cross the warps (ex. taking a left strand from the bottom and placing it on the upper right) it is really hard to mess this up. You’ll probably do it slightly differently than I did. What is really important is to keep your cords bundled into “no-tangle bobbins” – NOT all loose and tangly like in the photo above.

Keep the cord bundled up tightly to save yourself a headache.

The braid travels around the disk as you work, but you don’t need to pay attention to the numbers. And that’s all there is to it! For a project that requires no tools and no counting, the results are impressive! For a traditional friendship bracelet like the ones Jaci made, simply knot the ends together, preferably on your BFF’s wrist, so that it must be worn until it disintegrates.

Just tie a knot and trim the ends when you’ve braided a long enough piece.

I got on a roll, so I kept going and made my braid into a necklace. In the next blog I will show you how to finish braids like these, or any type of cord, really, with glue-on bullet ends. Have a great weekend! ~ Cindy

www.rings-things.com

How to pick the best metal hole punching tool for jewelry

July 12, 2011

A new hole punching plier just crossed my desk, and honestly, I was a bit taken aback. We already carry several hole punch pliers, as well as a screw-action metal punch, so why did we need another one? Hopefully this blog will answer that question and help you decide which tool is right for you.

Sometimes holes can be more about form than function!

It wasn’t that long ago (maybe 2-3 years?) that it was really hard to find a simple hand tool to punch clean holes in metal. Luckily we now have several options. Here are the main factors to consider when choosing the best punch for your needs:

  1. Hole size/shape – what size wire and/or jump rings need to fit? The smallest (1.25mm) fits regular jump rings just fine, but there have been times where I’ve needed a slightly bigger hole.
  2. Gauge – how thick of a piece of metal can you punch? All of the tools are designed for soft metal (such as sterling silver, copper, brass and aluminum). They can also be used on steel bottle caps, but doing so will wear out the punches more quickly. Remember, the bigger the gauge number, the thinner the metal (ex. 24 gauge is thinner than 20 gauge).
  3. Reach – how far from the edge of the piece you can punch a hole? It’s not really an issue if you are punching holes near the edge (most common), but if you plan to say, wire-wrap a stone onto the middle of a large metal sheet for a pendant, you might need to punch holes far from the edge.

Just look at those clean holes – and no power tools required!

EuroPunch pliers are available in 1.25mm and 1.8mm round, plus 1.5mm square and 1×1.7mm oval. Each pair of EuroPunch pliers reach about 0.5″ from the edge of your piece, and can punch through soft metal up to 18 gauge.

The BeadSmith punching pliers make 1.5mm round holes up to 3/4″ from the edge in soft metals up to 20 gauge.

Turn it to the right to punch the hole….turn it back to the left to release it. Easy!

The screw-action tool punches both 1.6mm (1/16″) and 2.3mm (3/32″) round holes, so it is really two tools in one. It is rated for soft metals up to 24 gauge. (We’ve successfully punched through pennies, which are close to 14 gauge, with this tool, but doing so will wear out the punch more quickly (just replace the punch, not the whole tool!). The screw-action tool reaches just a bit further than half an inch.

Speaking of replacing the punch…here is how you know it is time: the punch won’t quite punch all the way, leaving a little sharp piece you need to file off. You can buy replacement punches for any of the hole punch tools for just a few bucks.

Ragged holes like these means it is time to change the punch on your tool.

It honestly doesn’t take much pressure to punch a hole with any of these tools, but if you have difficulty squeezing firmly, the screw-action tool might be the best choice. I think the pliers are a little quicker to use, though. The BeadSmith punch pliers also feature a “gauge guard” – a screw that you can adjust to keep the pliers from punching too deeply and marring the surface around the hole. It is a nifty feature, but one you have to remember to use! If you forget to adjust the gauge guard, you will probably mar your metal a bit from time to time.

A thin piece of plastic prevents the pliers from leaving a mark around the hole.

BUT – here is a tip to keep your metal pristine no matter which hole punch you use:
Cut a little piece of plastic from the package the tool comes in, and punch through it. Then leave that little scrap on the punch (See image above). It effectively cushions your metal from the punch and removes all worry of marring your metal. If you forget, just buff the mark with some steel wool and it should disappear quite easily.

Happy punching! ~ Cindy

2018 Editor’s note: Links in the comments below have all been updated! (some of them broke when we upgraded our website)