Browsing Tag

artistic wire

DIY Aromatherapy Tassel Bracelet Tutorial

April 28, 2016

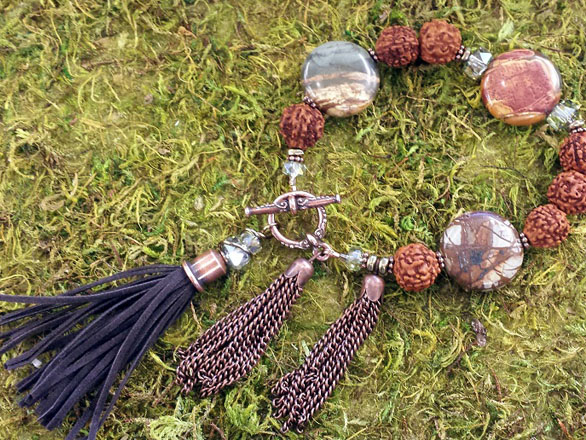
How-to Create a Custom Essential Oil Infused, Gemstone & Crystal Tassel Bracelet

Bracelet

This bracelet can be customized to include personal elements, represented by:

  • Gemstones and their properties (chakra, metaphysical, healing…)
  • Aromatherapy/essential oil blends and their uses (mosquito repellent, stress-relief, calming…)
  • Color intention and symbolism (harmony, strength, stability…)

Continue Reading…

DIY Team Spirit Earrings

August 31, 2015

With football season fast approaching, it’s time to break out your team spirit! Colorful jewelry that shows off team colors will make it easy for everyone to know who you’re cheering for! Simply swap out the Swarovski crystal colors to make earrings that support your favorite team!
Continue Reading…

DIY Wire Wrapped Briolette Earrings

July 31, 2015

Want a simple and versatile earring design that you can replicate over and over again? This wire-wrapped briolette earring design can be used for any tip-drilled teardrop beads or briolettes. That’s what makes these some of my favorite earrings to make! The result is simple yet can look dramatically different depending on what colors and gemstone beads or crystal pendants you choose.
Continue Reading…

How To Make A Wire Bird Nest

February 10, 2014

It’s February, and snow and ice are covering every surface… which means I’d really like to fly away to someplace warm for the winter.

Wire wrapped bird nest bracelet with freshwater pearl beads and Vintaj bird charms.

Wire wrapped bird nest bracelet with freshwater pearl beads and Vintaj bird charms.

But I don’t have wings, so the next best thing is having Kayla explain how she makes these adorable wire bird’s nests. Continue Reading…

Make Fashionable Ear Cuff Jewelry

October 9, 2013

If you haven’t yet jumped on the ear cuff bandwagon, now’s your chance! Some ear cuff designs include an earring post to hold the design in place, but many of today’s styles work for both pierced and non-pierced ears, making them as versatile as they are trendy.

Customer service rep Tracy and Gallery guru Amy made the following Five Ear Cuffs to showcase some of the styles popping up.

Spikes Galore Ear Cuff

Handmade ear cuff featuring spike beads and sparkly glass.

Lightweight plastic spike bead assortments give this ear cuff pizzazz and drama!

Continue Reading…

How to do a Herringbone Wire Wrap

September 30, 2011
Earrings made using a Herringbone Wire-wrapping Technique

Earrings made using a Herringbone Wire-wrapping Technique

Wire-wrapping has become my newest jewelry making addiction! I am always browsing the internet and looking for new inspiration and techniques that I have yet to master. My latest accomplishment was learning how to create the oh so complicated looking herring bone wrap. I have admired this style of wire wrapping for years but was always too intimidated to attempt it. A couple of weeks ago, I decided it was time to learn it. And guess what? It was really pretty easy! Now I will pass my knowledge on to you, fellow bloggers and bead addicts, so you too can feel that sweet satisfaction that comes from creating something new and beautiful! (not to mention the compliments you are sure to receive by your coworkers!)
Continue Reading…

Wire lashing: an easy way to cover your jewelry with beads or bling!

May 19, 2011
Two wire-lashed bracelets

Artistic Wire + bracelet forms = many many options!

I call this easy jewelry-making technique “wire lashing” to distinguish it from “wire wrapping” – but really, it is just wrapping thin wire around and around a component in order to cover it with beads (or chain!).

bracelet plain

A plain hook end bracelet is the perfect candidate for a good lashing!

The keys to wire lashing are simple, but oh so vital:

  1. Always begin with a few wire wraps around your base piece (in this case
    bangle bracelets) before adding beads or chain. Rather than trying to wrap the very end of the wire, leave about a 1″ tail so you have a bit of wiggle room.
  2. Always keep your wire wraps tight around the item. Pull the entire wire all the way through and around before beginning another wrap. If using beads, lay the bead against the base in the position you want it to end up in before wrapping the wire tight.
  3. Always use two or more wraps between beads to keep everything securely in place.
  4. Always stay calm if (ha – when!) the wire gets kinked or tangled. When it starts getting cranky, take a second to smooth it back out or it will grow into a major mess.
  5. When you’re all done, you can adjust the wraps and beads with your fingers to make it more uniform. Likely there will some wraps that are tighter than others. This is perfectly normal and easy to fix.

I’ve used this technique before on small items (kidney ear wires, links, ear hoops and hair combs) so decided to step up to bracelets today. The only difference is working with longer wire (about 4-5 feet for a typical bangle). You have the option of working with smaller sections of wire and adding new pieces as you go, but I really wanted to use one continuous piece. I did of course kink the wire. Repeatedly.

Looks scary, but this nightmare actually only took a few seconds to correct.

But the nice thing about using one piece of wire is that as you go along, the lashing goes faster and faster until suddenly you realize you are having fun! At the end, you feel so victorious you immediately want to make another. So you do … and realize the wire is too darn long again … but wait, now it is fun again … victory is within reach … This is how addictions start.

I like to use 24 or 26-gauge wire when lashing because it is very easy to manipulate with your fingers. Today I used several colors of Artistic Wire. The beaded bracelet has 6mm purple Miracle beads, 4mm turquoise magnesite and opalite barrel beads held in place by chartreuse Artistic Wire. It was quick and easy to make. However, I started with waaaay too much wire, so it took a little longer to add each bead than was really necessary. Impatient as always, I decided to do away with stringing beads. My next attempt uses rhinestone chain.

Sparkle mania

Sparkle mania has never been easier to achieve!

It turns out the 14pp size Swarovski Elements crystal rhinestone chain is almost exactly the same width as the bracelet form, so it stays in place nicely. I think this would be a great girl’s night jewelry project – simple, sparkly and easy to customize by adding some charms or changing up the wire color.

For those of you who prefer thread, check out Toni’s rhinestone hair comb – same technique, different materials.

rhinestone hair comb

Cover a comb with ribbon and rhinestones for easy elegance.

What else can we cover in rhinestone chain? Perhaps an easier question would be what can’t we cover! ~ Cindy